
Details
- Author(s)
- ISBN
ISBN 978-0-660-79050-3 - Catalogue number
M34-100/2025E-PDF
Introduction
This User Guide has been prepared to help users navigate through Natural Resources Canada’s (NRCan) Extractive Sector Transparency Measures Act (ESTMA or “the Act”) Reporting Portal. The ESTMA Reporting Portal is used to submit ESTMA reports, provide the latest contacts for your entity, and update web links.
Broadly, the steps to submit a report are as follows:
- individuals authorized to conduct ESTMA-related activities on behalf of an entity must create and register a client profile
- once a profile is created and registered, a request to access an entity must be submitted
- once access has been granted by NRCan, the individuals will be able to submit ESTMA-related information to NRCan on behalf of the Entity
This guide provides a step-by-step overview of how to complete these steps with screenshots and detailed instructions. If you have any questions related to the use of the ESTMA Reporting Portal not addressed in the instructions, please contact NRCan by email, at estma_reports-rapports_lmtse@nrcan-rncan.gc.ca. Please contact the Help Desk, at 1-855-525-9293, for help with technical problems.
Is use of the ESTMA Reporting Portal mandatory to enrol and submit ESTMA reports?
Yes. The Technical Reporting Specifications provide the required form and manner of reporting under the ESTMA, including how to use the ESTMA Reporting Portal to enrol, how to complete and submit the reporting template, and other reporting requirements.
Log in to the ESTMA Reporting Portal
In this section
ESTMA login options
There are 2 options to log in to the ESTMA Reporting Portal – either with a GCKey or Sign-In Partner. Individuals authorized to conduct ESTMA-related activities on behalf of an Entity can choose either login option to access the portal. Detailed steps for how to login with either option are provided below.
GCKey
GCKey is a unique electronic credential (username and password) that allows you to communicate securely with online government services. The Government of Canada, as the service provider, issues these credentials to individuals so they can access government online services.
Sign-In Partners
Sign-in partners are private-sector institutions that have partnered with Interac® sign-in service to enable their customers to use their online credentials (for example, card numbers / usernames and passwords) to access Government of Canada services. When you use a sign-in partner, none of your banking or personally identifiable information is communicated to the government service you are accessing, and the Government of Canada does not know which sign-in partner you have used. Similarly, no information about the government service being accessed will be shared with your sign-in partner.
Log in with GCKey
- Log in. If you already have a GCKey, access the ESTMA Reporting Portal and select “Login or Register”.
If you do not have a GCKey yet or would like to sign up for a new one, continue to the next section: Sign up for a new GCKey.
- Choose preferred sign-in option. Choose your preferred sign-in option by selecting “Sign in or create an account with GCKey”.
- Enter GCKey username and password. Enter your GCKey username and password in the appropriate fields, select “Sign-In”, and then select “Continue” to proceed to the two-factor authentication. The two-factor authentication is a code that is sent to the email address associated with your GCKey.
- Enter code. Enter the code received in the One-Time Passcode (required) field and select “Continue”.
- Obtain authentication. The authentication is successful, select “Continue”.
- Register client profile. You will then be redirected to the ESTMA Reporting Portal to register your Client Profile. For instructions, continue to the following section: Register your client profile.
Sign up for a new GCKey
If you do not have a GCKey yet, or if you wish to create a new one for the sole purpose of reporting through NRCan’s ESTMA Reporting Portal, follow the process below.
- Register. Access the ESTMA Reporting Portal and select “Login or Register”.
- Select GCKey option. Choose your preferred sign-in option by selecting “Sign in or create an account with GCKey”.
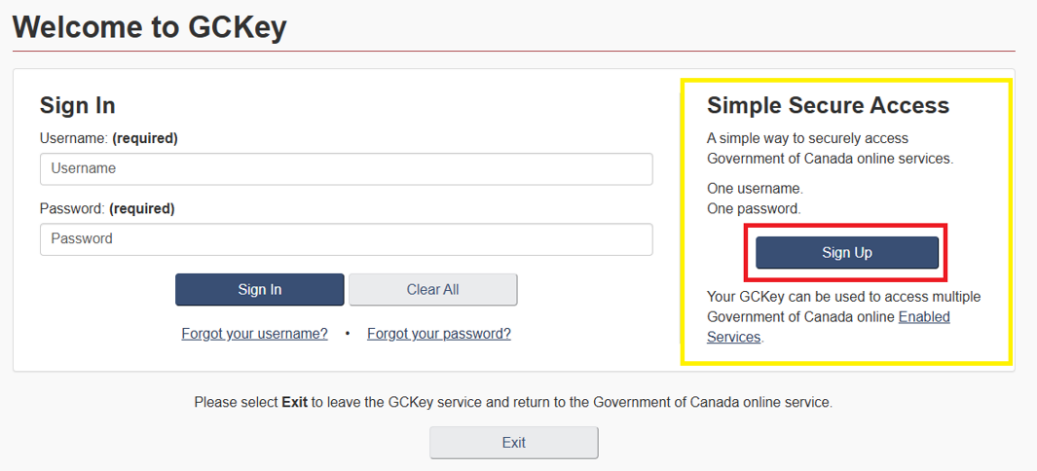
- Sign up for GCKey. On the Welcome to GCKey page, select “Sign Up”.
- Accept terms and conditions. Read and accept the terms and conditions of use. Click “I accept” to continue.
- Create username. Create your username using the username checklist criteria.
- Create password. Create a password that aligns with the password checklist. Once you have entered and confirmed your password, select “Continue”.
- Create recovery questions and answers. Create your recovery questions, answers and hints in case you lose your password.
- Recover your account (optional). To recover your username and password, you have the option to recover via email by selecting “Continue”. If you do not wish to provide an email address at this time, you may skip this step by selecting “Skip”.
- Complete GCKey sign up. You have successfully created your GCKey. Please select “Continue” to proceed to two-factor authentication.
- Confirm your email address. A confirmation code will be sent to your email address. Enter the code to confirm your email address. The code will expire in 12 hours.
- Choose two-factor authentication. Choose a method of two-factor authentication. Select 1 type of two-factor authentication you wish to use (smartphone/tablet, or desktop device, or email address).
- Accept terms and conditions. For the two-factor authentication method you have selected, read and accept the corresponding terms and conditions of use. Click “I accept” to continue.
- Follow instructions. Follow the instructions for the two-factor authentication method you have selected.
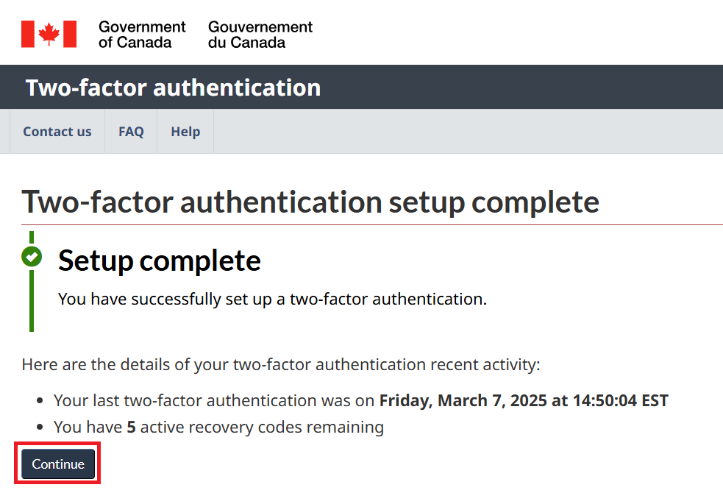
- Accept recovery codes. Read and accept the information about the recovery codes for your two-factor account by selecting the box with the following text: Yes, I have securely recorded and stored these codes. Click “Continue” to proceed to the terms and conditions.
- Complete two-factor authentication setup. When the setup is complete, click “Continue” to proceed to register your external account.
Log in with a sign-in partner
- Log in or register. From the ESTMA Reporting Portal, select “Login or Register”.
- Sign in with your bank. Select “Sign in with your bank” and you will be routed to the Interac® sign-in service.
- Select sign-in partner. Select your desired sign-in partner and follow the institution’s instructions to enter your client card/username and password.
- Accept terms and conditions. You will be directed to the Terms and Conditions of Use and Privacy Notice page, select “Accept and Continue”.
- Register your client profile. You will then be redirected to the ESTMA Reporting Portal to register your external account. For instructions, continue to the following section: Register your client profile.
Is my information secure?
Yes. The information entered in the ESTMA Reporting Portal is stored in accordance with the requirements of the Government of Canada for the security of personal information. The ESTMA Reporting Portal requires the use of secure log-in credentials. Only individuals with the proper credentials and authorized NRCan personnel can access the information. The information you provide is collected under the authority of the ESTMA and is protected under the Privacy Act.
Registration and enrolment
In this section
After logging in, individuals authorized to conduct ESTMA-related activities on behalf of an entity must register and enrol.
Register your client profile
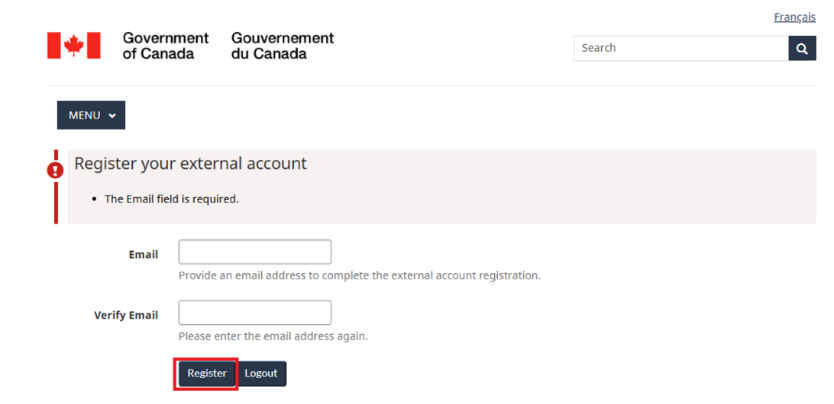
- Register external account. Register your external account by entering your email address and click “Register”.
- Accept terms and conditions. You are required to agree to the terms and conditions before proceeding. Read and accept the terms and conditions account by selecting the box with the text: I agree to these terms and conditions. Select “Continue” to proceed.
- Add profile. You will be automatically redirected to the Client Profile page. Enter your information in the blank fields and select “Add Profile Information”.
- Confirm email. Now that your client profile has been created, select “Confirm Email”.
- Obtain email confirmation. Having confirmed your email address, you will receive an email to the address associated with your GCKey.
- Complete registration of client profile. To confirm registration of your client profile, select the link in your email or copy and paste the URL into your Internet browser. (Note: You have 60 minutes to confirm your email address otherwise you have to re-register.)
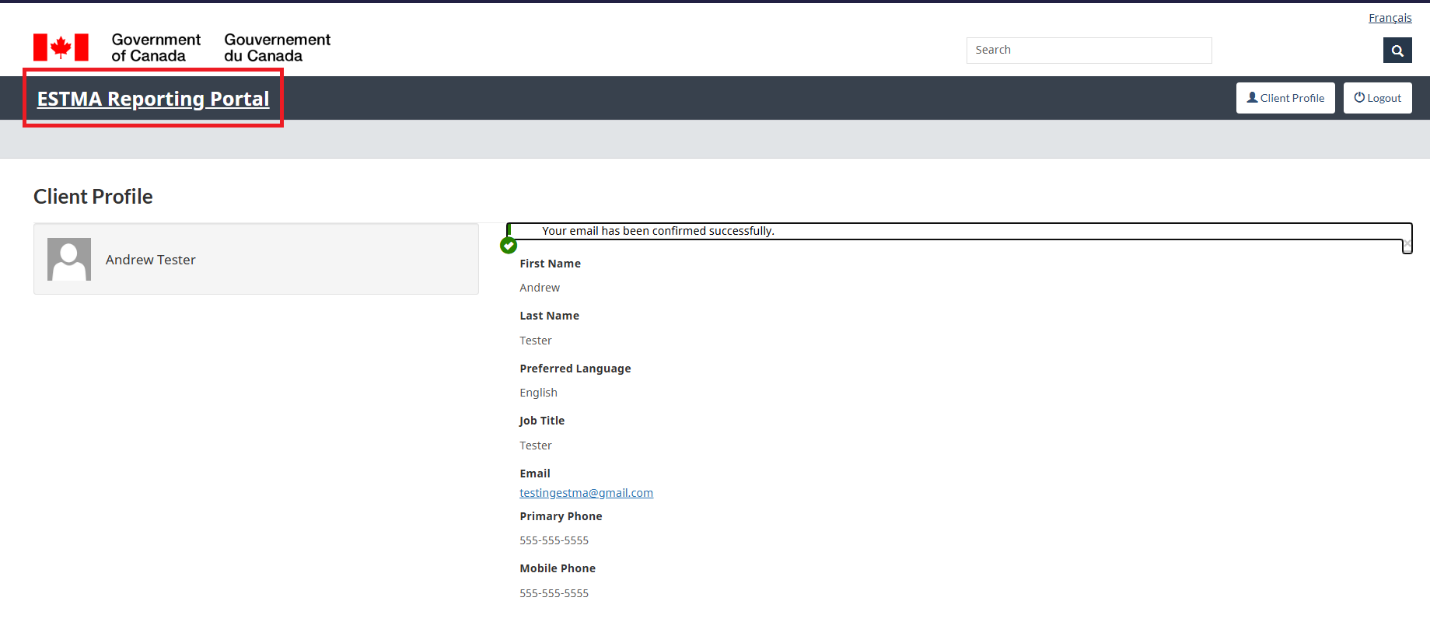
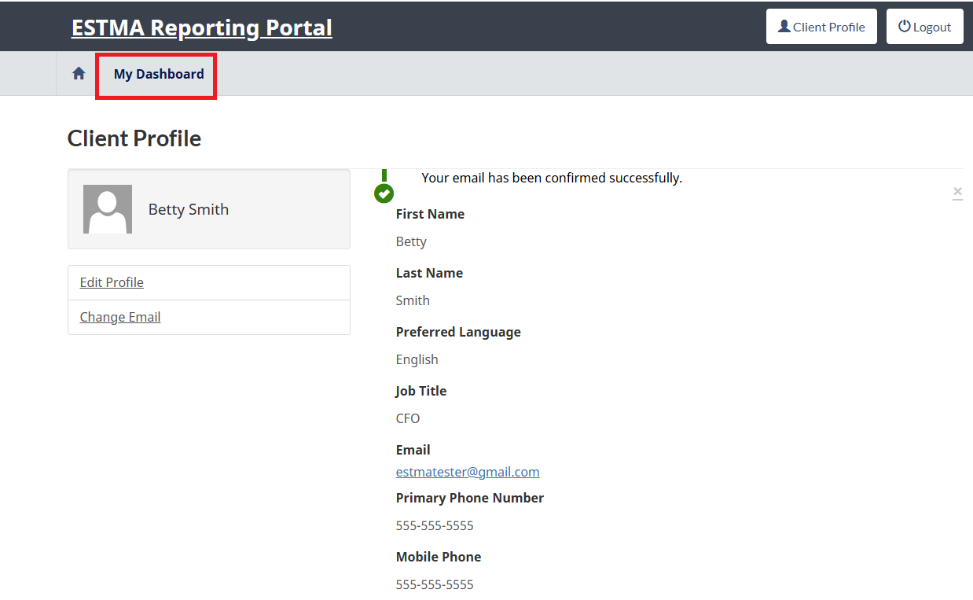
- Obtain confirmation. Once your email has been confirmed successfully, registration of your client profile is complete. Select “ESTMA Reporting Portal” or refresh the page.
- Navigating to My Dashboard or NRCan welcome page. Select “My Dashboard” or “Continue to Dashboard” to enrol a company, or request access to an already enrolled reporting entity. Select “ESTMA Reporting Portal” to be redirected to the NRCan welcome page.
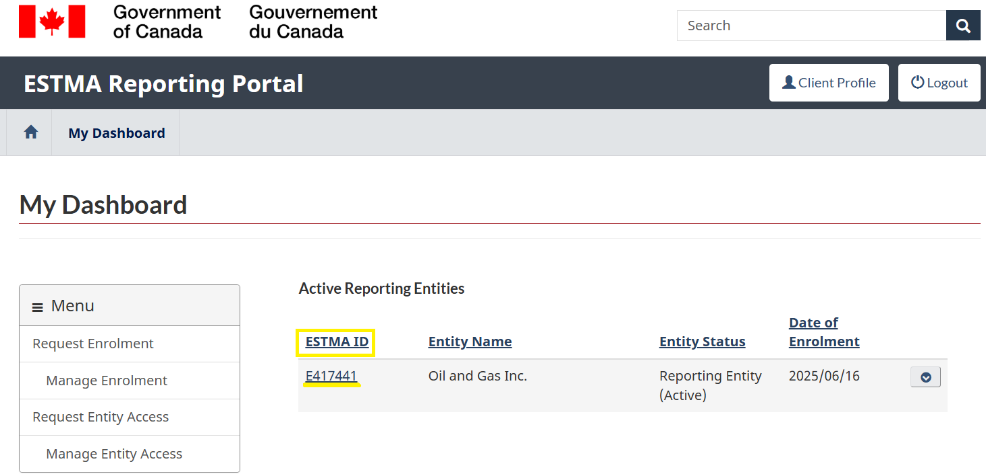
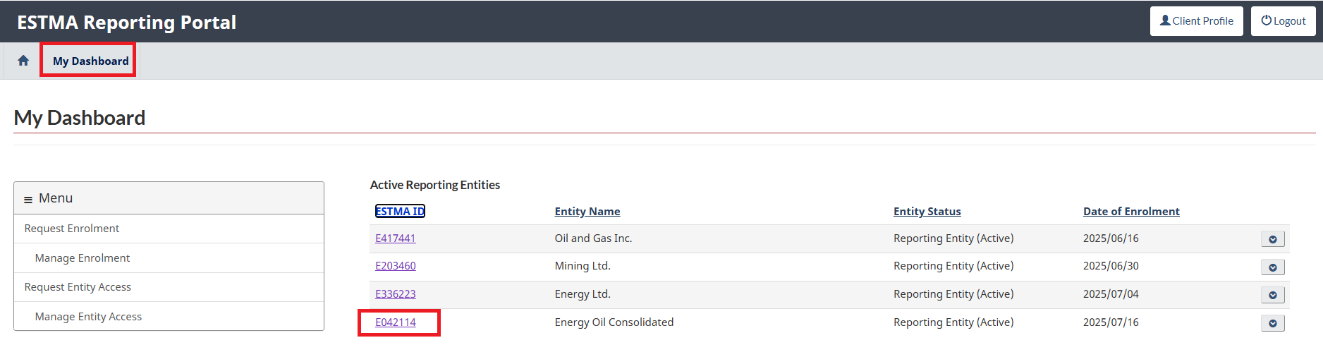
Navigate the My Dashboard page
The purpose of the My Dashboard page is to display the entity profile(s) as well as their status. An enrolled company that meets section 8(1) of the Act is categorized as an “Active Reporting Entity.” An enrolled company that still exists but no longer meets section 8(1) of the Act is categorized as an “Inactive Entity.” An enrolled company that previously met section 8(1) of the Act, but has since ceased to exist due to dissolution, etc., is categorized as an “Archived Entity.”
- Request enrolment. To enrol a company, select “Request Enrolment” from the menu on the left-hand side of the page.
- Request access. To request access to an already enrolled entity, select “Request Entity Access” from the menu.
- View entity profiles. After the enrolment or entity access request has been accepted, all reporting entity profiles will be displayed on the My Dashboard page.
Request enrolment
Enrol a company in a few easy steps. An actively enrolled company is a reporting entity.
- Request enrolment. To enrol a company, select “My Dashboard” from the top navigation and select “Request Enrolment” from the left-hand menu.
- Enter entity information. Enter entity information necessary to the enrolment. Mandatory fields are denoted with an asterisk (*).
- Enter the contact information of 2 company representatives. Enrolled entities must always maintain 2 functional contacts. After the entity’s enrolment request has been accepted by an NRCan officer, additional contacts can also be added. After entering the contacts, select “Save and Continue” at the bottom of the page to proceed to the next step.
- Add documentation (optional). In most situations, no supporting documentation is required. If documentation is deemed necessary, an NRCan officer will contact you after the enrolment has been submitted.
- Add notes (optional). Any notes or questions about your enrolment can be entered in the Additional Notes field.
- Save drafts. If you have entered information but are not yet ready to submit the request, you can leave the page, and a draft will be saved. To view your draft, select “Manage Enrolment” from the menu.
- Submit and view request. To proceed with the submission, select “Submit”. A pop-up will appear. To confirm, select “Submit” again. An automated email will be sent, and a message will indicate the submission was successful. To view your submitted request, select “Manage Enrolment”.
- View the case status. On the Manage Enrolment page, view the My Entity Enrolments table to determine the status of your submitted request. To view details of the request, select the hyperlinked reporting entity name. If additional information or documentation is required, an automated email will be sent, and the case status will change to the following: Pending clarification / supporting documentation.
- Obtain confirmation that request is accepted. When the enrolment has been accepted, an automated email will be sent, and the reporting entity will appear on the My Dashboard page.
Request entity access
If an entity has already been enrolled, you simply need to “Request Entity Access” to connect it to your client profile.
- Request entity access. To request access to an already enrolled company, select “My Dashboard” from the top navigation and select “Request Entity Access” from the left-hand menu.
- Enter ESTMA ID number. Enter the ESTMA ID of the already enrolled company, referred to as an “entity”. Enter the letter E followed by the 6 numbers of the ESTMA ID, e.g., E123456. Mandatory fields are denoted with an asterisk (*).
- Verify requester information. Confirm the contact information you want associated with the entity, and then select “Save and Continue” to proceed to the next step.
- Add documentation (optional). In almost all situations, no supporting documentation is required. If documentation is deemed necessary, an NRCan officer will contact you after the entity access request has been submitted.
- Add notes (optional). Any notes or questions about your entity access request can be included here.
- Save drafts. If you have entered information but are not yet ready to submit the request, you can leave the page, and a draft will be saved. To view your draft, select “Manage Entity Access” from the menu. Drafts can be edited or deleted by clicking the small drop-down arrow on the right-hand side of the request.
- Submit and view request. To proceed with the submission, select “Submit”. A pop-up will appear. To confirm, select “Submit” again. An automated email will be sent, and a message will indicate the submission was successful. To view your submitted request, select “Manage Entity Access”.
- View the case status. On the Manage Entity Access page, view the My Entity Access Requests table to determine the status of your submission. To view details of the request, select the hyperlinked ESTMA ID. If additional information or documentation is required, an automated email will be sent, and the case status will change to the following: Pending clarification / supporting documentation.

- Obtain confirmation that request is accepted. When the entity access request has been accepted, an automated email will be sent, and the reporting entity will appear on the My Dashboard page.

Who can register to create a client profile and conduct ESTMA activities on behalf of a company?
Companies can authorize any individual associated with the company to create an account using a GCKey or sign-in partner. Registered users can enrol a reporting entity, request access to an existing entity, submit reports, update contacts and report web links. Client profiles are restricted to single users.
Edit client or entity information
In this section
Edit your client profile
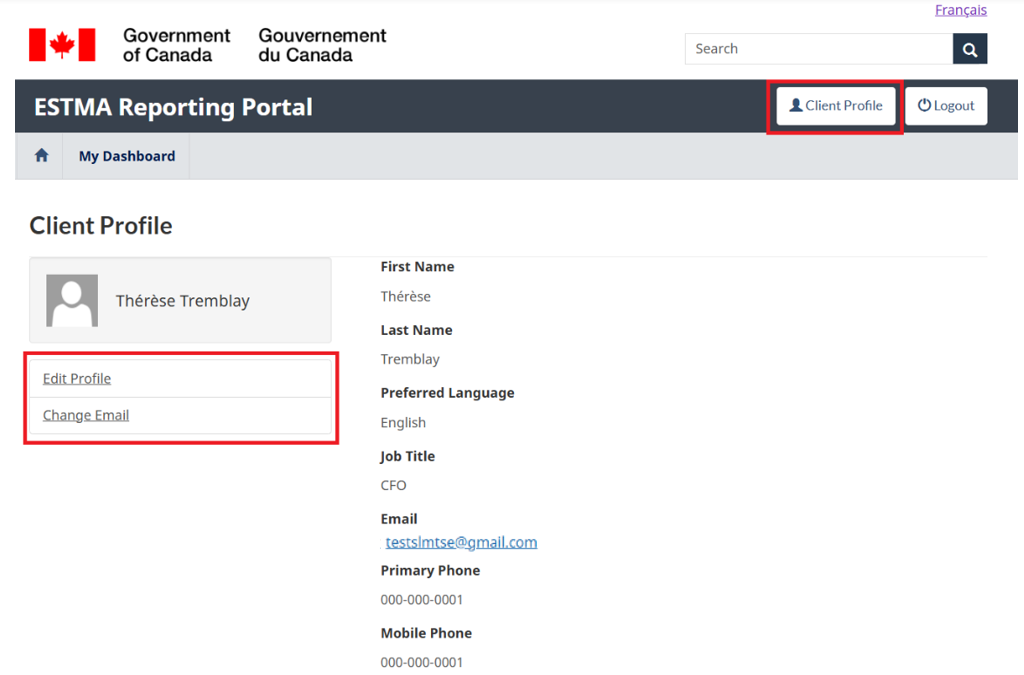
To edit your personal client profile, click on the “Client Profile” button at the top-right corner of the page.
- Edit profile. To edit any of the information in your client profile, click “Edit Profile” from the left-hand menu.
- Change email. To change your email address, click “Change Email” from the left-hand menu.
Edit entity profile
The information in an entity’s profile, including address, and financial year-end, can be updated.
- Select hyperlinked ESTMA ID. Select “My Dashboard” from the top navigation and click on the entity’s hyperlinked ESTMA ID.
- Edit profile. You will be redirected to the entity’s Profile. Click on “Edit Profile” to change or update company information.
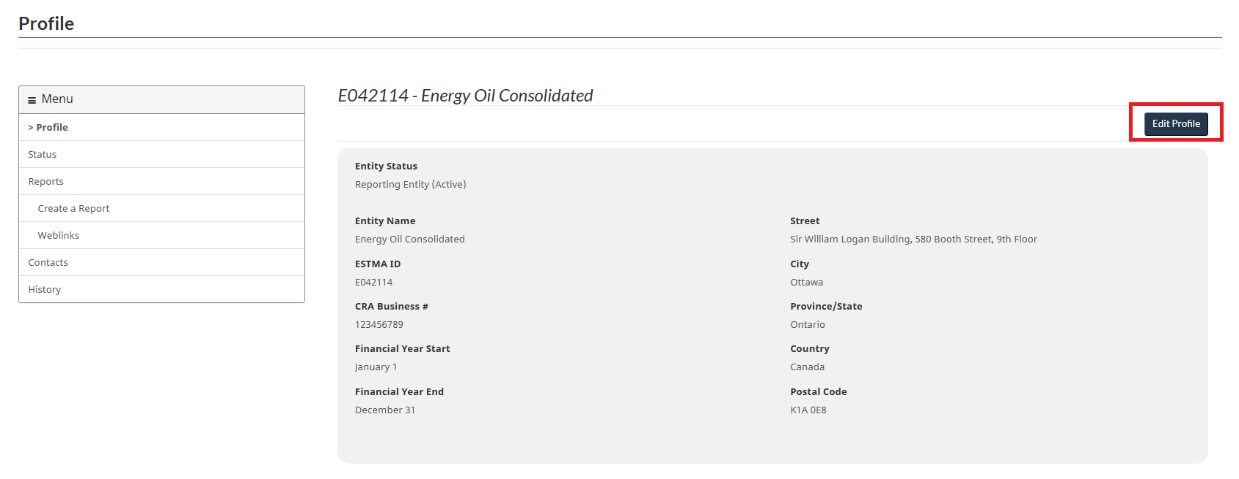
- Enter new information. Go to the applicable field that requires changes, delete the current information or use the drop-down menu to enter or select the new information. For example, to edit the company name, select the Entity Legal Name field. Use the backspace key to delete the text, enter the new name, and then select “Save and Continue” to proceed to the next step.
- Review entity information. The information you have changed will be highlighted in yellow. Make sure it is correct, then select “Save and Continue”.
- Add documentation (optional). In most situations, no supporting documentation is required. If submitting a legal name change, however, the certificate of change of name must be attached.
- Add notes (optional). Any notes or questions about your request can be included here.
- Save drafts. If you have entered information but are not yet ready to submit the request, you can leave the page, and a draft will be saved. On the Profile page, find your draft under “Pending Requests”. Drafts can be edited or deleted by clicking the small drop-down arrow on the right-hand side of the request.
- Submit and view request. To proceed with the submission, select “Submit”. A pop-up will appear. To confirm, select “Submit” again. An automated email will be sent, and a message will indicate the submission was successful. To view your submitted request, select “Back to Profile”.
- View the case status. On the Profile page, scroll down to “Pending Requests” to determine the status of your submission. To view details of the request, select the hyperlinked case ID number. If additional information or documentation is required, an automated email will be sent, and the case status will change to the following: Pending clarification / supporting documentation.
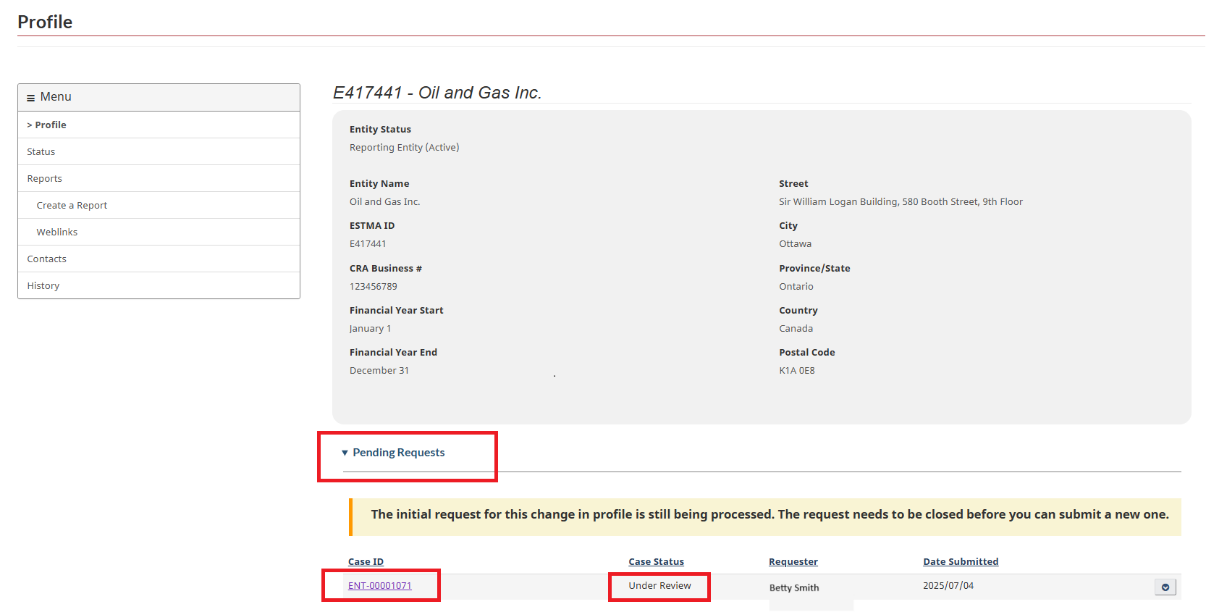
- Obtain confirmation that request is accepted. When the request has been accepted, an automated email will be sent, and the request will appear on your History page, under “Profile Requests”.
Change entity status
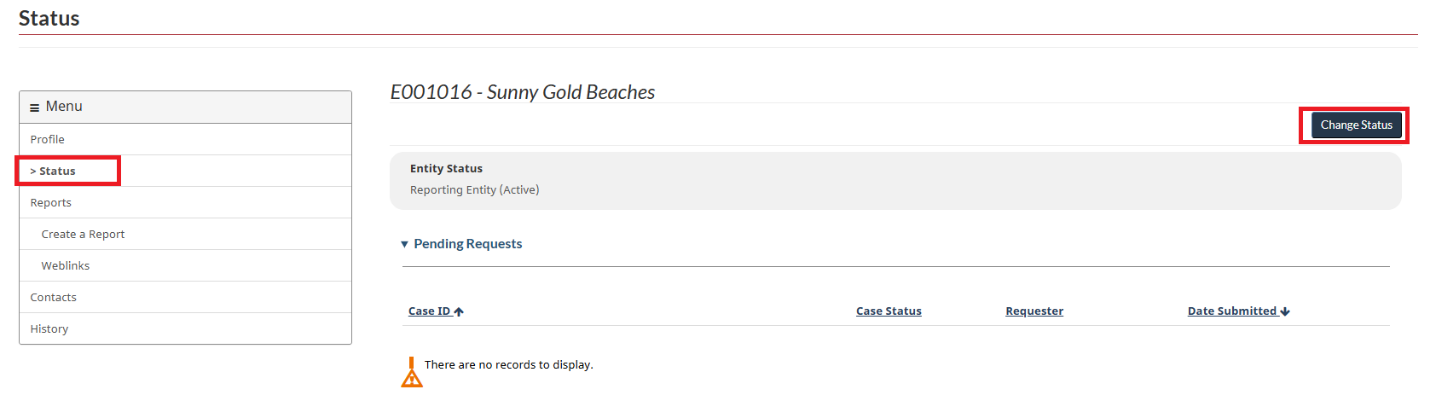
For the purposes of administering the ESTMA, the entity status indicates whether a company is subject to the Act. An enrolled company that meets section 8(1) of the Act is categorized as an “Active Reporting Entity.” An enrolled company that still exists but no longer meets section 8(1) of the Act is categorized as an “Inactive Entity.” An enrolled company that previously met section 8(1) of the Act, but has since ceased to exist due to dissolution, etc., is categorized as an “Archived Entity.”
- Change status. Select “My Dashboard” from the top navigation and click on the entity’s hyperlinked ESTMA ID. To change an entity’s status, select “Status” from the left-hand menu, and then click on the “Change Status” button.
- Enter status information. On the Change Status page, select the new entity status from the drop-down menu in the New Entity Status field, enter the appropriate date in the Status Change Effective Date field (when the event occurred), and enter the reason for the change in status in the Status Change Reason field.
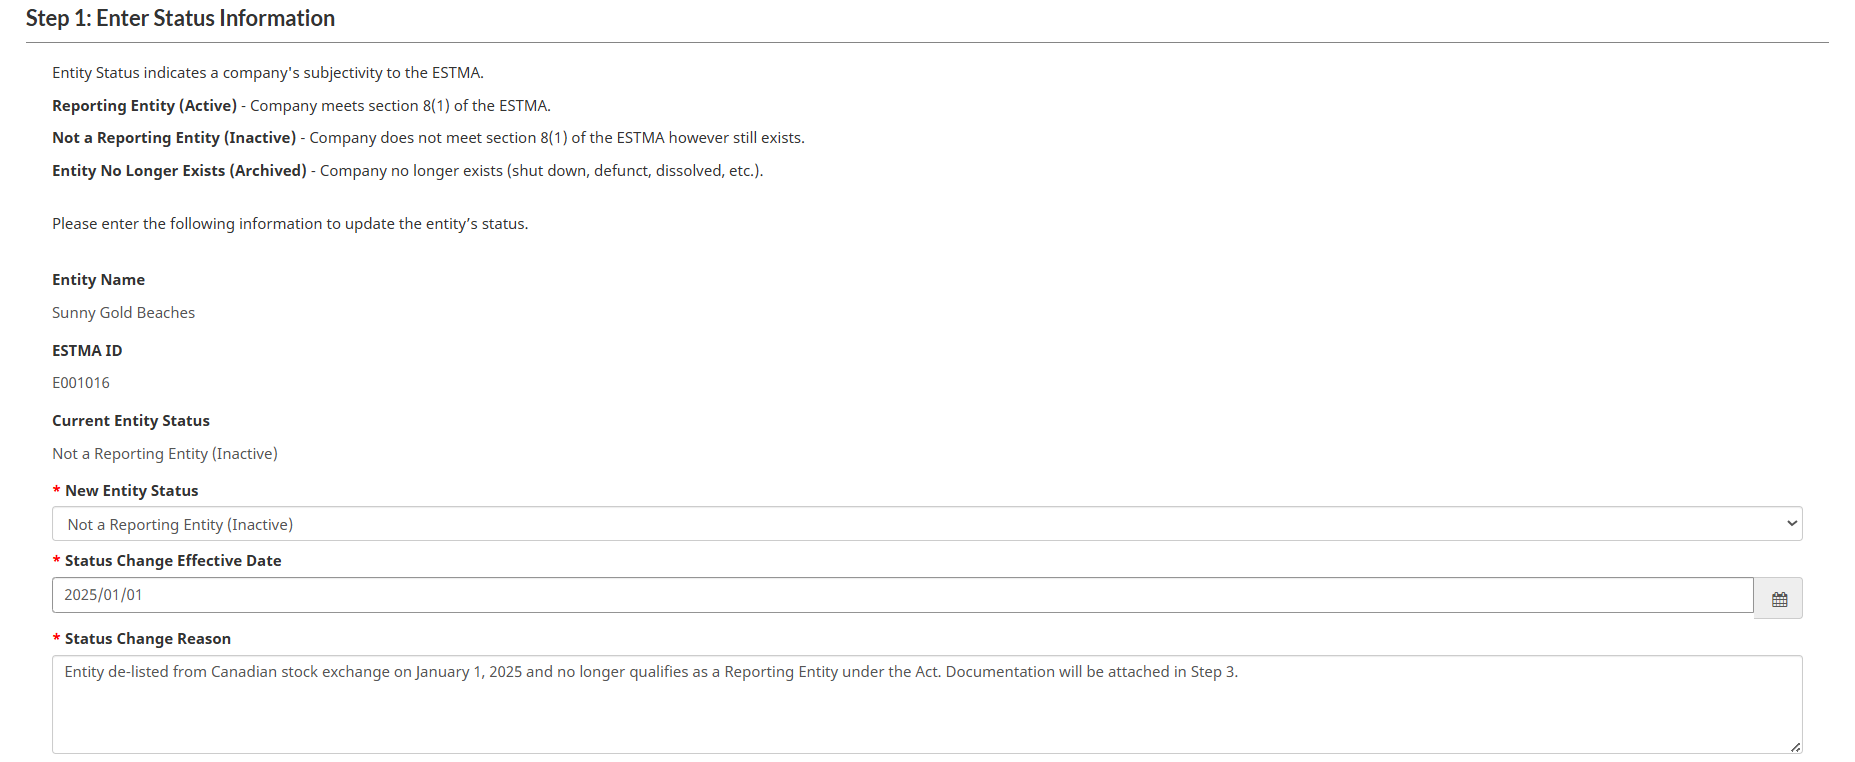
- Confirm attestation. To proceed, you must attest to the change in entity status. Select “I confirm” and then select “Next” at the bottom of the page.
- Add documentation (optional). If a company has been acquired, merged, or delisted, or another event has occurred, select “Add Files” to attach the announcement and any other applicable documentation. If a company has been dissolved, attach the certificate of dissolution.
- Add notes (optional). Any notes or questions about your change in status can be entered in the Notes field.
- Save drafts. If you have entered information but are not yet ready to submit the request, you can leave the page, and a draft will be saved. On the Status page, your draft will be under “Pending Requests”. Drafts can be edited or deleted by clicking the small drop-down arrow on the right-hand side of the request.
- Submit and view request. To proceed with the submission, select “Submit”. A pop-up will appear. To confirm, select “Submit” again. An automated email will be sent, and a message will indicate the submission was successful. To view your submitted request, select “Back to Status”.
- View the case status. On the Status page, view the Pending Requests table to determine the status of your submission. To view details of the request, select the hyperlinked case ID number. If additional information or documentation is required, an automated email will be sent, and the case status will change to the following: Pending clarification / supporting documentation.
- Obtain confirmation that request is accepted. When the request has been accepted, an automated email will be sent, and the request will appear on your History page, under “Status Requests”.
Submit report
In this section
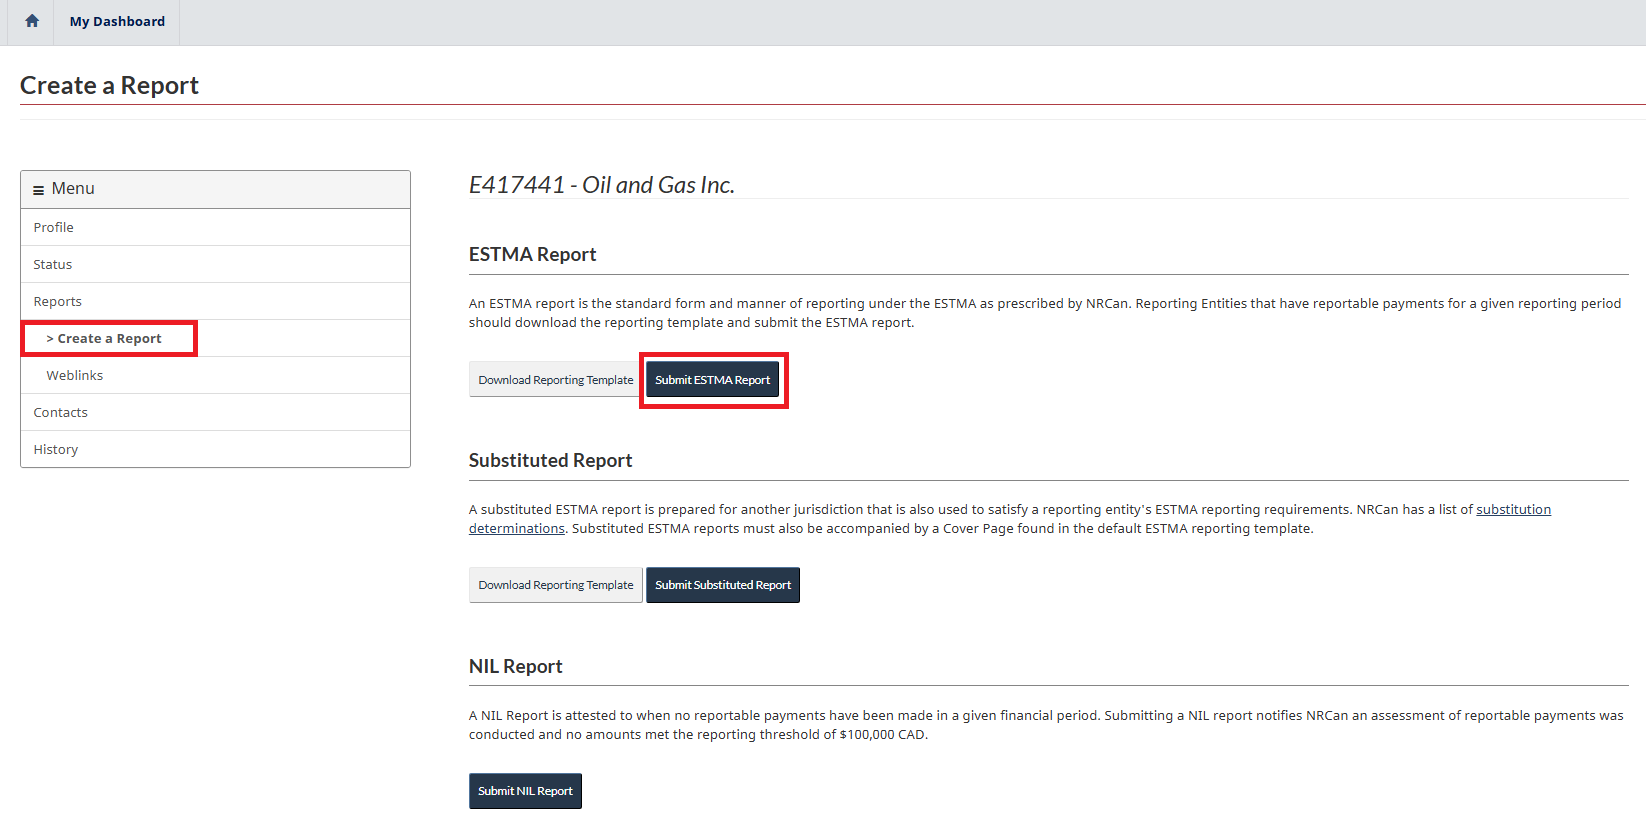
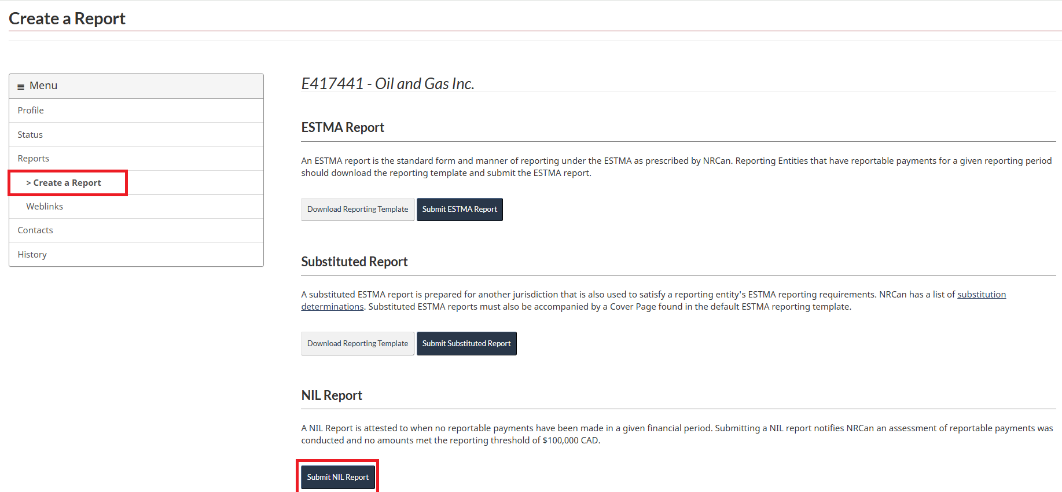
Submit an ESTMA report
An ESTMA report is the standard form and manner of reporting under the ESTMA as prescribed by NRCan. Reporting entities that have reportable payments for a given reporting period should download the reporting template and submit the ESTMA report.
- Create a report and download template. Select “My Dashboard” from the top navigation and click on the entity’s hyperlinked ESTMA ID. Select “Create Report” from the left-hand menu and then click on “Download Reporting Template”. Complete and save the reporting template to your computer, ensuring the report is saved in Excel format with extension XLSX (.xlsx file format). This is the only file format that can be used. Note that PDFs (.pdf file format) are not accepted and cannot be used.
- Submit ESTMA report. On the Create a Report page, select “Submit ESTMA Report”.
- Save drafts. If you have entered information but are not yet ready to submit the report, you can leave the page, and a draft will be saved. On the Reports page, your draft will be under “Pending Reports”. Drafts can be deleted by clicking the small drop-down arrow on the right-hand side of the request.
- Upload report. Select the Upload button and a pop-up will appear where you can select “Add files”.
- Add file and upload.
- Select “Add files”.
- Select “Choose a File”.
- Select the ESTMA report from your computer, and then select “Open”.
- Select “Add files”. The file has been added.
- Select “Upload”. The file has been uploaded.
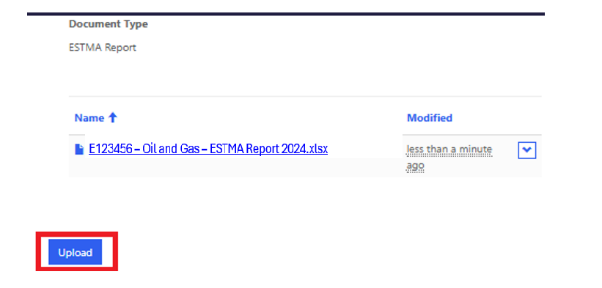
- To edit or delete a file, select the drop-down arrow on the right-hand side of the table.

- Verify report. Having selected “Upload”, the system will now verify the report. To be successfully verified by the system:
- Use the most recent version of the Reporting Template (version 3), which can be uploaded from either the ESTMA Reporting Portal or the website.
- Ensure the report is in Excel format with the sheets in the correct order (data entry page, cover page, payments by payee page, and payments by project page) and saved with the extension XLSX (.xlsx).
- Obtain confirmation of verification. The report has been successfully verified. Select “Save and Continue” to proceed. If you wish to delete the report, select the drop-down arrow on the right-hand side next to “Created On”.

- Review ESTMA report. The data entered in the reporting template can now be reviewed. After reviewing the report data and confirming everything has been included and entered correctly, select “Save and Continue” to proceed.
- Enter web link. All ESTMA reports must be published online to a website that is publicly accessible. Enter the link where the submitted report is found online. Reporting entities without proprietary corporate websites can publish ESTMA reports using free online services, such as Google Drive or Dropbox.
- Add documentation (optional). Any supporting documentation can be attached here.
- Add notes (optional). Any notes or questions related to the report can be included here.
- Submit and view request. To proceed with the submission, select “Submit”. A pop-up will appear. To confirm, select “Submit” again. An automated email will be sent, and a message will indicate the submission was successful. To view your submitted request, select “Back to Reports”.
- View the case status. On the Reports page, view the Pending Reports table to determine the status of your submission. To view details of the request, select the hyperlinked case ID number. If changes to the report or other information is required, an automated email will be sent, and the case status will change to the following: Pending clarification / supporting documentation.
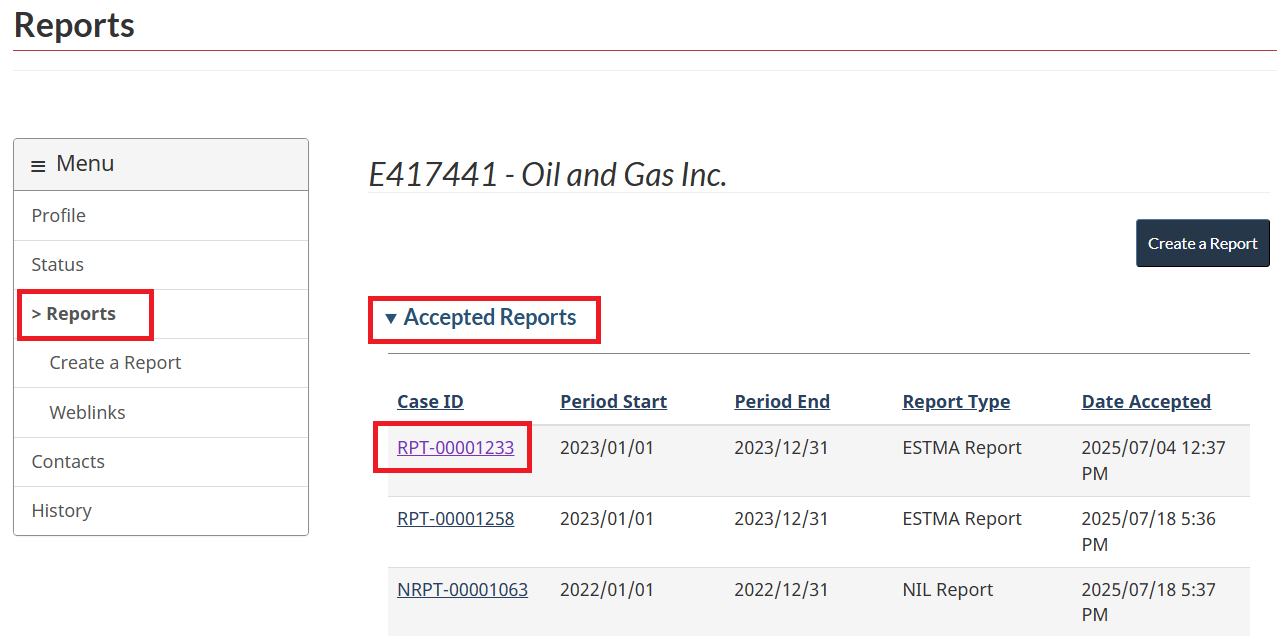
- Obtain confirmation that report is accepted . When the report has been accepted, an automated email will be sent, and the request will appear on both the Reports page, under “Accepted Reports”, and your History page, under “Report Requests”.
Submit an amended ESTMA report
If an error or omission is identified in a published ESTMA report, the entity must notify NRCan of the error immediately, publish an amended report online and submit it in accordance with the process outlined in the Technical Reporting Specifications.
- Select the accepted ESTMA report. Select “My Dashboard” from the top navigation and click on the entity’s hyperlinked ESTMA ID. Select “Reports” from the left-hand menu and scroll to the “Accepted Reports” section.
- Submit an amended ESTMA report. Select the accepted report that you want to amend by clicking on the hyperlinked case ID, then scroll down to the bottom of the page, and click on “Submit an Amended Report”. For instructions on how to upload an amended ESTMA report, refer to the Submit an ESTMA report section in this guide.
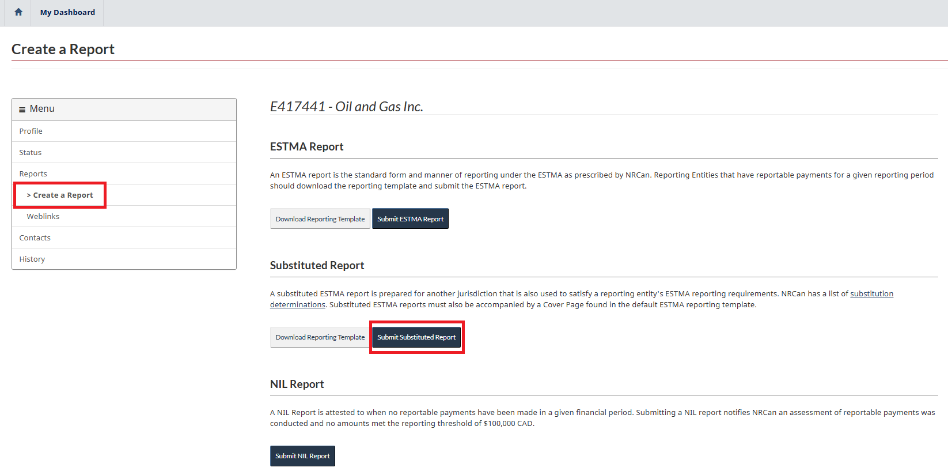
Submit a substituted ESTMA report
A substituted ESTMA report is prepared for another jurisdiction that is also used to satisfy a reporting entity’s ESTMA reporting requirements. NRCan has a list of substitution determinations. Substituted ESTMA reports must also be accompanied by a cover page found in the default ESTMA reporting template.
- Create a report and download template. Select “My Dashboard” from the top navigation and click on the entity’s hyperlinked ESTMA ID. Select “Create Report” from the left-hand menu and then click on “Download Reporting Template”. Complete the data entry page, which will auto-populate the cover page. Save the data entry and cover page to your computer. As instructed on the data entry page, hide the data entry page so only the cover page is shown.
- Submit substituted ESTMA report. On the Create Report page, select “Submit Substituted Report”.
- Save drafts. If you have entered information but are not yet ready to submit the request, you can leave the page, and a draft will be saved. On the Reports page, your draft will be under “Pending Reports”. Drafts can be deleted by clicking the small drop-down arrow on the right-hand side of the request.
- Upload report and cover page
- Select the "Upload" button and a pop-up will appear.
- Select “Document Type” and choose “Substituted ESTMA Report”.
- Select “Save and Attach File”.
- Select “Add files”.
- Select “Choose a File” from the pop-up.
- Select the substituted ESTMA report from your computer, and then select “Open”.
- Select “Add files”. The file has been added.
- Select “Upload”. The file has been uploaded.
- To edit or delete a file, select the drop-down arrow on the right-hand side of the table.
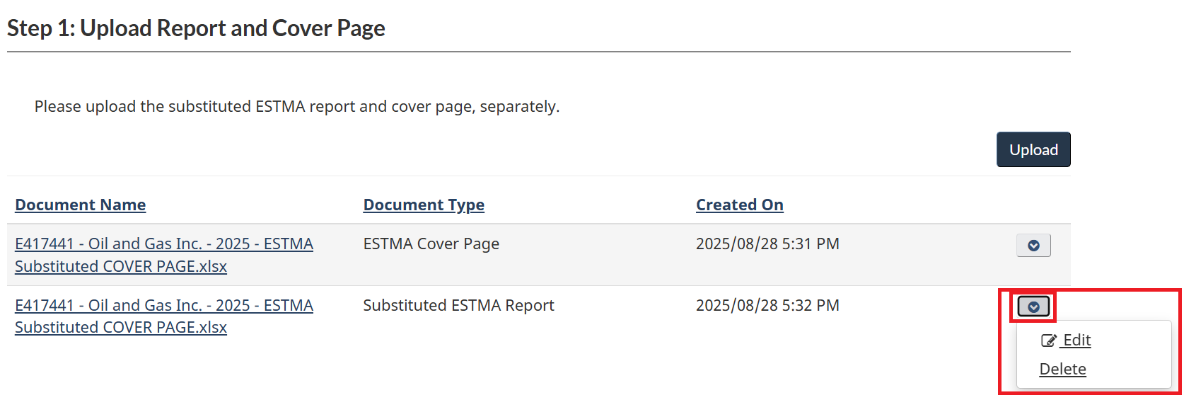
- Repeat the above steps to upload the substituted report cover page. When selecting the document type, select “ESTMA Cover Page”.
- Enter reporting period. Enter the reporting period for the substituted ESTMA report. The reporting period refers to the entity’s financial year start and end dates.
- Enter web links. All substituted ESTMA reports and accompanying cover pages must be published online to a publicly accessible website. Enter the links where the report and cover page can be found online and then select “Save and Continue” to proceed.
- Add documentation (optional). Any supporting documentation can be attached here.
- Add notes (Optional). Any notes or questions related to the report can be included here.
- Submit and view request. To proceed with the submission, select “Submit”. A pop-up will appear. To confirm, select “Submit” again. An automated email will be sent, and a message will indicate the submission was successful. To view your submitted request, select “Back to Reports”.
- View the case status. On the Reports page, view the Pending Reports table to determine the status of your submission. To view details of the request, select the hyperlinked case ID number. If changes to the report or other information is required, an automated email will be sent, and the case status will change to the following: Pending clarification / supporting documentation.
- Obtain confirmation that report is accepted. When the report has been accepted, an automated email will be sent, and the request will appear on both the Reports page, under “Accepted Reports”, and your History page, under “Report Requests”.
Submit a NIL report
A NIL report is attested to when no reportable payments have been made in a given financial period. Submitting a NIL report notifies NRCan that an assessment of reportable payments was conducted and no amounts met the reporting threshold of CAD $100,000.
- Create report. Select “My Dashboard” from the top navigation and then click on the entity’s hyperlinked ESTMA ID. Select “Create Report” from the left-hand menu.
- Submit NIL report. Select “NIL Report” from the Create a Report page.
- Enter information. Select the reporting year start and end dates, then enter the name and title of the attesting officer, as well as the date of the attestation.
- Confirm attestation. To attest that there are no payments to be disclosed, select “I confirm”. To proceed, select “Next”.
- Add documentation (optional). Any supporting documentation can be attached here.
- Add notes (optional). Any notes or questions related to the NIL report can be included here.
- Submit and view request. To proceed with the submission, select “Submit”. A pop-up will appear. To confirm, select “Submit” again. An automated email will be sent, and a message will indicate the submission was successful. To view your submitted request, select “Back to Reports”.
- View the case status. On the Reports page, view the Pending Reports table to determine the status of your submission. To view details of the request, select the hyperlinked case ID number. If changes to the report or other information is required, an automated email will be sent, and the case status will change to the following: Pending clarification / supporting documentation.
- Obtain confirmation that report is accepted. When the report has been accepted, an automated email will be sent, and the request will appear on both the Reports page, under “Accepted Reports”, and the History page, under “Report Requests”.
Update and change web links
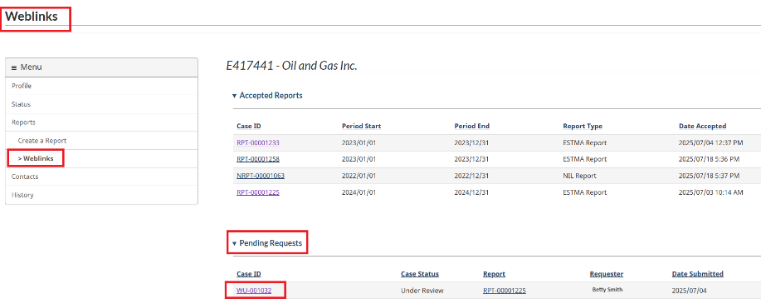
Reports must be made available to the public on the Internet for a minimum of 5 years. When a report web link changes, entities must provide NRCan with the new web link.
- Select entity. Select “My Dashboard” from the top navigation and then click on the reporting entity’s hyperlinked ESTMA ID. Select “Reports” from the left-hand menu.
- Select reports. In the Accepted Reports table, find the report that requires a change in web link, and select the hyperlinked case ID number.
- Edit web link. You will be redirected to the Accepted ESTMA Report page, scroll down to the web link section, and select “Edit Weblink”.
- Enter new web link, submit and view request. Enter the new web link in the appropriate field. To proceed with the submission, select “Submit”. An automated email will be sent, and a message will indicate the submission was successful. To view your submitted request, select “Back to Weblinks”.
- View the case status. On the Weblinks page, view the Pending Requests table to determine the status of your submission. To view details of the request, select the hyperlinked case ID number.
- Obtain confirmation that request is accepted. When the web link has been accepted, an automated email will be sent, and the request will appear on the History page, under “Weblink Requests”.
Change reporting entity contacts
In this section
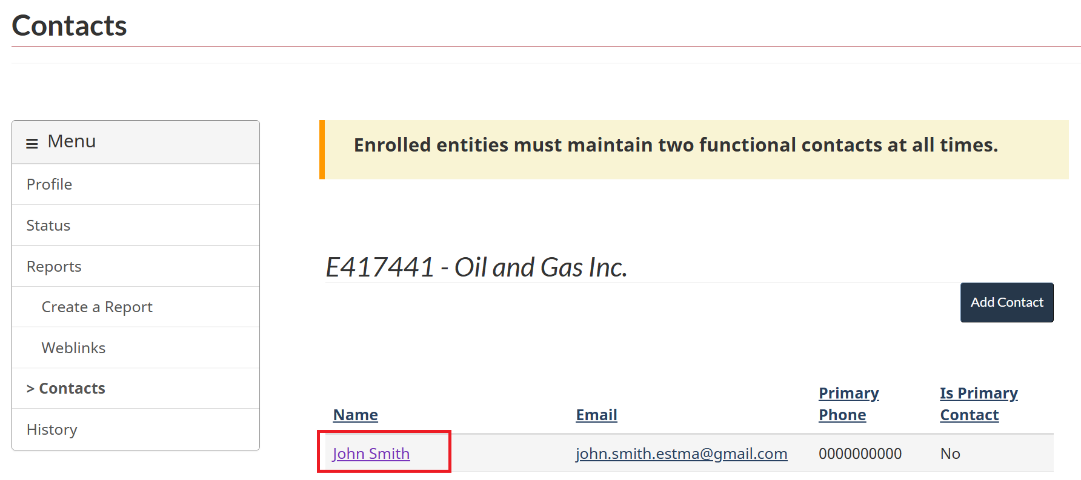
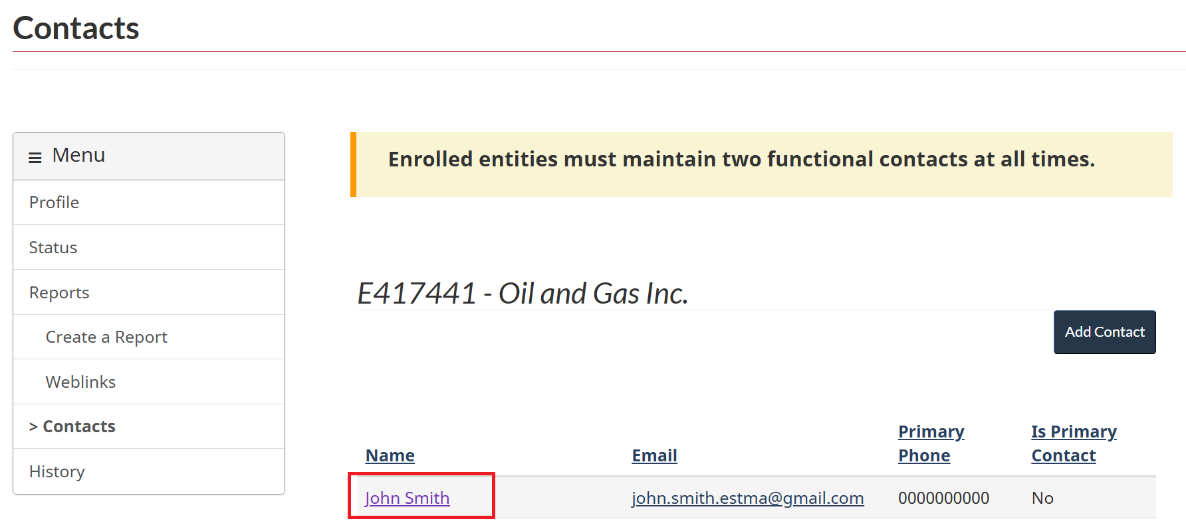
Add a contact
- Select entity. Select “My Dashboard” from the top navigation, click on the entity’s hyperlinked ESTMA ID, and then select “Contacts” from the left-hand menu.
- Add contact. On the Contacts page, select “Add Contacts”.
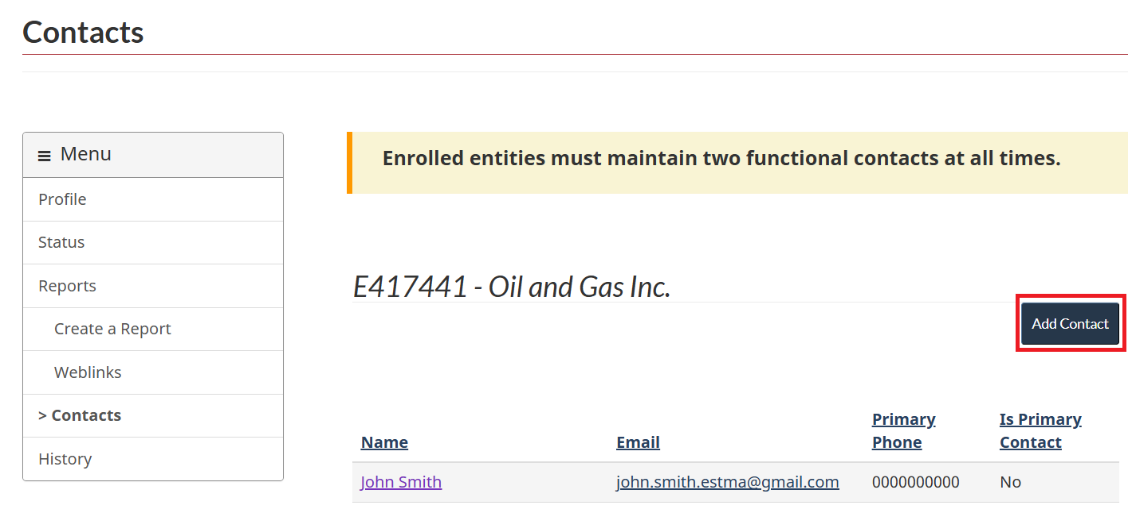
- Enter contact information. Complete the mandatory fields with contact information, including whether the contact is a primary contact, by selecting “No” or “Yes”. Note: All contacts are included on correspondence. Select “Next” to proceed to the next page.
- Add documentation (optional). In most situations, no supporting documentation is required. If documentation is deemed necessary, an NRCan officer will contact you after the contact form has been submitted.
- Add notes (optional). Any notes or questions about the contact can be entered in the Notes field.
- Submit and view request. To proceed with the submission, select “Submit”. A pop-up will appear. To confirm, select “Submit” again. An automated email will be sent, and a message will indicate the submission was successful. To view your submitted request, select “Back to Contacts”.
- Save drafts. If you have entered information but are not yet ready to submit the request, you can leave the page, and a draft will be saved. On the Contacts page, your draft will be under “Pending Requests”. Drafts can be edited or deleted by clicking the small drop-down arrow on the right-hand side of the request.
- Obtain confirmation that request is accepted. When the contact has been accepted, an automated email will be sent, and the request will appear on the History page under “Contacts Requests”.
How many contacts can be associated with an entity?
There is no limit to the number of contacts that an entity can authorize.
Edit a contact
- Select entity. Select “My Dashboard” from the top navigation, click on the entity’s hyperlinked ESTMA ID, and then select “Contacts” from the left-hand menu.
- Select contact. Select hyperlinked name of contact you wish to edit.
- Edit contact. View contact details and select “Edit Contact”.
- Enter contact information. Go to the applicable field that requires changes and delete the current information. For example, to edit the phone number, use the backspace key to delete the text, enter the new number, and then select “Next” to proceed to the next step.
- Review new information. The information you have changed will be highlighted in yellow. Ensure it is correct, then select “Next.”
- Add documentation (optional). In most situations, no supporting documentation is required.
- Add notes (optional). Any notes or questions about your request can be included here.
- Submit and view request. To proceed with the submission, select “Submit”. A pop-up will appear. To confirm, select “Submit” again. An automated email will be sent, and a message will indicate the submission was successful. To view your submitted request, select “Back to Contact Information”. Note: The same contact cannot be further edited or removed until the first request has been accepted or rejected.
- Save drafts. If you have entered information but are not yet ready to submit the request, you can leave the page, and a draft will be saved. On the Contacts page, your draft will be under “Pending Requests”. Drafts can be edited or deleted by clicking the small drop-down arrow on the right-hand side of the request.
- Obtain confirmation that request is accepted. When the contact has been accepted, an automated email will be sent, and the request will appear on the History page, under “Contacts Requests”.
Remove a contact
All reporting entities must have 2 contacts on file. To remove a contact, ensure the replacement contact has been added first. The option to “Remove Contact” will not appear if there are only 2 contacts on file.
- Select entity. Select “My Dashboard” from the top navigation, click on the entity’s hyperlinked ESTMA ID, and then select “Contacts” from the left-hand menu.
- Select contact. Select the name of the contact you wish to remove.
- Remove contact. View contact details and select “Remove Contact”.
- Review contact information. Ensure that you wish to remove the contact. To proceed, click “Save and Continue”.
- Add documentation (optional). In most situations, no supporting documentation is required.
- Add notes (optional). Any notes or questions about your request can be included here.
- Submit and view request. To proceed with the submission, select “Submit”. A pop-up will appear, to confirm, select “Submit” again. An automated email will be sent, and a message will indicate the submission was successful. To view your submitted request, select “Back to Contact Information”.
- Safe drafts. If you have entered information but are not yet ready to submit the request, you can leave the page, and a draft will be saved. On the Contacts page, your draft will be under “Pending Requests”. Drafts can be edited or deleted by clicking the small drop-down arrow on the right-hand side of the request.
- Obtain confirmation that request is accepted. When the contact has been accepted, an automated email will be sent, and the request will appear on the History page, under “Contacts Requests”.
If an ESTMA Reporting Portal contact is no longer employed by an entity, can they still access the entity’s account?
Yes. For this reason, entities should remove contacts no longer authorized to act on their behalf for the purposes of the ESTMA.
View history
All requests submitted on behalf of an entity that have been accepted or rejected are included in the History page. To view details of a specific request, select the hyperlinked case under case ID number. To view drafts or submitted requests, select Profile, Status, Reports, Weblinks, or Contacts from the menu on the left-hand side of the History page.
Need help?
Please contact the Help Desk, at 1-855-525-9293, for help with technical problems.
If you have questions about the ESTMA Reporting Portal, how to enrol a company or request access, or any of the reporting processes and requirements, please send an email to estma_reports-rapports_lmtse@nrcan-rncan.gc.ca.