
Keeping The Heat In - Section 8: Upgrading windows and exterior doors
Windows, doors, and skylights can account for up to 35 percent of total house heat loss. This chapter discusses upgrade or replacement options for windows and doors to save energy.
8.1 Windows
There are a number of options for upgrading the energy efficiency of your windows. Windows can be repaired by servicing hardware such as latches, cranks and locks or retrofitted with caulking and weatherstripping or adding glazing and storm windows. At times the best choice is total window and frame replacement with new ENERGY STAR® certified windows or high-performance inserts. If the frames are still in good condition, inserts (such as new sash and glazing units) can be a good option, especially for homes with heritage status.
8.1.1 Window types
Residential windows and skylights come in two basic types: operable and non-operable (or “fixed”). While non-operable windows may be more airtight, operable windows (including casement, awning, hopper, tilt, turn, and slider) allow for ventilation or emergency escape routes. There are also operable skylights that open like “awning-style” windows but are designed to be installed on an angle. See Figure 8-1 for illustrations of these windows.
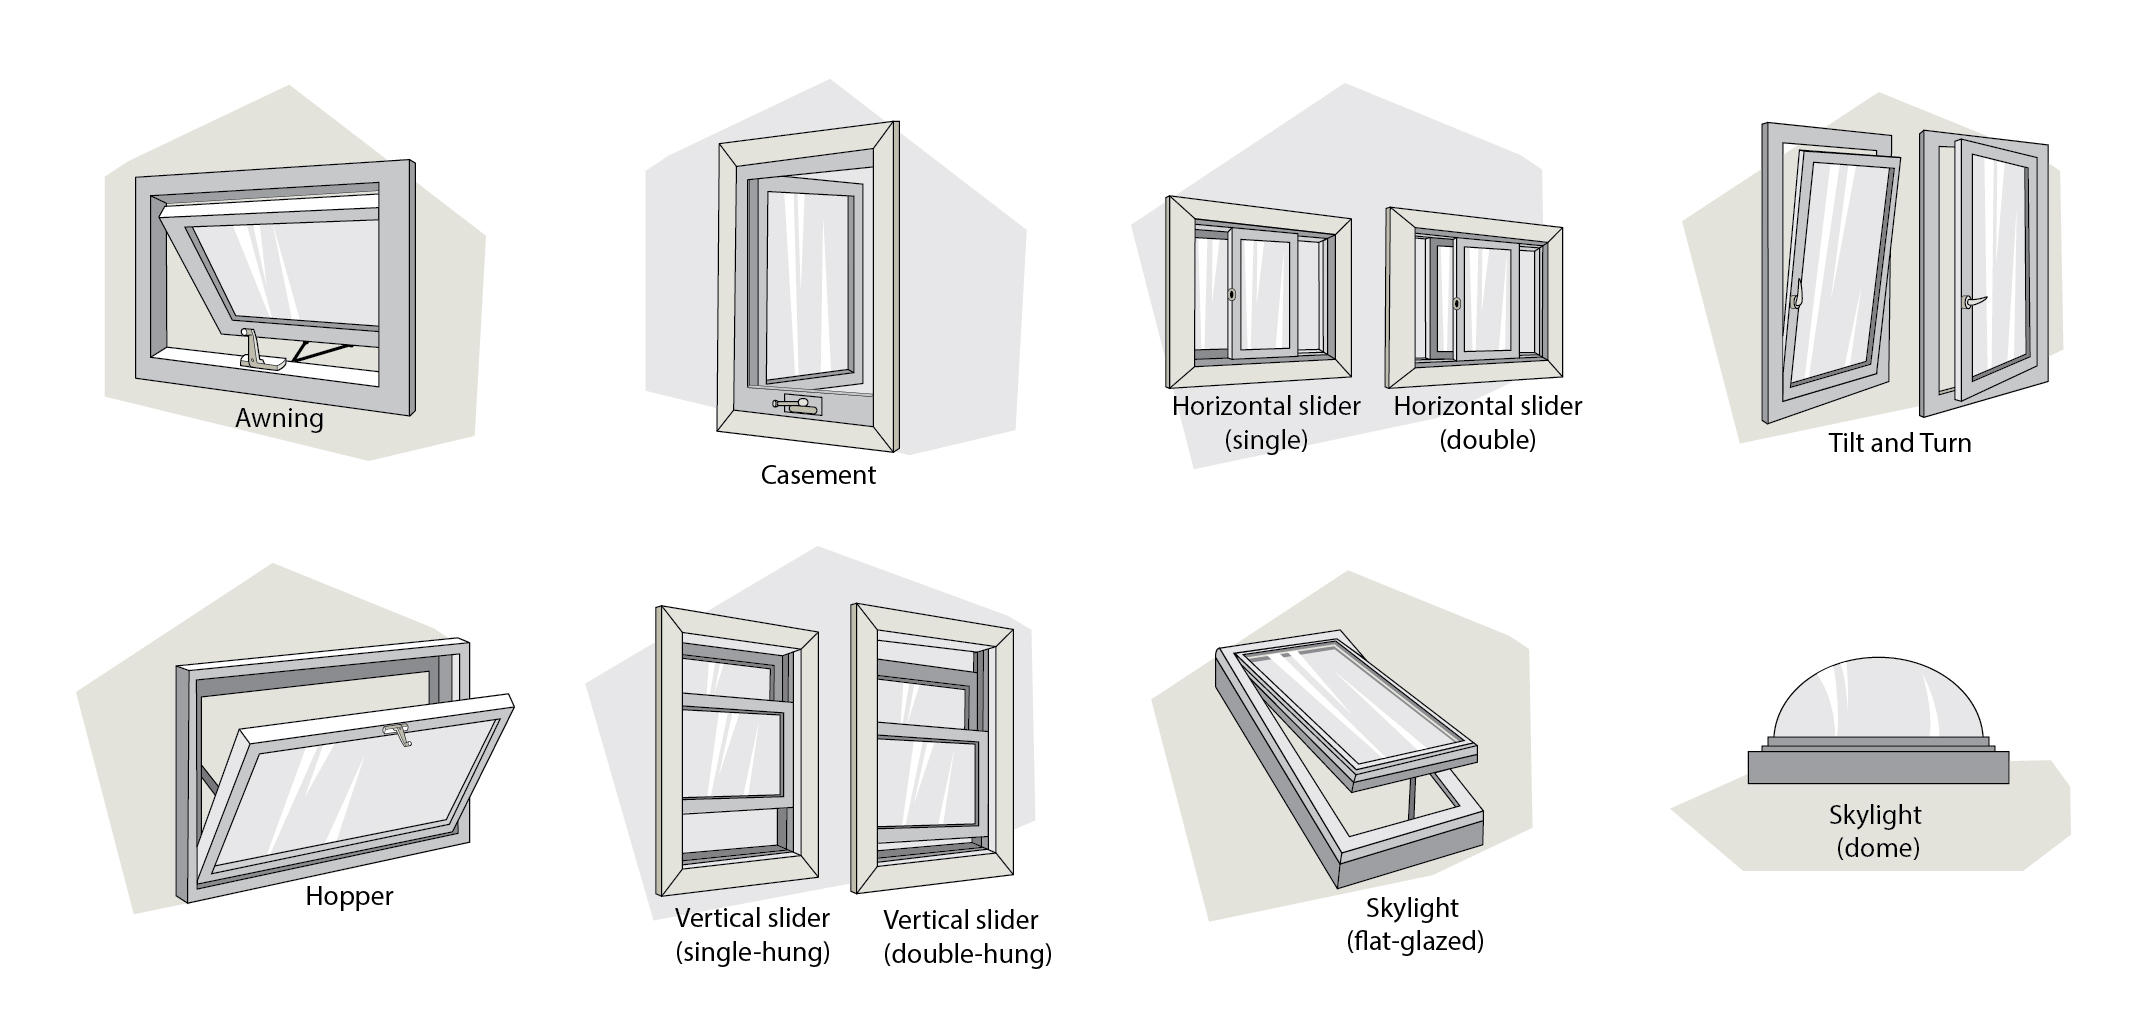
Figure 8-1 Types of windows
Text version
Illustration of various windows with different styles and functionalities such as awning, casement, horizontal slider single and double, tilt and turn, hopper, vertical slider (single and double – hung), skylight (flat-glazed) and skylight (dome).
Figures 8-2 and 8-3 illustrate two different styles of windows and their various components.
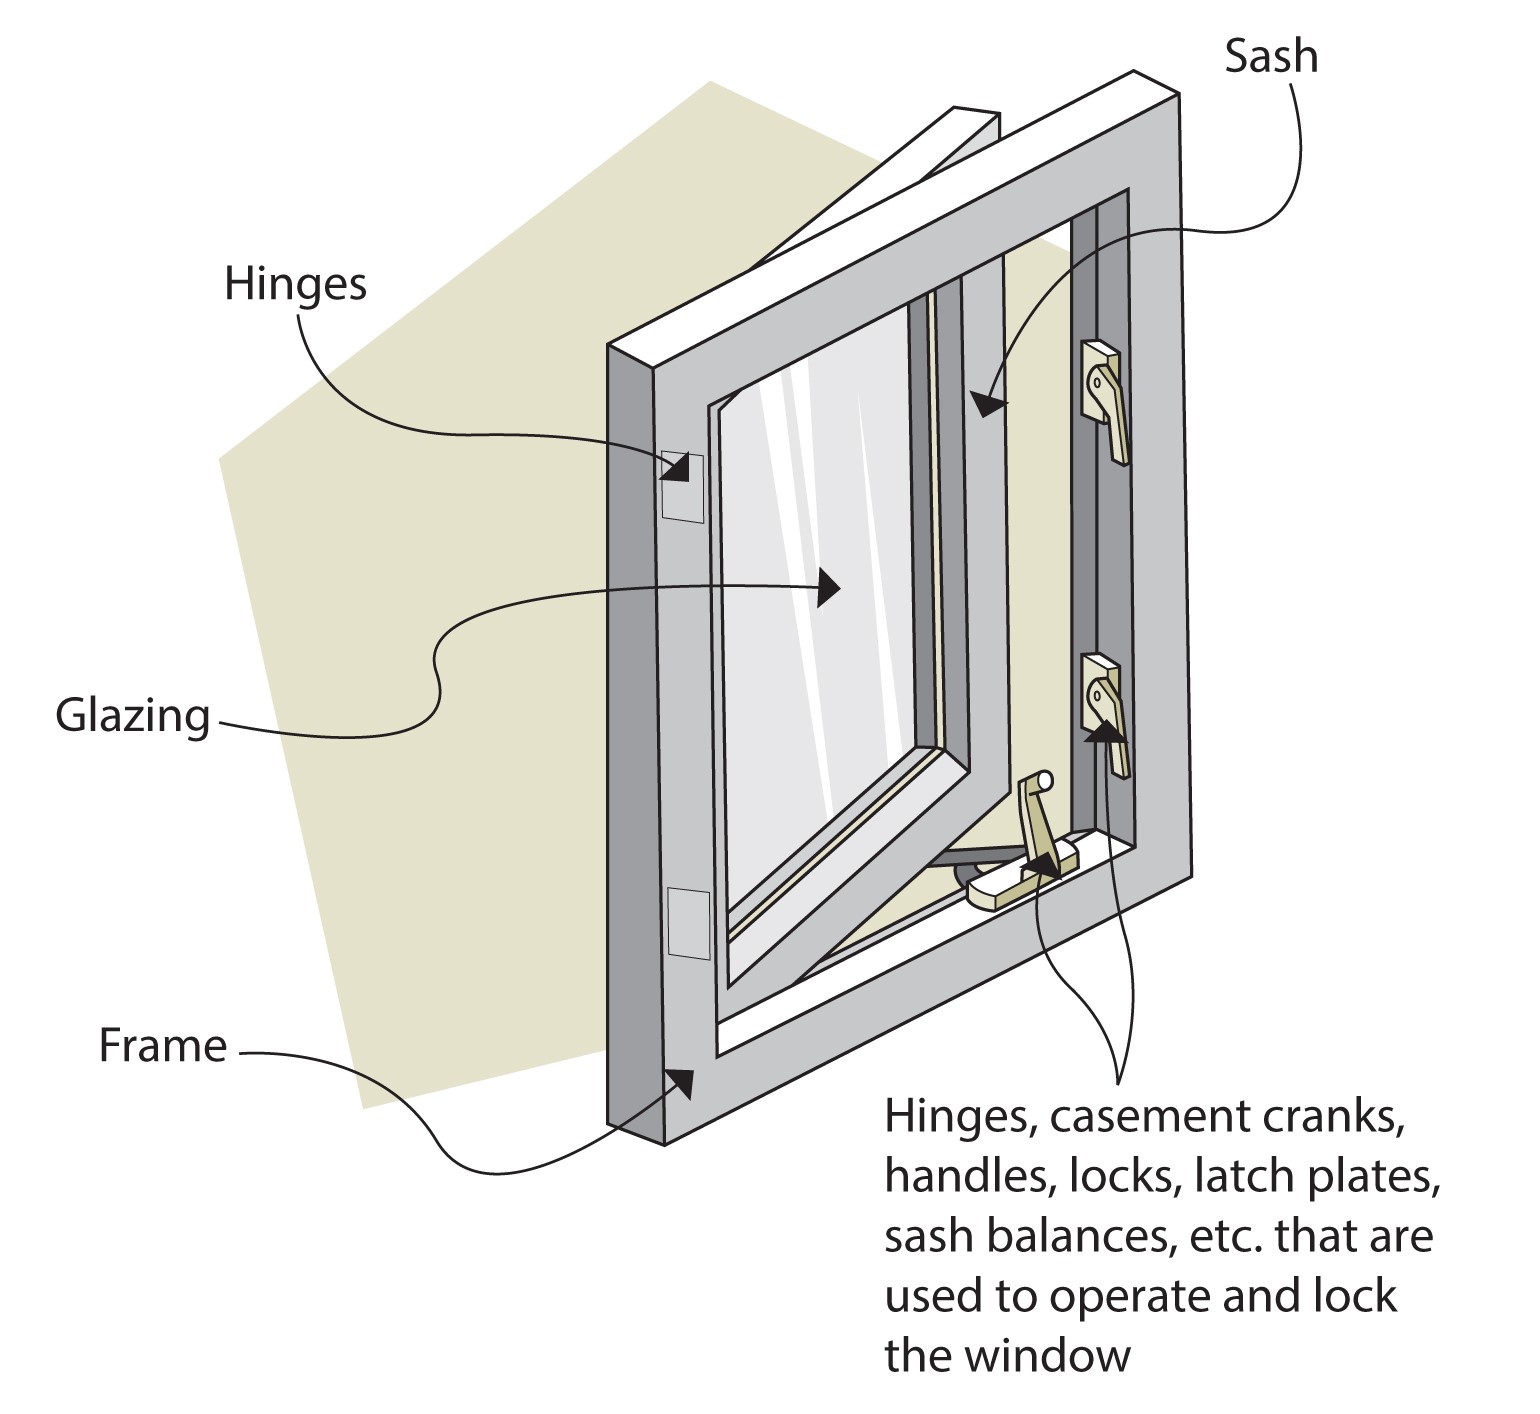
Figure 8-2 Casement window showing parts and hardware
Text version
Illustration of a casement window in open position, showing the window frame, sash, glazing and hinges and other hardware. Hinges, casement cranks, handles, locks, latch plates, sash balances, etc. that are used to operate and lock the window.
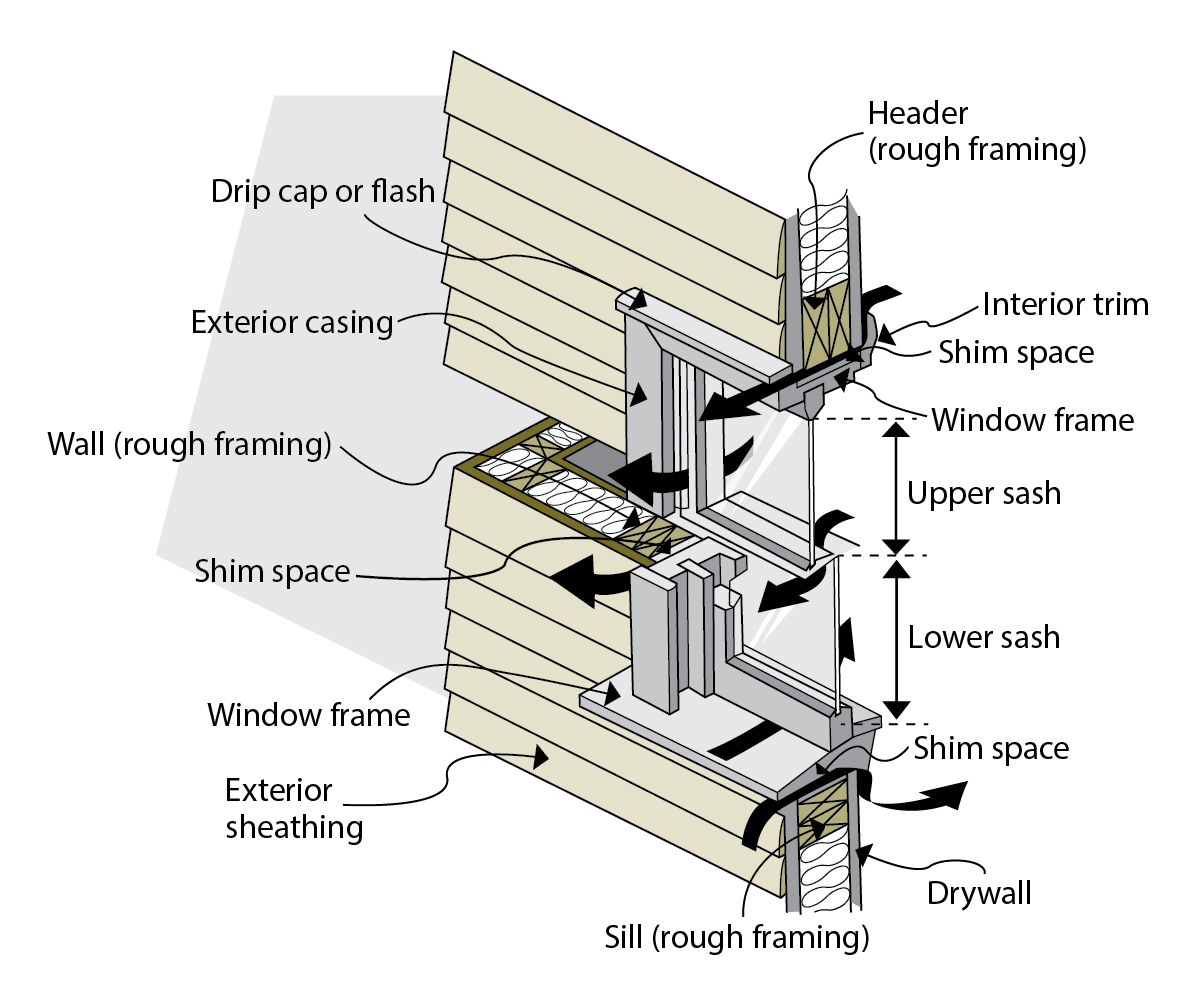
Figure 8-3 Double-hung window showing parts and air-leakage paths
Text version
Cutaway showing the elements of a double-hung window and its location in the rough framing of an insulated wall. Window elements include the drip cap or flash, exterior casing, window frame, the upper and lower sashes, shim spaces. The exterior sheathing and interior drywall are also indicated. Arrows show the air-leakage paths through gaps at the rough framing at the header, sill and around the window frame, the shim spaces, sashes and window trim.
8.1.2 Material options
Windows and skylights for use in houses and low-rise buildings are commonly manufactured from a variety of materials, including aluminum, fiberglass, vinyl and wood, or a combination of these materials. While aluminum conducts heat more than non-metals, the overall energy efficiency of the window or skylight is more dependent on the actual design of the product. This is reflected in the energy-performance rating which takes into account the entire window assembly (see Part 8.1.4, Rating Information).
8.1.3 Glazing
Glazing is the generic term for the transparent material, usually glass, in a window, door or skylight. Ordinary glass is called annealed glass. Glass can also be tempered (heat-strengthened) or laminated (to make it more shatter-resistant and better withstand adverse weather conditions). Glazing options include the following:
i) Glazing layers
A single-glazed product has one pane of glass. A double-glazed product has two panes; a triple-glazed three; and a quad-glazed four. More glazing layers reduce outdoor noise from entering the house. One of the panes in a triple-glazed product may be substituted for a thin layer of suspended polyester film to reduce the overall weight.
ii) Low-E coatings
Low emissivity or low-E coatings have a fine, factory installed transparent coating of metal applied to one or several glazing surfaces to reduce heat loss in the winter and heat gain in the summer. Low-E coatings can reduce heat loss in the winter and heat gain in the summer by up to 50%. This is beneficial as it helps to maintain a comfortable room temperature year round, reduces the load on a home’s heating, ventilating and air-conditioning (HVAC) system and saves on energy bills.
Low-E coatings can come in passive or solar control options. Passive low-E coatings have a high Solar Heat Gain Coefficient (SHGC) and are designed to harness the sun’s energy to supplement the home’s heating system. Alternatively, solar control low-E coatings have a lower SHGC that can reduce the load on a home’s air conditioning system (see Part 8.1.4.ii Solar Heat Gain Coefficient (SHGC) for more information).
An after-market product to consider in improving energy efficiency is low-E films, which can be applied to existing glazed units.
iii) Gas fill
The space(s) between glazings in double-, triple-, and quad-glazed windows are filled with an odourless, colourless, harmless inert gas, such as argon or krypton, to reduce heat transfer through the glass.
iv) Insulated spacers
Traditional aluminum-box spacers between glazings contribute to heat loss and condensation problems along the edges. Spacers designed with thermal breaks that use better insulating materials such as foam, plastic or composites reduce edge heat loss.
v) Optimal glazing spacing
The size of spacing between each glazing affects the insulation value of a window. If the space is too narrow, conduction through the air space is significant. If too wide, convection currents will start to form when still air begins to rise as it is heated on the warm interior side and falls as it is cooled on the cold exterior side of the window resulting in unwanted heat transfer (loss). The best spacing to minimize convection losses is 12 to 16 mm (1/2 to 5/8 in.).
8.1.4 Rating information
Windows and skylights are tested using standard sample sizes to fairly rank their overall energy performance. The energy performance and terminology that are most often used in Canada to describe the windows, doors and skylights are provided in this section. This information will help start the conversation with your windows supplier who can help determine the appropriate window specifications for your needs.
i) U-factor
The U-factor measures the rate of heat loss of a window assembly and is an inverse of the RSI or R-value. The lower the U-factor, the greater the resistance to heat loss (unlike the RSI or R-value for which the greater number, the better the resistance to heat loss). Overall U-factor includes centre-of-glass, edge of glass and frame U-factors. Better performing double-glazed windows can have U-factors of 1.2 W/m2∙K or lower and triple-glazed windows can have U-factors as low as 0.8 W/m2∙K.
ii) Solar Heat Gain Coefficient (SHGC)
A fraction between 0 and 1 indicating the amount of the sun’s heat that can pass through the product (solar gain). The lower a window’s SHGC, the less solar heat it transmits, and this reduces the load on the home’s cooling system. The higher a window’s SGHC, the more solar energy is allowed (and trapped) in the house and this reduces the load on the home’s heating system.
Ultimately selecting the appropriate SHGC depends on the climate (length of the heating season vs. the cooling season), the ability of a home to regulate temperature (HVAC system, air-tightness of a home, passive heat elements that absorb residual heat), available shading (such as overhangs above windows) and orientation of the windows and doors.
As a rule of thumb, a SHGC of between 0.3-0.4 is optimal for homes that were substantially renovated for energy efficiency or new homes in Canada.
High SHGC (greater than 0.4) will allow more solar heat gains into the home and is normally suitable in the following instances:
- In homes built before 1980 or in homes that are not well insulated and air sealed.
- In mainly sunny areas with a short cooling season (less than two months) and summer temperatures less than 25oC most of the time.
- In homes with passive solar heating design.
Discuss with your window and door supplier the role of solar heat gain in your home.
iii) Energy Rating (ER)
This unitless number reflects the balance between heat transfer (U-factor) and solar gain. Higher numbers indicate a slower heat transfer without significantly reducing the amount of solar gain.
iv) Visible Transmittance (VT)
The percentage or fraction of visible light that can pass through the glazing. The higher the number, the greater the amount of visible light that can pass through.
v) Centre-of-Glass U-factor
Often called “centre-of-glass ratings,” these values make the product appear more energy-efficient than it really is, because other parts of the window/glazing assembly are not included, only the glass portion is considered.
8.1.5 Replacing glazing, sashes and windows
Properly installed energy-efficient windows make homes more comfortable by reducing drafts and increasing the temperature of the interior side of the window, reducing condensation. Energy-efficient windows will have many of the following features:
- Double-, triple- or even quadruple-glazing
- Low-emissivity (low-E) glass
- Inert gas, such argon or krypton in the sealed unit
- Low conductivity or warm-edge spacer bars
- Insulated frames and sashes
- Good air tightness
If your inspection has revealed serious problems with a window’s glazing, sash or the entire unit, your best option will be to replace all or part of the window.
For example, if the glazing is only a single pane of glass or is in poor condition, you can buy a new sealed glazing window insert. If the frame is in poor condition, it may be time to replace the unit.
8.1.6 Taking stock
Check each window for signs of damage: rot, mold and/or staining on or around the window, the condition of the glass, putty and paint, weatherstripping and the operation and condition of the hardware. Some windows may need only minor air sealing work, while others require major upgrading or even replacement. Check for air leakage around the frame and at all movable joints. Combine a visual inspection with a test using a leak detector as described in Section 2, “How your house works.”
8.1.7 Condensation problems
Interior surface condensation and frosting are common complaints. Sometimes the problem is light fogging on some windows; at other times, there may be persistent and heavy frost covering the glass. Many homeowners buy new windows only to find that the problem becomes worse because the old, leaky windows actually helped to reduce humidity. The new windows seal the house more tightly, causing a rise in humidity. Some solutions are to reduce humidity levels in the house and improve the house ventilation.
Alternatively, you can increase the surface temperature of the window by installing more efficient windows, such as ENERGY STAR® certified windows. In more extreme climates, homes may have more problems with edges of the glazing fogging up and freezing. Triple-glazed windows help reduce this problem while offering better performance overall.
When condensation forms between panes on non-sealed glazing units or storm windows, moist house air has leaked past the inner pane and condensed on the outer pane. Even dry houses can suffer from this type of condensation problem. This problem is common on second storeys where there is more air being pushed out the window because of the stack effect. The solution is to weatherstrip the inner sash to prevent air leakage; make sure that the weep holes on the storm windows, which allow water to escape, are open to the outside.
If condensation occurs inside a sealed double-glazed unit, due to the seal being broken, the problem is best corrected by replacing the glazing unit. Check to see if the window is still under warranty. Although some specialty companies can refurbish sealed glazing units that have failed, this is considered a temporary fix that will not offer the same original energy efficiency.
For more information on moisture and condensation, see Part 2.4, Control of moisture flow, and Section 4, “Comprehensive air leakage control,” and Part 9.4, Ventilation and combustion air.
8.1.8 Interior caulking
Window air leakage can be reduced by applying a continuous bead of caulk around the window trim where it meets the wall, at the mitred joints of the trim, and between the trim and the frame (see Figure 8-4). Make sure the caulk is intended for indoor use (do not use exterior caulking indoors), can be painted and is of good quality. For more information about caulking products, see Part 3.3, Air barrier materials.
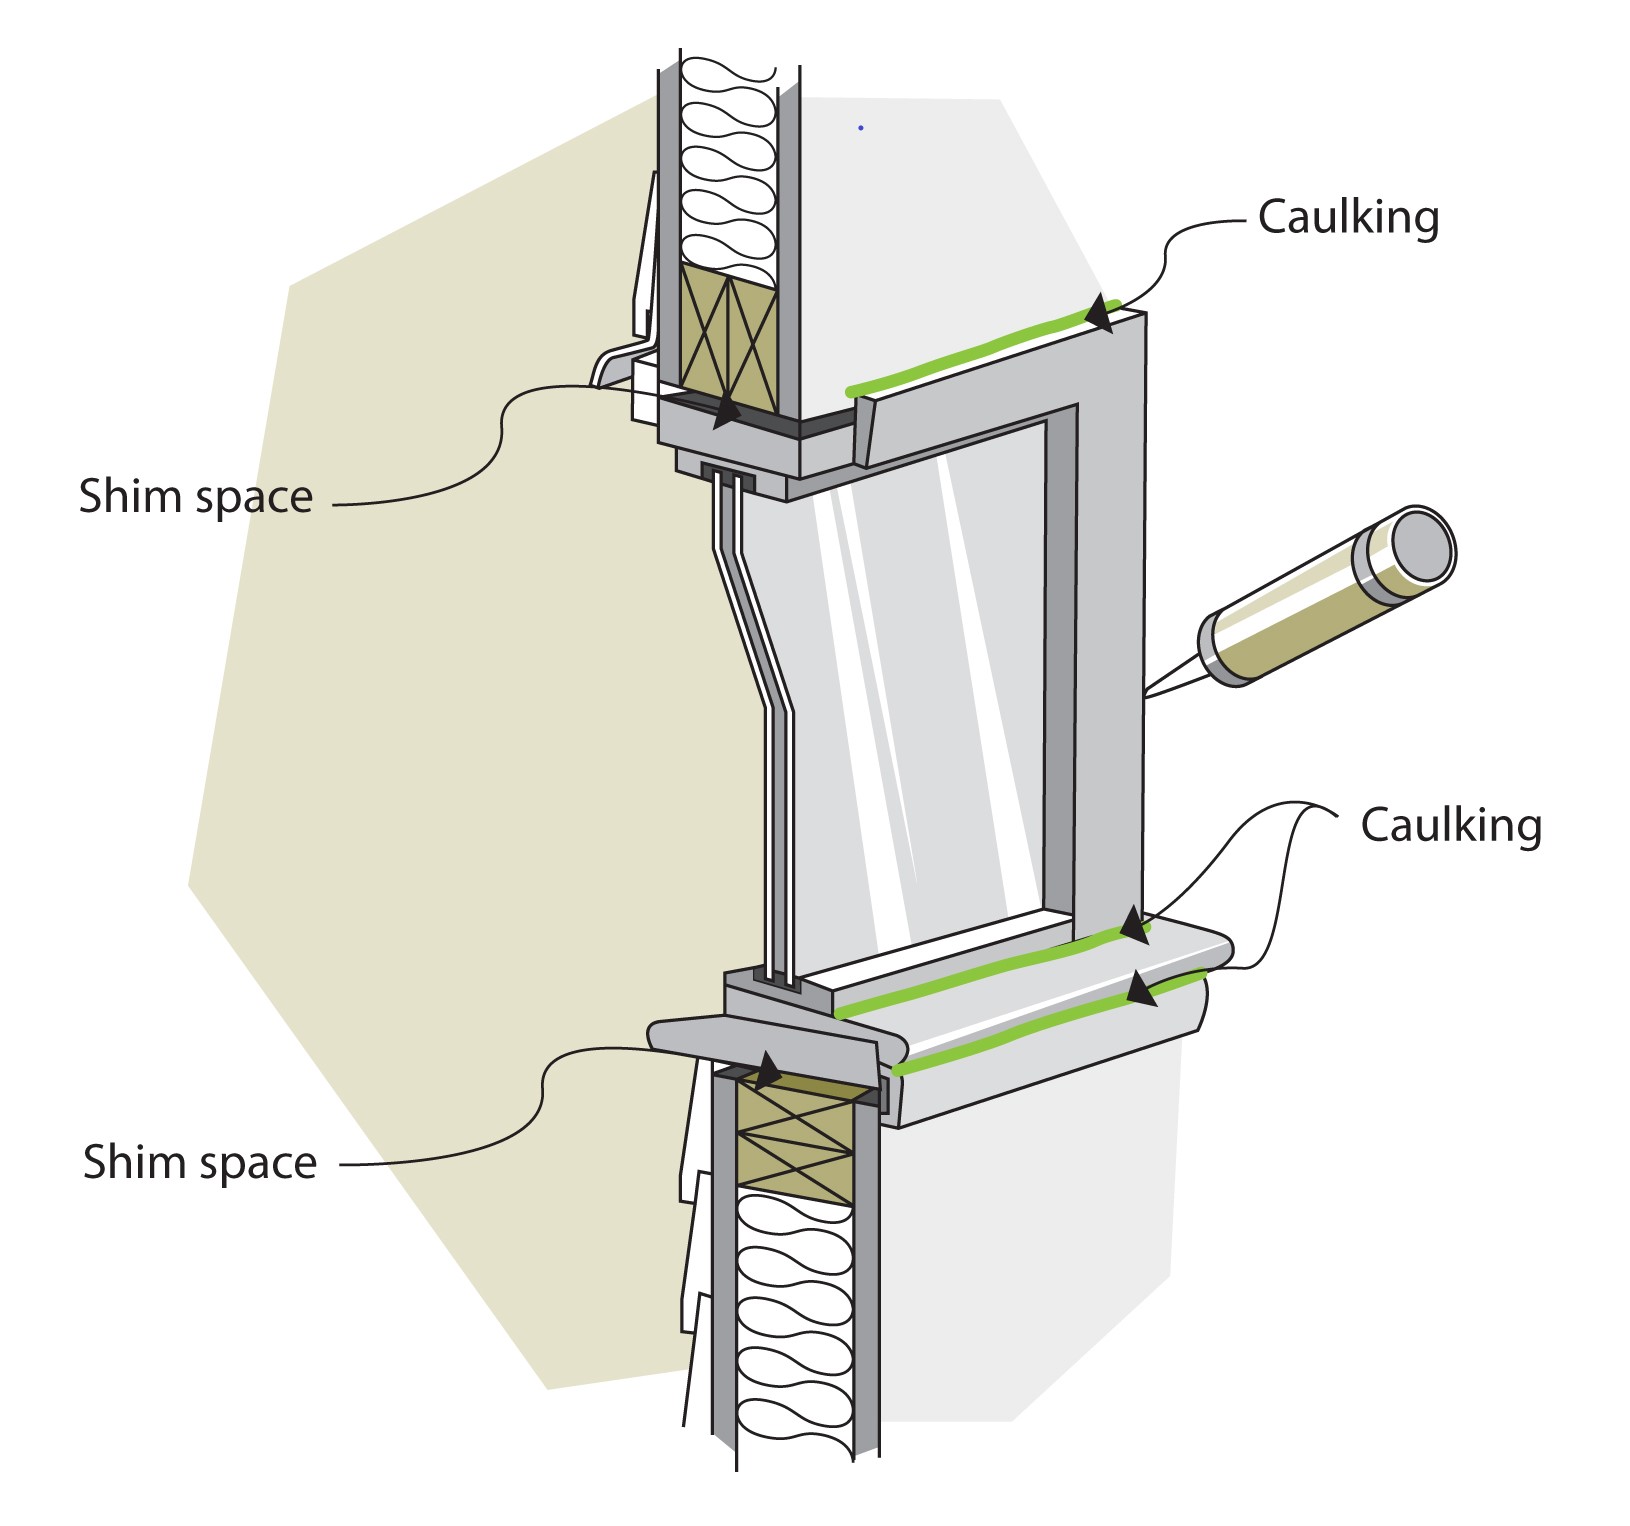
Figure 8-4 Where to caulk the joints of a fixed window
Text version
Cutaway of an exterior wall with a double-glazed fixed window, the edges and joints between the window frame, sill and all trim are sealed with caulking.
If a window is particularly leaky and the trim can be easily removed and re-installed, remove the trim, add insulation, and seal the gap before reapplying the trim. If the gap is small, 6 mm (¼ in.) or less, insulating the gap followed by caulking may suffice. Larger gaps may require either a backer rod with caulking or low-expansion foam (see Figure 8-5).
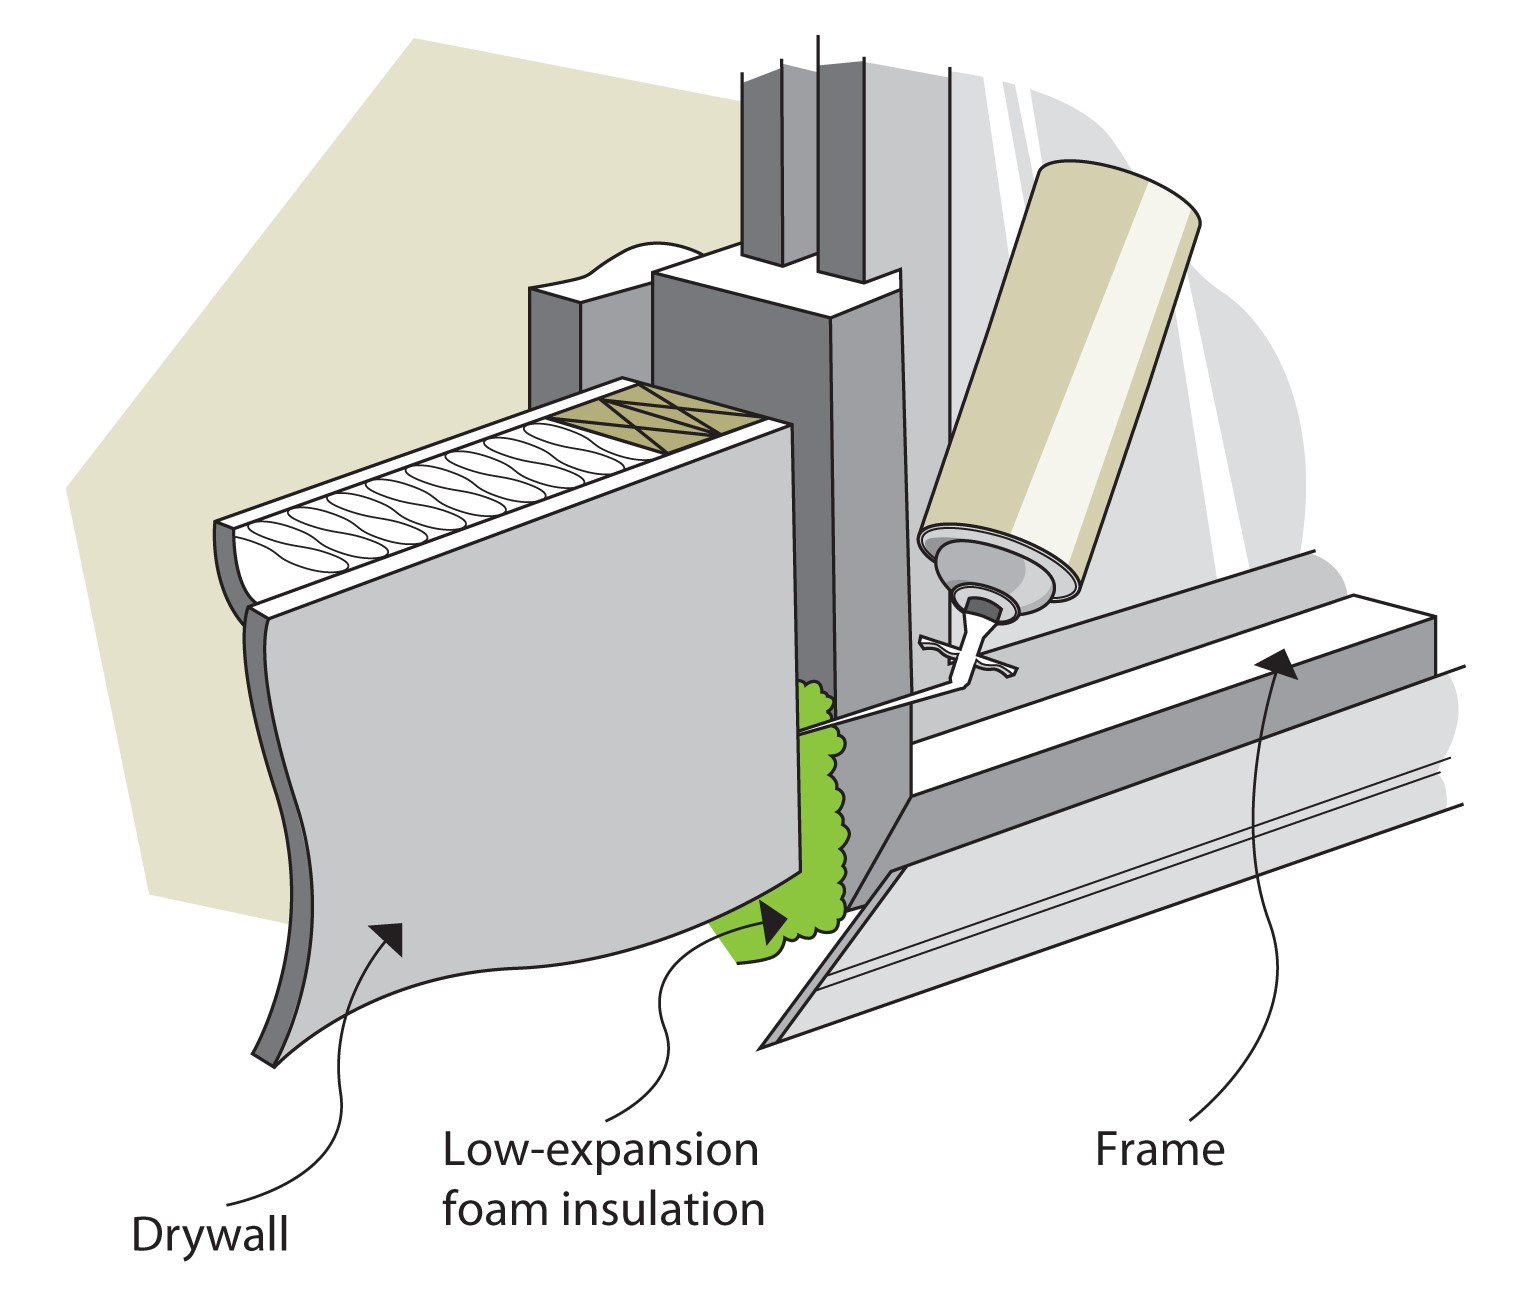
Figure 8-5 How to seal behind the window trim
Text version
Cutaway of an interior-view detail of an exterior wall showing the rough framing and the corner of the window. A canister of low-expansion foam insulation injects sealant into the gap between the rough framing and the window frame, behind the window trim. The wall containing the window is finished with drywall.
To further reduce air leakage, apply a layer of red technical tape to cover the joint between the wall and window frame. Ensure that the tape will be hidden by the trim as it cannot be painted and red adhesive may remain after excess tape is removed.
8.1.9 Exterior caulking
Exterior caulking is the last and weakest defense against rain entering a wall from the outside. The best defense against window and door wall leakage includes the following two items:
- Properly applied flashing (such as top window flashing is underneath the air barrier, while side and bottom flashings are on top of the air barrier)
- A properly detailed drainage plane
Caulking on the outside of a window should be done only after interior sealing is complete. If the exterior is caulked first, it can trap warm, moist air in the wall, which over time, can damage the wall.
8.1.10 Weatherstripping
Weatherstripping is used to create a seal between the frame and door or window sash to block rain and dust and to minimize air leakage. There are four different types of seals: compression, brush, sweep and magnetic. Other than fixed windows, the most airtight windows are typically those with compression or magnetic seals. These are generally found on casement, awning, hopper and tilt-turn-style windows and most operable skylights. Look for and question the quality of the hardware and weatherstripping when selecting windows and doors. If the windows do not have to be opened and do not serve as emergency exits, they can be locked and caulked. Where storm windows are installed, seal the inside window more tightly than the outside window to reduce condensation problems.
Technical note
Building codes require that every bedroom have at least one window that opens from the inside to allow escape in case of emergency. Be mindful of this requirement before deciding to seal shut certain windows.
Many types of weatherstripping are available. Table 3-4 lists some of the more common varieties of weatherstripping, though it is certainly not an exhaustive list. Try to visit a window and door supplier that stocks a wide variety of original manufacturer products. For newer windows with built-in weatherstripping that has lost its effectiveness over time, pry out a sample and take it to the window manufacturer or supplier for replacement with the same type. Cheaper products are usually less durable and less effective, so do not choose merely on the basis of cost.
Preparation and installation are important and typically involve the following steps:
- Try to adjust and square windows that are out of alignment.
- Remove old weatherstripping, caulking and blobs of paint from contact surfaces. If the surface is very uneven, apply a bead of caulking under the weatherstripping or fill, sand and paint the surface to make it smooth.
- Clean the surface with a clean cloth and fast-drying mineral spirits or MEK (methyl ethyl ketone).
- Apply the weatherstripping. With doors and windows that are used often, you may want to reinforce the adhesive types with staples.
- Check the window for smooth operation and ensure all hinges, slides and hardware operate freely and correctly.
- Periodically check the weatherstripping for wear.
i) Double-hung and single-hung windows
Double-hung and single-hung windows should be weatherstripped on the sides, top and bottom of the moving sash, as shown in Figure 8-6. Caulk air leaks around the fixed portion of the window.
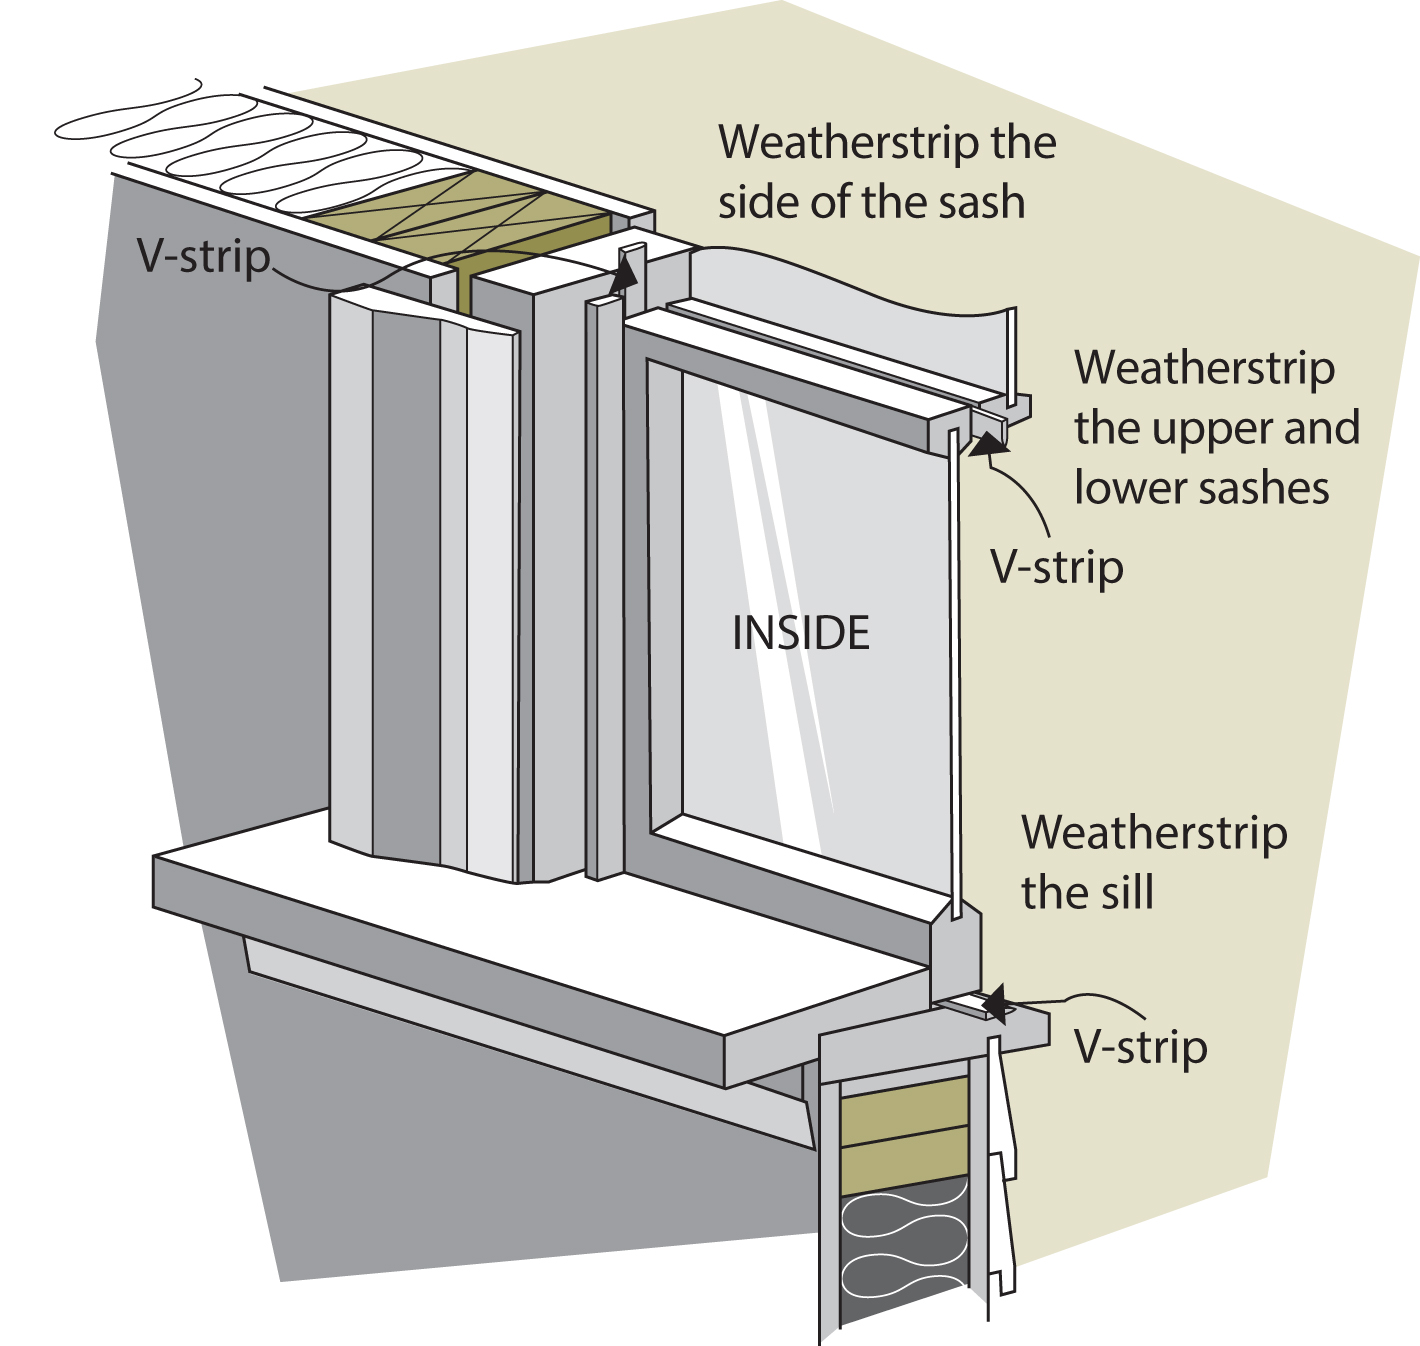
Figure 8-6 Where to weatherstrip a single hung window
Text version
Cutaway of an interior view of a window with V-strip weatherstripping along all edges of the sash where it meets the frame. The area where the upper and lower sashes meet is also weatherstripped.
Sides
The thin plastic V-type weatherstripping is a good choice. Open the window and slip the stripping up the crack between the sash and the frame, with the mouth of the V facing the exterior. It need only extend to 25 mm (1 in.) above the top of the closed window. You can do a better job if you first remove the stop and the bottom sash.
Top
Weatherstrip the space where the two sashes meet by removing the lower sash and applying V-type weatherstripping to the upper window from the inside.
Bottom
Apply V-type or compression-type neoprene rubber to the windowsill where the closed window will sit or to the bottom of the moving window sash itself.
ii) Sliding windows
Sliding windows with sashes typically use brush weatherstripping that will require removing the sash and pulling the old weatherstripping out of its slot (see Figure 8-7). Cut the new material to the length required and snap or slide it into the slot. Tack, staple, or glue each end of the brush material to ensure that the weatherstripping stays in place before reinstalling the sash.
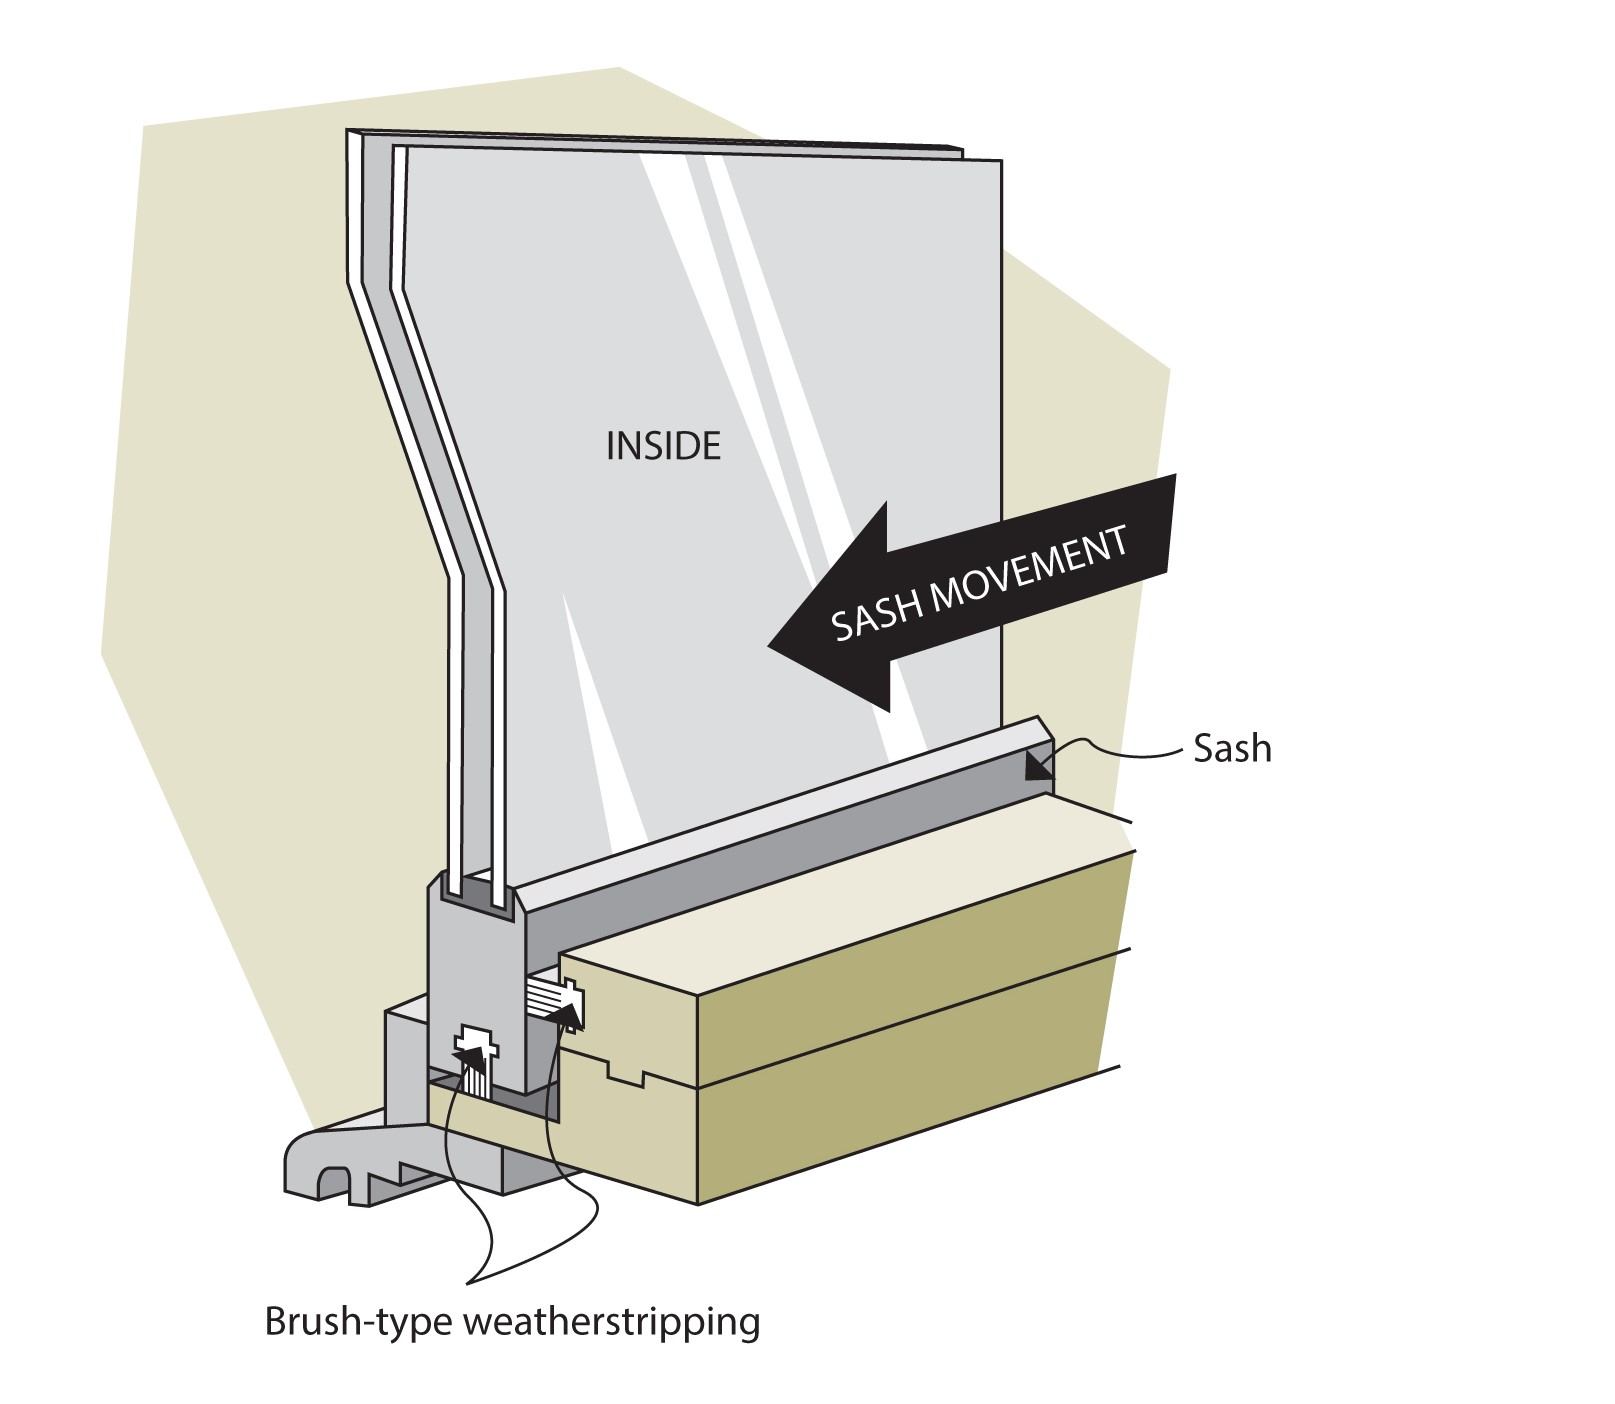
Figure 8-7 Brush weatherstripping on a sliding window
Text version
Cutaway of an interior view of a double-glazed sliding window with brush-type weatherstripping. Weatherstripping is installed on the bottom and faces of the sliding portion of the sash where it contacts the frame. An arrow indicates the sideways direction of sash movement.
Sashless sliders – panes of glass not encased in a frame – are inefficient. At the very least they should be supplemented with interior storm windows. Better yet, replace them with energy-efficient units.
iii) Swing-type (hinged) windows
Swing-type (hinged) windows are treated like doors. Apply weatherstripping to the frame so it meets the edge of the sash or place it on the stop where it will meet the face of the sash (see Figure 8-8). The force of a closed window against the weatherstripping makes a pressure seal. Hinged windows usually require a combination of V-strip and compression-type weatherstripping. Hinges and locking hardware may complicate the job. Sometimes, more than one weatherstrip will therefore be needed in those areas.
.jpg)
Figure 8-8 Compression and sweep weatherstripping on a casement window
Text version
Cutaway of an interior view of a double-glazed casement window with sweep-type weatherstripping on the base of the sash and compression-type weatherstripping where the casement meets the frame. An arrow indicates the outward movement of the sash.
8.1.11 Storm window systems
Single-glazed windows lose about 10 to 20 times as much heat as the same area of a properly insulated wall. Storm windows or double-glazed sealed units will reduce the heat loss by almost half. Storm windows can be installed on the inside or the outside, can be permanent or seasonal, and can be made to order.
Exterior storm window systems
Exterior storm windows were once very common and continue to serve a useful role in many applications. They are usually constructed of a wood or metal frame, with glass or an acrylic sheet as glazing.
Exterior storm windows can be either seasonal (installed in the fall and removed in the spring) or permanent. Seasonal storm windows should be inspected each year before installation to ensure that the glazing, putty and weatherstripping are in good condition. A drawback of seasonal units is the labour involved in installing and removing them each year, as well as the need for storage. Permanent exterior storm windows are usually equipped with a built-in screen and a sliding sash.
When you use exterior storm windows, the main interior window must be air sealed more tightly than the storm window to prevent moist household air from entering the space between the windows and being trapped, where it can condense and cause deterioration of the sash and frame.
Interior storm window systems
Interior storm windows are generally attached directly to the window frame, which helps reduce air leakage around the window. To minimize condensation and air leakage, interior storm windows should be sealed tightly so that no warm air gets between the storm unit and the original window after installation.
Interior storm windows are lighter and more accessible than seasonal exterior storm windows especially on upper floors. A disadvantage is that blinds or other window treatments may have to be repositioned to accommodate the storm window.
Interior storm windows are typically used in the winter only and are stored for the rest of the year. However, in an air-conditioned house, they can also help keep heat out and cool air in during the hot summer months.
There are two common interior storm window system options – heat-shrink film with double-sided tape and clear rigid acrylic sheets with magnetic seals.
i) Heat-shrink film with double-sided tape
These inexpensive, temporary, do-it-yourself kits are sold at most hardware and building supply stores and include instructions for installation. With this system, two-sided tape attaches the film to the window trim, after which the film is heated with a hair dryer to shrink it tightly across the window. In most cases, the film can be used only once.
Although this system provides an excellent seal and good visibility, the two-sided tape can lift paint when it is removed. As well, once this system is installed, the window cannot be opened without removing or puncturing the film.
Points to keep in mind:
- Lightweight film may be damaged if you have young children or pets in the house.
- Plastics must be kept away from strong heat sources.
- Some people may be sensitive to plastics, which can emit odours, particularly when their surfaces are warmed by sunlight.
ii) Clear rigid acrylic sheets with magnetic seals
This seasonal system is more durable than plastic film but more expensive; plus, it may require the services of a contractor.
To install a magnetic seal system, a metal strip is fastened to the window trim using double-sided tape (this strip can be painted to match the frame). A magnetic molding is then secured to the acrylic sheet and the sheet is pressed into place on the metal strip.
When the acrylic sheets are not in use, they must be stored in a flat or vertical position (not slanted) and in a cool place protected from exposure to sunlight and excessive heat. The rigid glazing is easier to clean and has a more finished appearance than shrink film.
Some plastic supply stores sell these systems (and the appropriate cleaning products) and can cut the sheets to the size required. As well, some firms specialize in manufacturing and installing these systems.
Specialty products
There are two products that are most suitable for areas that have very high solar gains that make the room too hot: applied window films and multi-layered polyester films. Films are usually professionally applied with some precautions.
Applied window films are usually made from a clear or tinted polyester substrate with a scratch-resistant coating on one side and an adhesive with a protective liner on the other. Multi-layered polyester films are black on one side and silver on the other. The film is permanently attached to the window by removing the liner and pressing it firmly on the glass.
Window films with a solar-control coating reduce solar gain and help protect carpeting, draperies, furniture, and wood from fading. They should not be used on all windows as they offer very little increased insulation and greatly cut down on solar gain, which could lead to higher energy bills during the heating season. There is also a small risk of glass breakage due to increased thermal stress and the use of these films may void the warranty issued by the original window manufacturer.
Curtains and blinds can help reduce radiant heat loss from windows during the heating season and reduce solar gain during the summer. Shutters, shades, awnings, and trees can also reduce solar gains during the summer. Close window coverings during the day and open windows at night for ventilation.
During the heating season, insulated drapes offer somewhat more benefit than non-insulated drapes and blinds. However, as curtains and blinds are not airtight, they may cause window condensation problems in the winter.
8.1.12 Skylights
Skylights can come in a flat glazed design, a dome lens design, or a tubular design, and should have a low curb (the part that holds the glass at the roof line to reduce heat loss through the frame). Skylights commonly suffer from water leakage and condensation around the frame and curb or tunnel. For operable skylights, ensure that hardware is working, and all seals are in good order. Keep rain out by repairing exterior seals and flashings. Curbs and interior tunnels around the skylight must be well insulated and air sealed to reduce condensation. Reduce summer overheating with light-reflective glazing and blinds.
Do not open a skylight (or upper storey window) in hot weather if the house air temperature is cooler than the outside air as this can cause reverse stack effect. Opening the skylight draws hot air into the house especially when air conditioning is being used as the cooler air leaks out of the lower level of the home thereby drawing hot air through the open skylight or window. Reverse stack effect negates the effectiveness of air conditioning or natural cooling.
8.2 Doors
Doors come in two operable styles: swinging (hinged) and sliding. Doors can either be solid or have glazing in the door, beside the door (sidelight) or above the door (transom). Doors can be made from a solid material, such as wood, or have an insulated core that is covered with a metal, fiberglass, or wood shell. Insulated core doors are more thermally resistant than solid material doors and doors that include glazing. See Figure 8-9 for components of a door system and Figure 8-10 for types of patio doors.
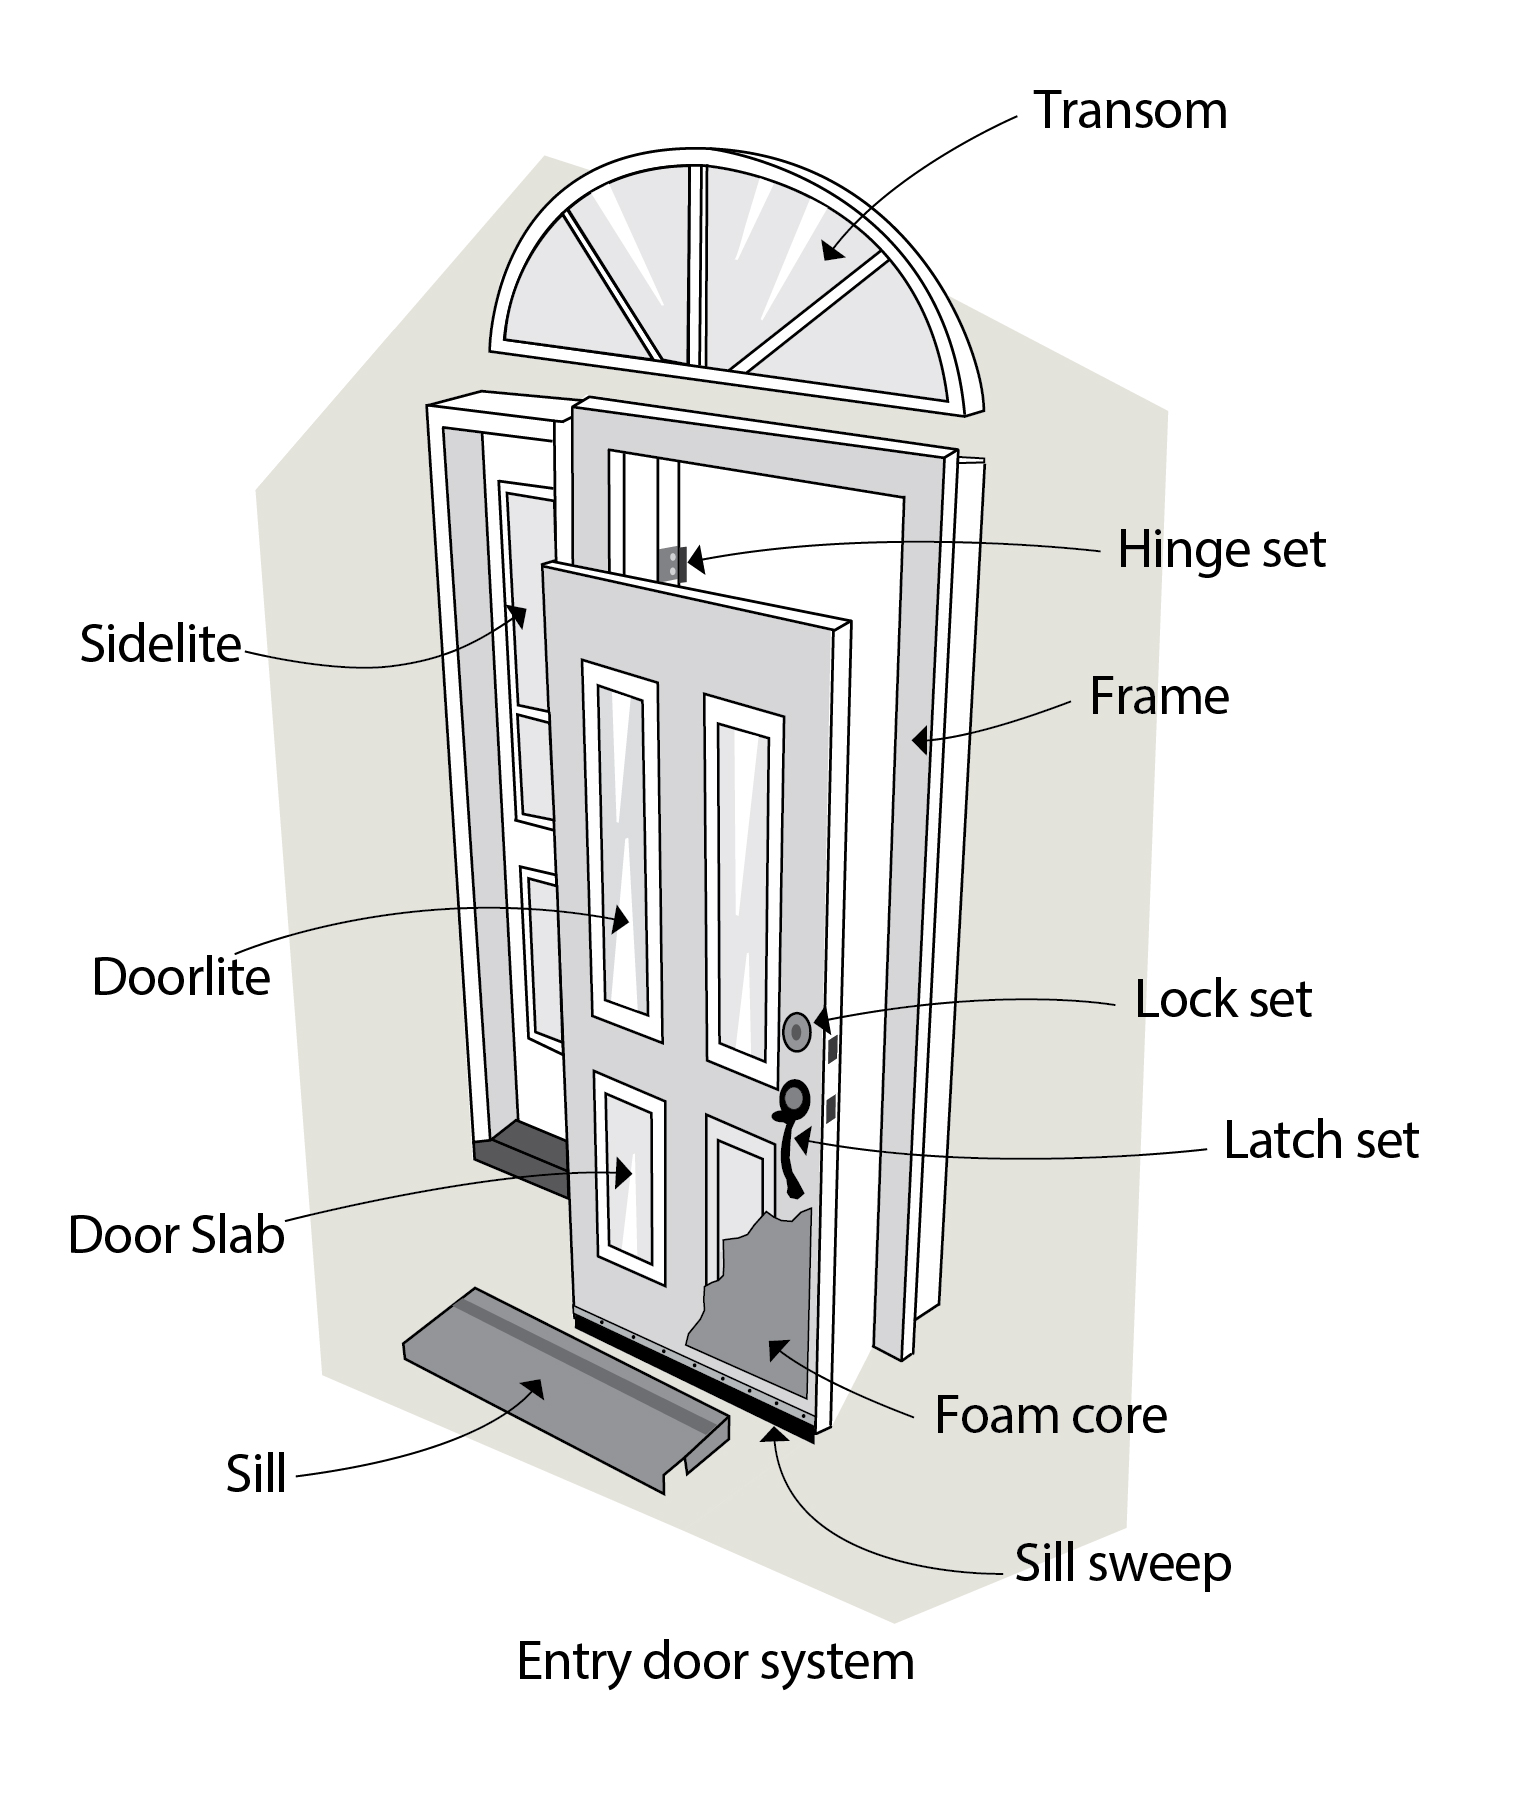
Figure 8-9 Components of an entry door system
Text version
Illustration of an entry door system that highlights different components such as sill, door slab, doorlite, sidelite, transom, hinge set, door frame, lock set, latch set, foam core, and sill sweep.

Figure 8-10 Types of patio doors
Text version
Illustration of various types of patio doors such as swinging (hinged) patio or garden door, French door, and sliding patio door.
Poor installation, years of hard use, shifting foundations and seasonal warping can often force hinged doors and sliding glass patio doors to become out of square with their frames. If doors do not fit snugly, fix or replace the door, frame, hardware, gaskets and weatherstripping. The same techniques for preparing windows (as explained in Part 8.1, “Windows”) apply to all doors including any needed repairs or adjustments, surface preparation and cleaning for the weatherstripping. Technical specifications such as glazing and rating information covered in Part 8.1, Windows apply to doors as well.
8.2.1 Weatherstripping the doors
Weatherstrip the top and sides of the door frame as illustrated in Figure 8-11, image A and Figure 8-11, image B. The easiest and most effective weatherstripping for a door frame is a good quality V-shaped vinyl type (see Figure 8-11, image B), which makes contact with the edge of the door and provides a good seal even when the door warps from season to season.
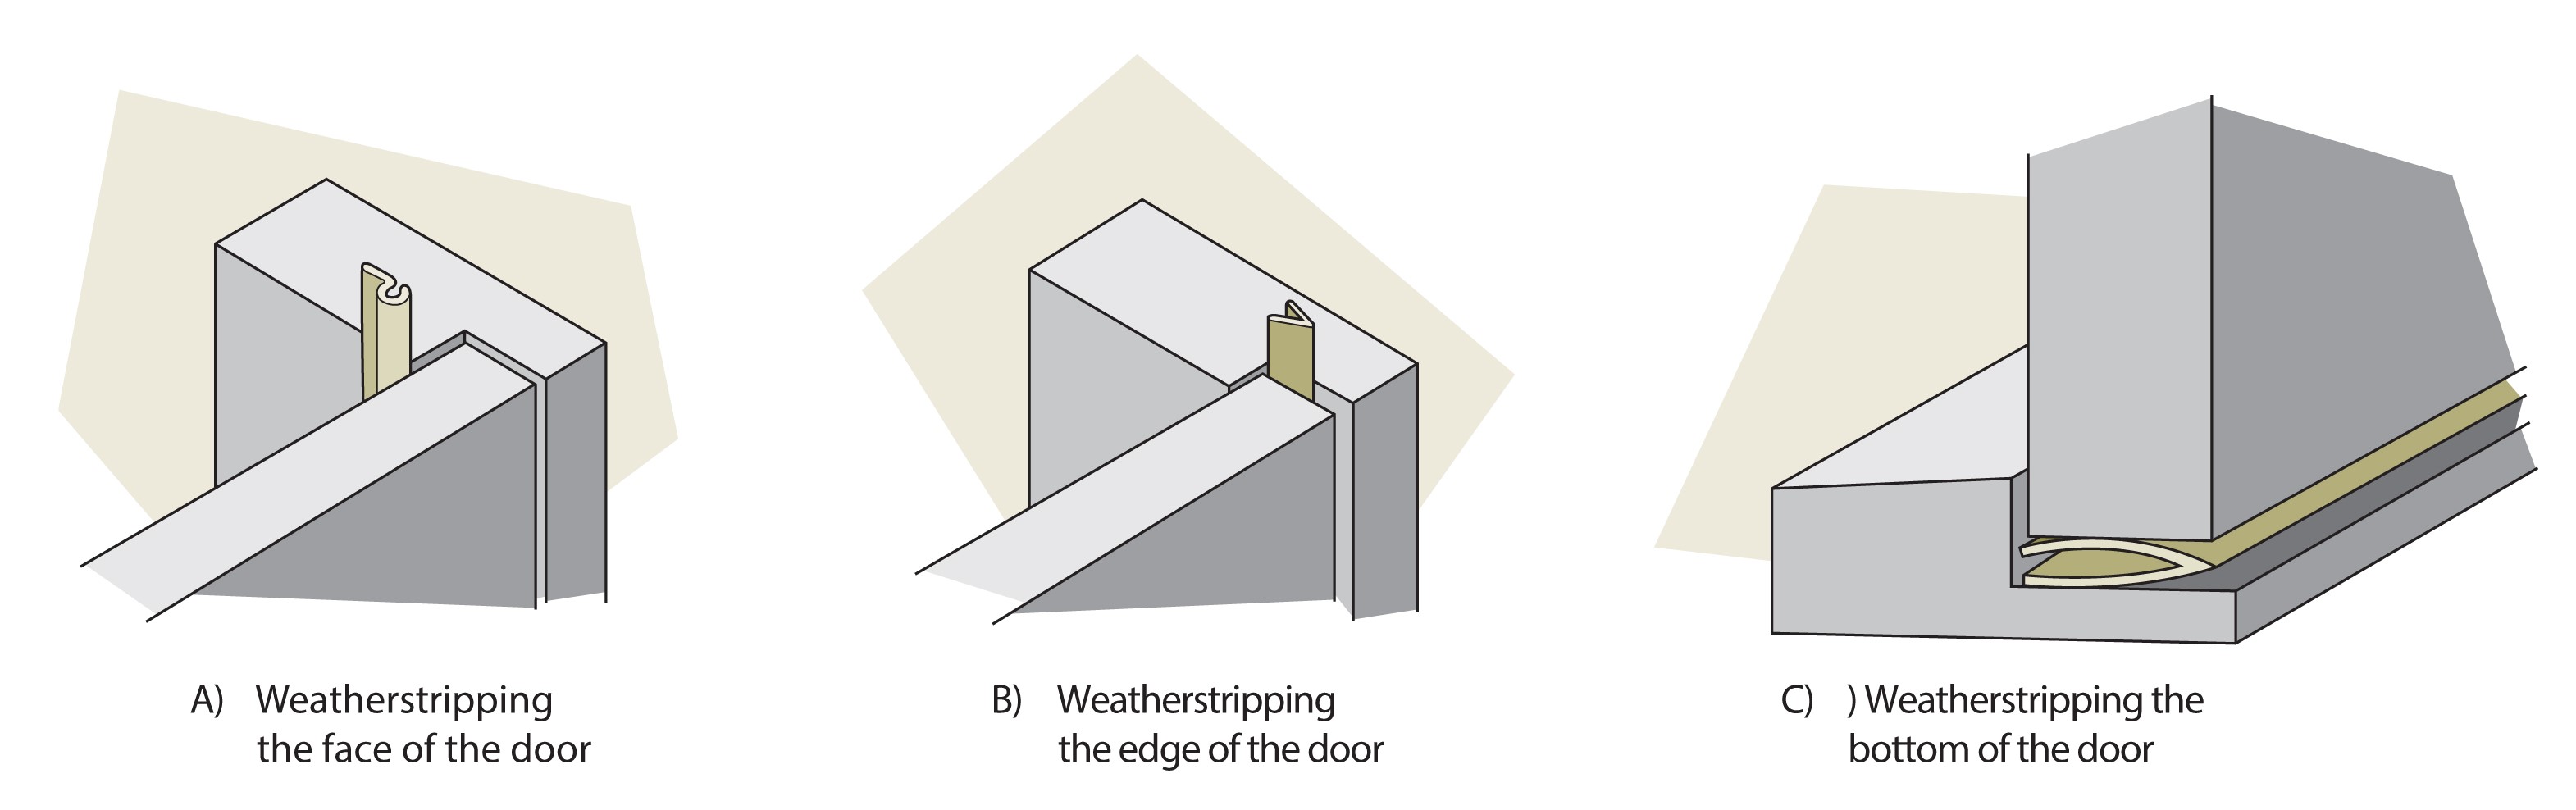
Figure 8-11 Methods of weatherstripping a door
Text version
Three cutaways of a door inside its frame showing different methods of weatherstripping to create a seal. A) The first shows weatherstripping applied to the interior face of the door where it meets the frame. B) The second shows V-type weatherstripping applied where the edge of the door meets the frame and C) The third shows weatherstripping along the bottom of the door where it contacts the threshold.
For increased protection, attach weatherstripping to the stop so that it presses against the face of the door as shown in Figure 8-11, image A. There are also many types of combination metal and foam or rubber weatherstripping that are screwed to the stop. They should be adjusted regularly to conform to the changing warp of the door.
Apply weatherstripping to either the door sill (see the threshold in Figure 8-11, image C) or to the door itself. Although this can be a difficult area to seal well, it is worthwhile doing because this is often a source of major drafts. Use durable material that can withstand traffic and is flexible enough to conform to changes in the door caused by fluctuations in humidity and temperature. The weatherstripping should also be easy to replace. A good seal can usually be obtained with gasketed door-bottom weatherstripping that attaches to the door, or with full or partial threshold weatherstripping that is attached to the door sill.
When the weatherstripping is applied to the door itself, a very durable material is necessary. The most effective choice is the combination type, which is simply tacked or screwed along the bottom inside surface of the door. There should be slots that allow for some adjustment of the weatherstripping.
There is a wide variety of door weatherstripping on the market, including kits that include weatherstripping and threshold or door bottom seals. Some products come with replacement seals. Look for high-quality, durable products.
For sliding patio doors, replace weatherstripping and hardware when worn. Replace poor condition sliding patio doors with ENERGY STAR® certified units. In the interim, older patio sliding doors not used in winter can be sealed with removable sealant or covered with heat-shrink film.
8.3 Contracting the work
Air sealing and repairing windows and doors can become part of the work of an air sealing contractor (see Section 3, “Materials”). If you are having only some of the windows or doors replaced, ask the contractor to check and replace defective weatherstripping on the remaining units.
When getting estimates, make sure the contractor has experience in the type of work you want done. Ask the contractor if the company offers a third-party warranty on products and services.
Have a knowledgeable professional install windows, doors, and skylights according to the manufacturer's instructions. Typically, installations of windows and doors by a professional contractor ensure that the product’s warranty will be covered.
A poorly installed product may not operate properly and could cause cold drafts even though the product itself is energy efficient. Poor installation may also allow water to leak into the home, leading to costly damages.
Here are some installation criteria:
- The installation should provide an airtight, insulated seal.
- After installation, the window or door should retain its original shape and should be level and square. Windows may be installed at an angle (for example on a sloped ceiling) only if they are designed for that position.
- The window or door should not support any load other than its own weight (unless specifically designed to do so).
- Any exterior finishing, such as flashing, should prevent water penetration by directing water away from windows, skylights and doors and their frames. Appropriate sealing tapes and caulking should only be used as recommended by the manufacturer.
- Any skylight or tunnel should be well sealed from the interior and the exterior and well insulated.
When replacing existing windows or doors, there are two types of installation: insert and complete tear out.
An insert retrofit involves installing a new window or door into the frame of the existing window or door that is being replaced. However, an insert should be done only if the existing frame has not deteriorated and is properly sealed and insulated. An insert is usually less expensive and minimizes the disturbance to the surrounding wall and trim. Skylights are typically not retrofitted with inserts.
A complete tear out involves removing the old window, door or skylight, including the frame. A tear out allows the installer to make an airtight insulated seal between the product and the rough opening. The original door opening, or window glass area is usually retained or enlarged. For certified window installations refer to the Window Wise program.
Helpful information on energy-efficient windows, doors and skylights can be found on the Government of Canada website.
Page details
- Date modified: