Keeping The Heat In - Section 2: How your house works
Understanding how your house works before starting a retrofit will help ensure that the job meets your expectations and that you will not be causing new issues while resolving old ones. This section explains how building science principles can help you control the flow of heat, air and moisture / humidity, and why you must consider these factors together. From your bedroom to your basement, the heating and cooling system plays an important part of improving the comfort of your home, reducing your energy bills and helping reduce harmful greenhouse gases (GHGs).
2.1 The basics of house performance
We expect our homes to be sturdy and durable, provide shelter, and keep us warm and comfortable. Some factors working together to meet these needs include the building envelope, the mechanical system and us, the occupants. This section is mainly about improving the performance of the building envelope.
2.1.1 The building envelope
The building envelope is the shell of the house, comprising the basement or crawl space walls and floor (i.e. the foundation), the above-grade walls, the roof, and the windows and doors. The envelope separates our indoor environment from the weather outside. To maintain our indoor environment, the envelope must control the flow of heat, air and moisture from the inside to the outdoors.
2.1.2 The envelope and heat flow
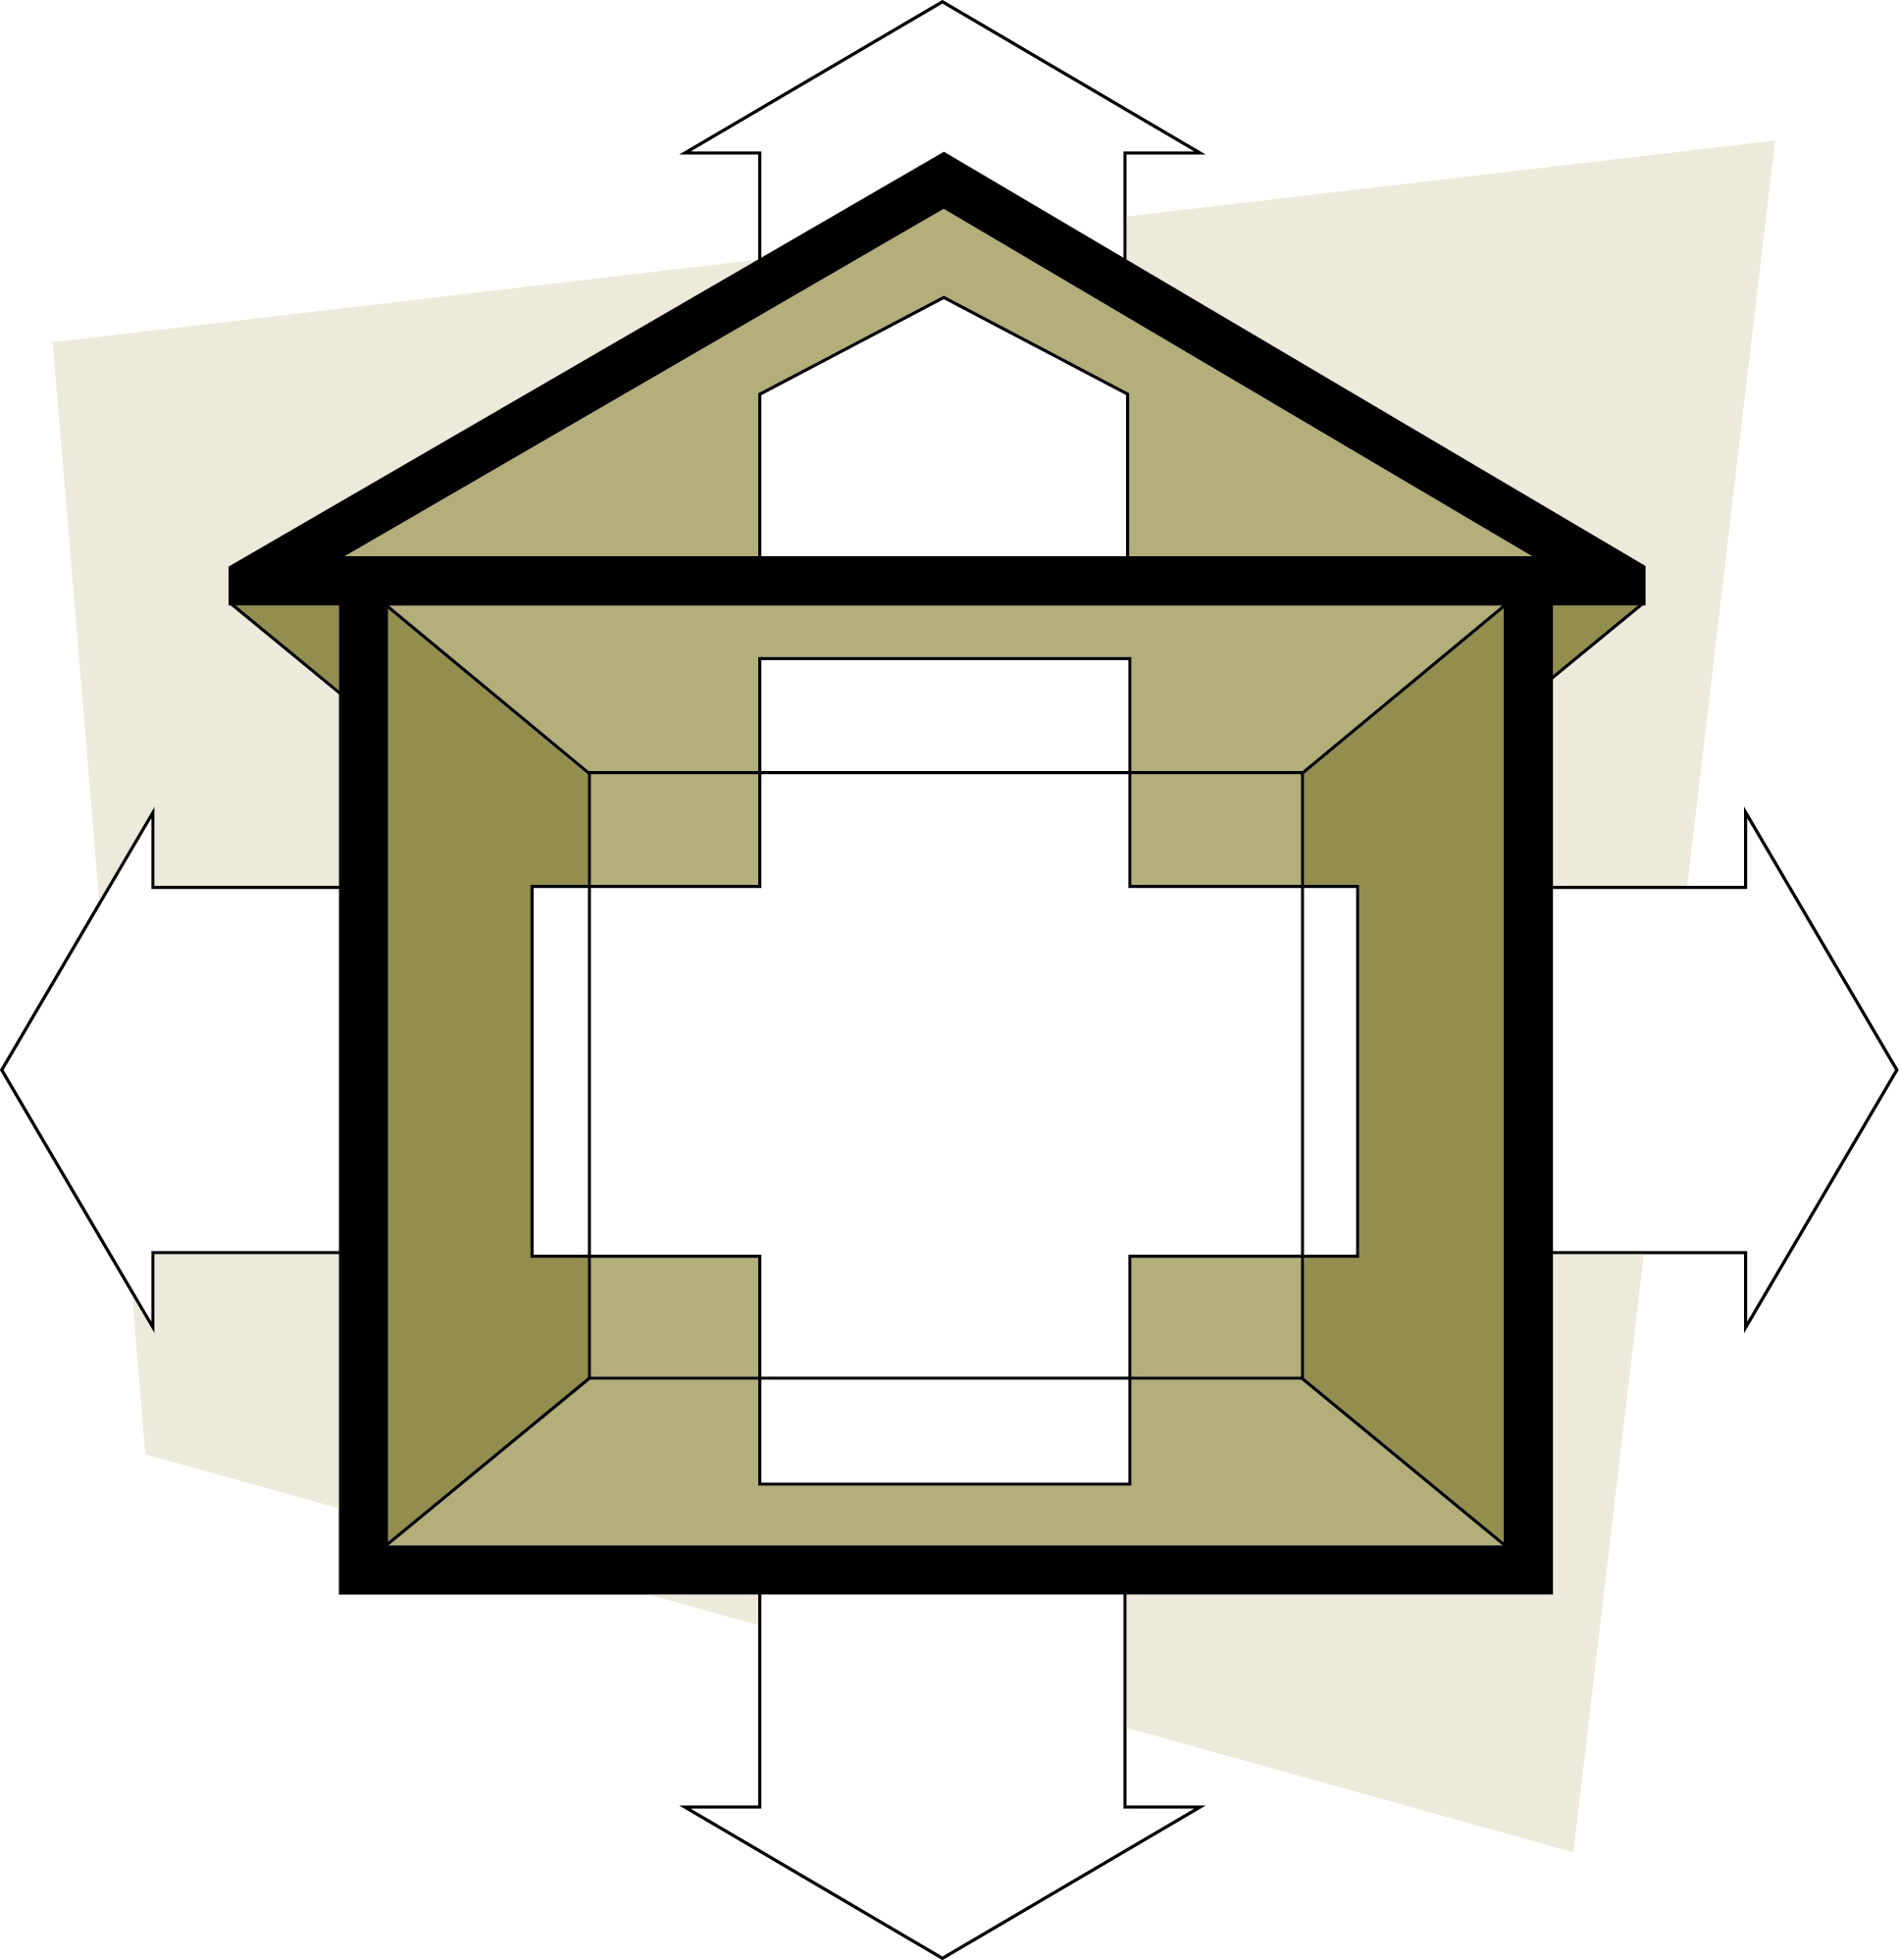
Heat will move wherever there is a difference in temperature. Many people believe that because hot air rises, most heat loss will be through the ceiling. This is not necessarily so. As shown in Figure 2-1, heat moves in any direction – up, down or sideways – as long as it is moving from a warm spot to a colder one.
2.1.3 How does heat flow?
Heat flows in three distinct ways as illustrated in Figure 2-2. In a wall, for example, heat can move in one, two or three ways at the same time.

Figure 2-2 Heat can move by conduction, convection and radiation
Text version
Illustration of a hand near a hot frying pan on a stove showing conduction, a cutaway of an exterior wall with arrows moving in a circular motion within the wall cavity showing convection, and an illustration of a hand near a hot light bulb showing radiation.
- Conduction: Heat can be transferred directly from one part of an object to another part by particles within the object interacting with each other. For example, heat from a cast iron frying pan is transferred to the handle and eventually to your hand. Some materials conduct heat better than others, depending on their structure. Insulation works by reducing heat flow with tiny pockets of air, which are relatively poor conductors of heat.
- Convection: The movement of fluid such as air or water can transfer heat. In an uninsulated wall space, for instance, air picks up heat from the warm side of the wall and then circulates to the cold wall, where it loses the heat. The mixing of warm and cold air also transfers some heat. Cold convection currents are often misinterpreted as air leaks around windows.
- Radiation: Any object will radiate heat in the same way as the sun or a fire does. Think of thermal radiation as light. Like light, thermal radiation travels in straight lines from its source, and can reflect off certain surfaces. When standing in front of a cold window, you radiate heat to the window and so you feel cold, even though the room temperature may be high.
In most houses, radiation accounts for less than 10 percent of heat loss and most of that loss will be associated with windows. Conduction and convection are the main causes of heat loss; convection is the main culprit when the house is leaky.
2.1.4 The envelope and airflow
Uncontrolled airflow (i.e. leakage) through the envelope can be the major source of heat loss and can lead to other problems. Since warm air can carry large amounts of water vapour, airflow is also the main means by which moisture is carried into the envelope.
Under winter conditions, inside air is forced out through the building envelope, carrying heat and moisture, while incoming replacement air brings drafts and dry winter air. For air to move from one side of the building envelope to the other, there must be holes in the envelope and a difference in air pressure between the inside and outside. The difference in air pressure can result from any combination of wind, a temperature difference creating a stack effect in the home, and combustion appliances or exhaust fans. The causes of airflow through the building envelope are demonstrated in Figure 2-3.
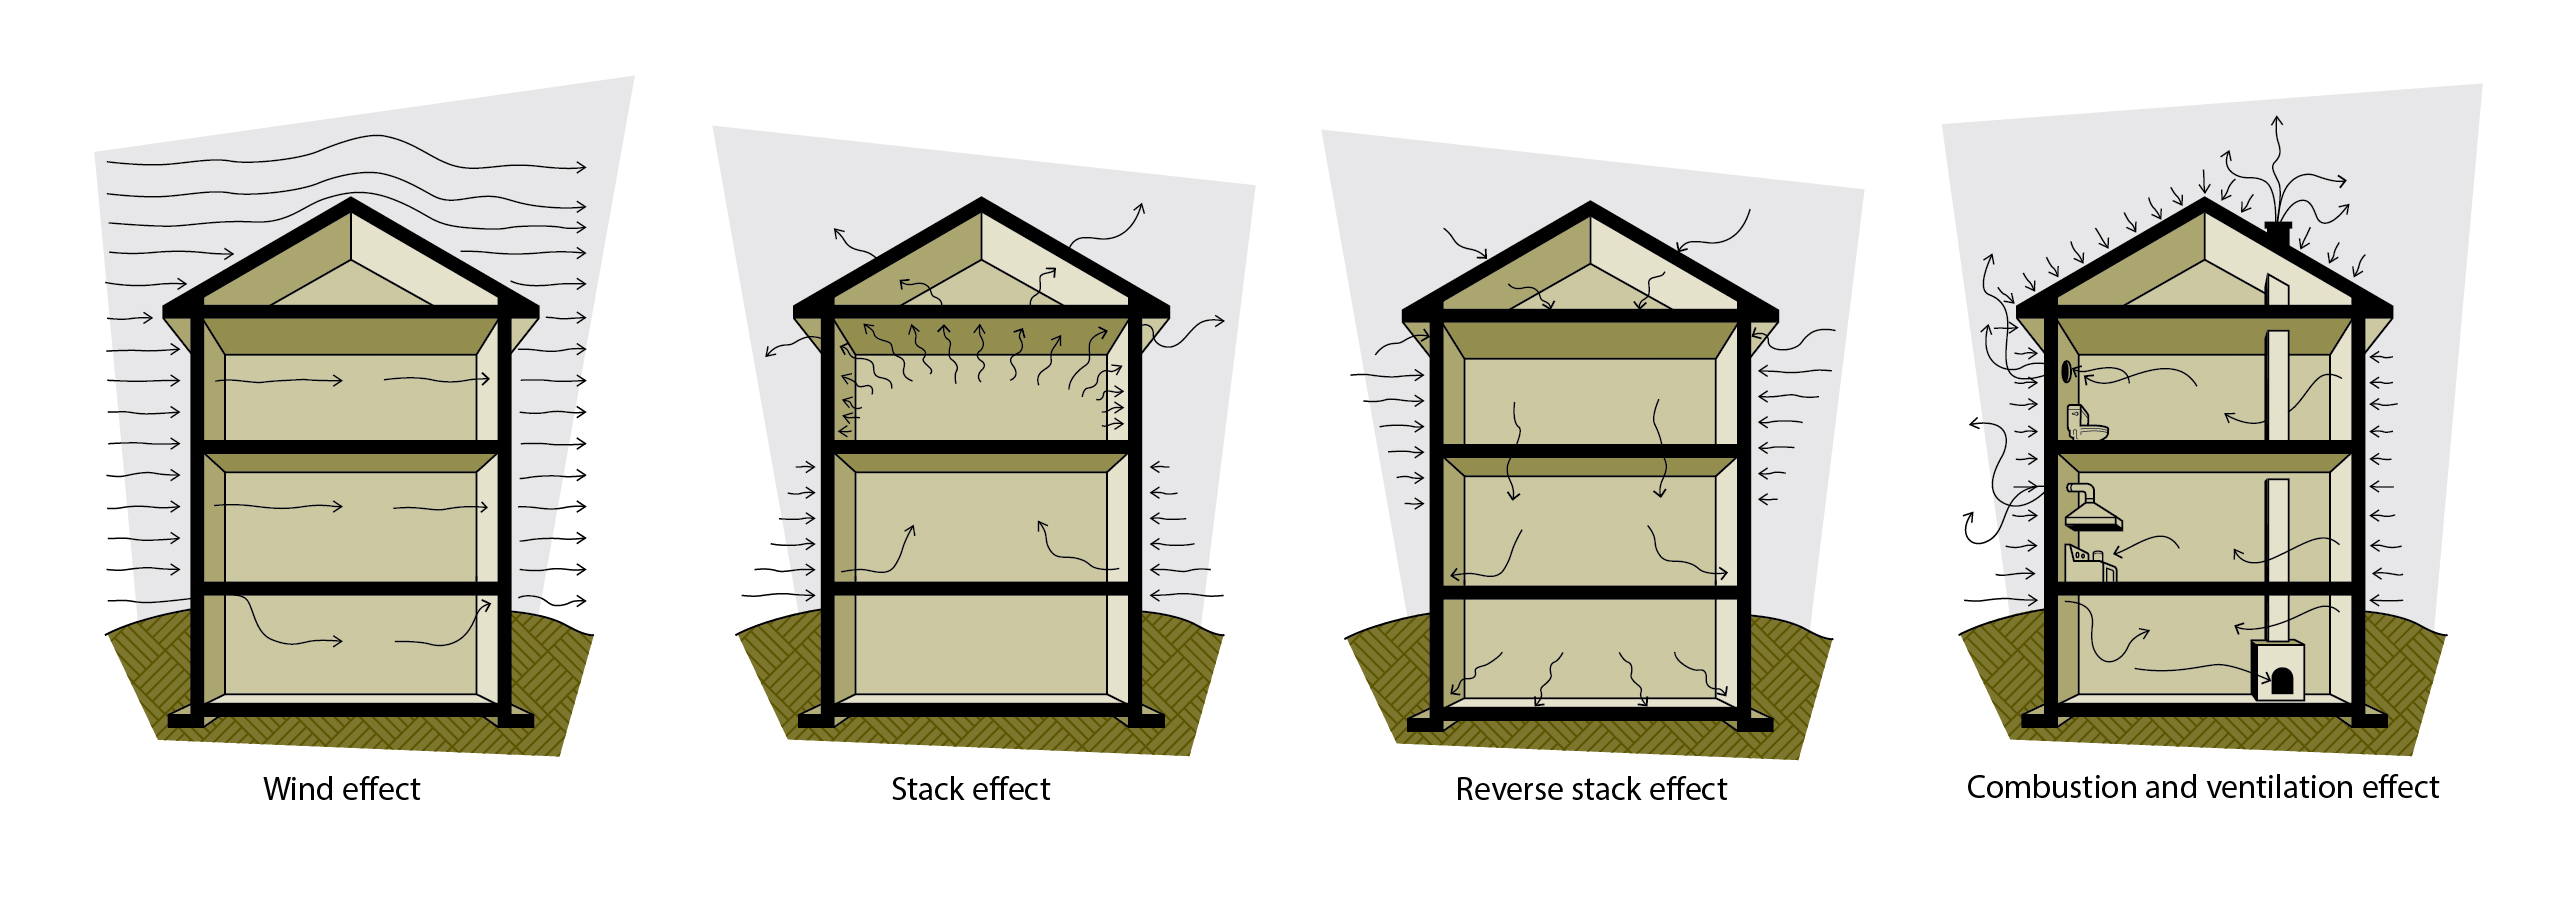
Figure 2-3 Causes of airflow through the building envelope
Text version
Wind effect is represented by a cutaway of a house with arrows showing wind passing over the house and some wind travelling through the house. Stack effect is represented by a cutaway of a house with arrows showing wind entering the first floor and then moving up and out through the attic and roof. Combustion and ventilation effect is represented by a cutaway of a house with a number of arrows entering from the exterior from all directions and leaving through the chimney and kitchen and bathroom ventilation.
- Wind effect: When wind blows against the house, it creates a high-pressure area on the windward side and forces air into the house. There is a low-pressure area on the downwind side (and sometimes other sides) where inside air is forced out.
- Stack effect: In a heated home, less dense warm air rises and expands, creating a higher-pressure area near the top of the house. Air escapes through holes in the ceiling and cracks in the walls and around upper-storey windows. The force of the rising air creates lower pressure near the bottom of the house, which draws outside air in through cracks and openings (e.g. basement windows and rim joist space). Stack effect increases as a result of higher leakage rates, higher building heights and larger differences between the indoor and outdoor temperatures.
- Reverse stack effect: During the cooling months, the opposite of stack effect occurs in the home. This is caused by denser cool indoor air creating a high-pressure area near the bottom of the home, pushing air out. As this cooled air leaks out at the lower level, warm unconditioned air replaces it by entering any openings at the upper levels, and flows downwards through the house. Reverse stack effect typically has less impact than stack effect due to the smaller temperature difference between the outdoor and indoor air temperatures during the cooling months. Due to reverse stack effect, when air conditioning your home it is counterproductive to open upper level windows.
- Combustion and ventilation effect: Fuel-burning appliances, such as those that use wood, oil, natural gas or propane, need air to support combustion and provide the draft in the chimney. Open chimneys and fireplaces exhaust a lot of air, reducing pressure within the house. Because this air must be replaced, outside air is drawn in through leaks in the envelope. See Part 9.4, Ventilation and combustion air.
2.1.5 The envelope and moisture
Water, in all of its states, is the major cause of damage to a building and affects its durability. Moisture can cause concrete to crumble, wood to rot and paint to peel; it can also damage plaster, ruin carpets and encourage mould growth. Moisture can appear as a solid (ice), a liquid (water) or a gas (water vapour). It can originate from the outside of a building as surface runoff, ground water, ice, snow, rain or fog. It can also originate from the inside as water vapour produced by the occupants and their activities like washing, cleaning and cooking, and direct sources like houseplants, aquariums and humidifiers. Moisture can also come from plumbing leaks, open sumps and damp or leaky foundations.
In its different forms, moisture can move through the envelope in a number of ways:
- Gravity: Water running down a roof or condensation running down a windowpane shows how gravity causes water to move downward.
- Capillary action: Water can move in any direction including sideways or upward by capillary action. Capillary action depends on the presence of very narrow spaces, as with lapped siding or porous materials such as concrete or soil. Think of how a paper towel wicks water.
- Diffusion: Water vapour can move directly through materials by diffusion. Diffusion depends on a difference in water vapour pressure and the material’s resistance to this pressure (e.g. some paints help reduce diffusion through drywall).
- Air movement: Moisture in the form of water vapour is carried by moving air, for example, where there is an opening in the house envelope.
Far more moisture can be carried by airflow through a small hole in the envelope than by diffusion through a much larger area in the building materials, as illustrated in Figure 2-4.
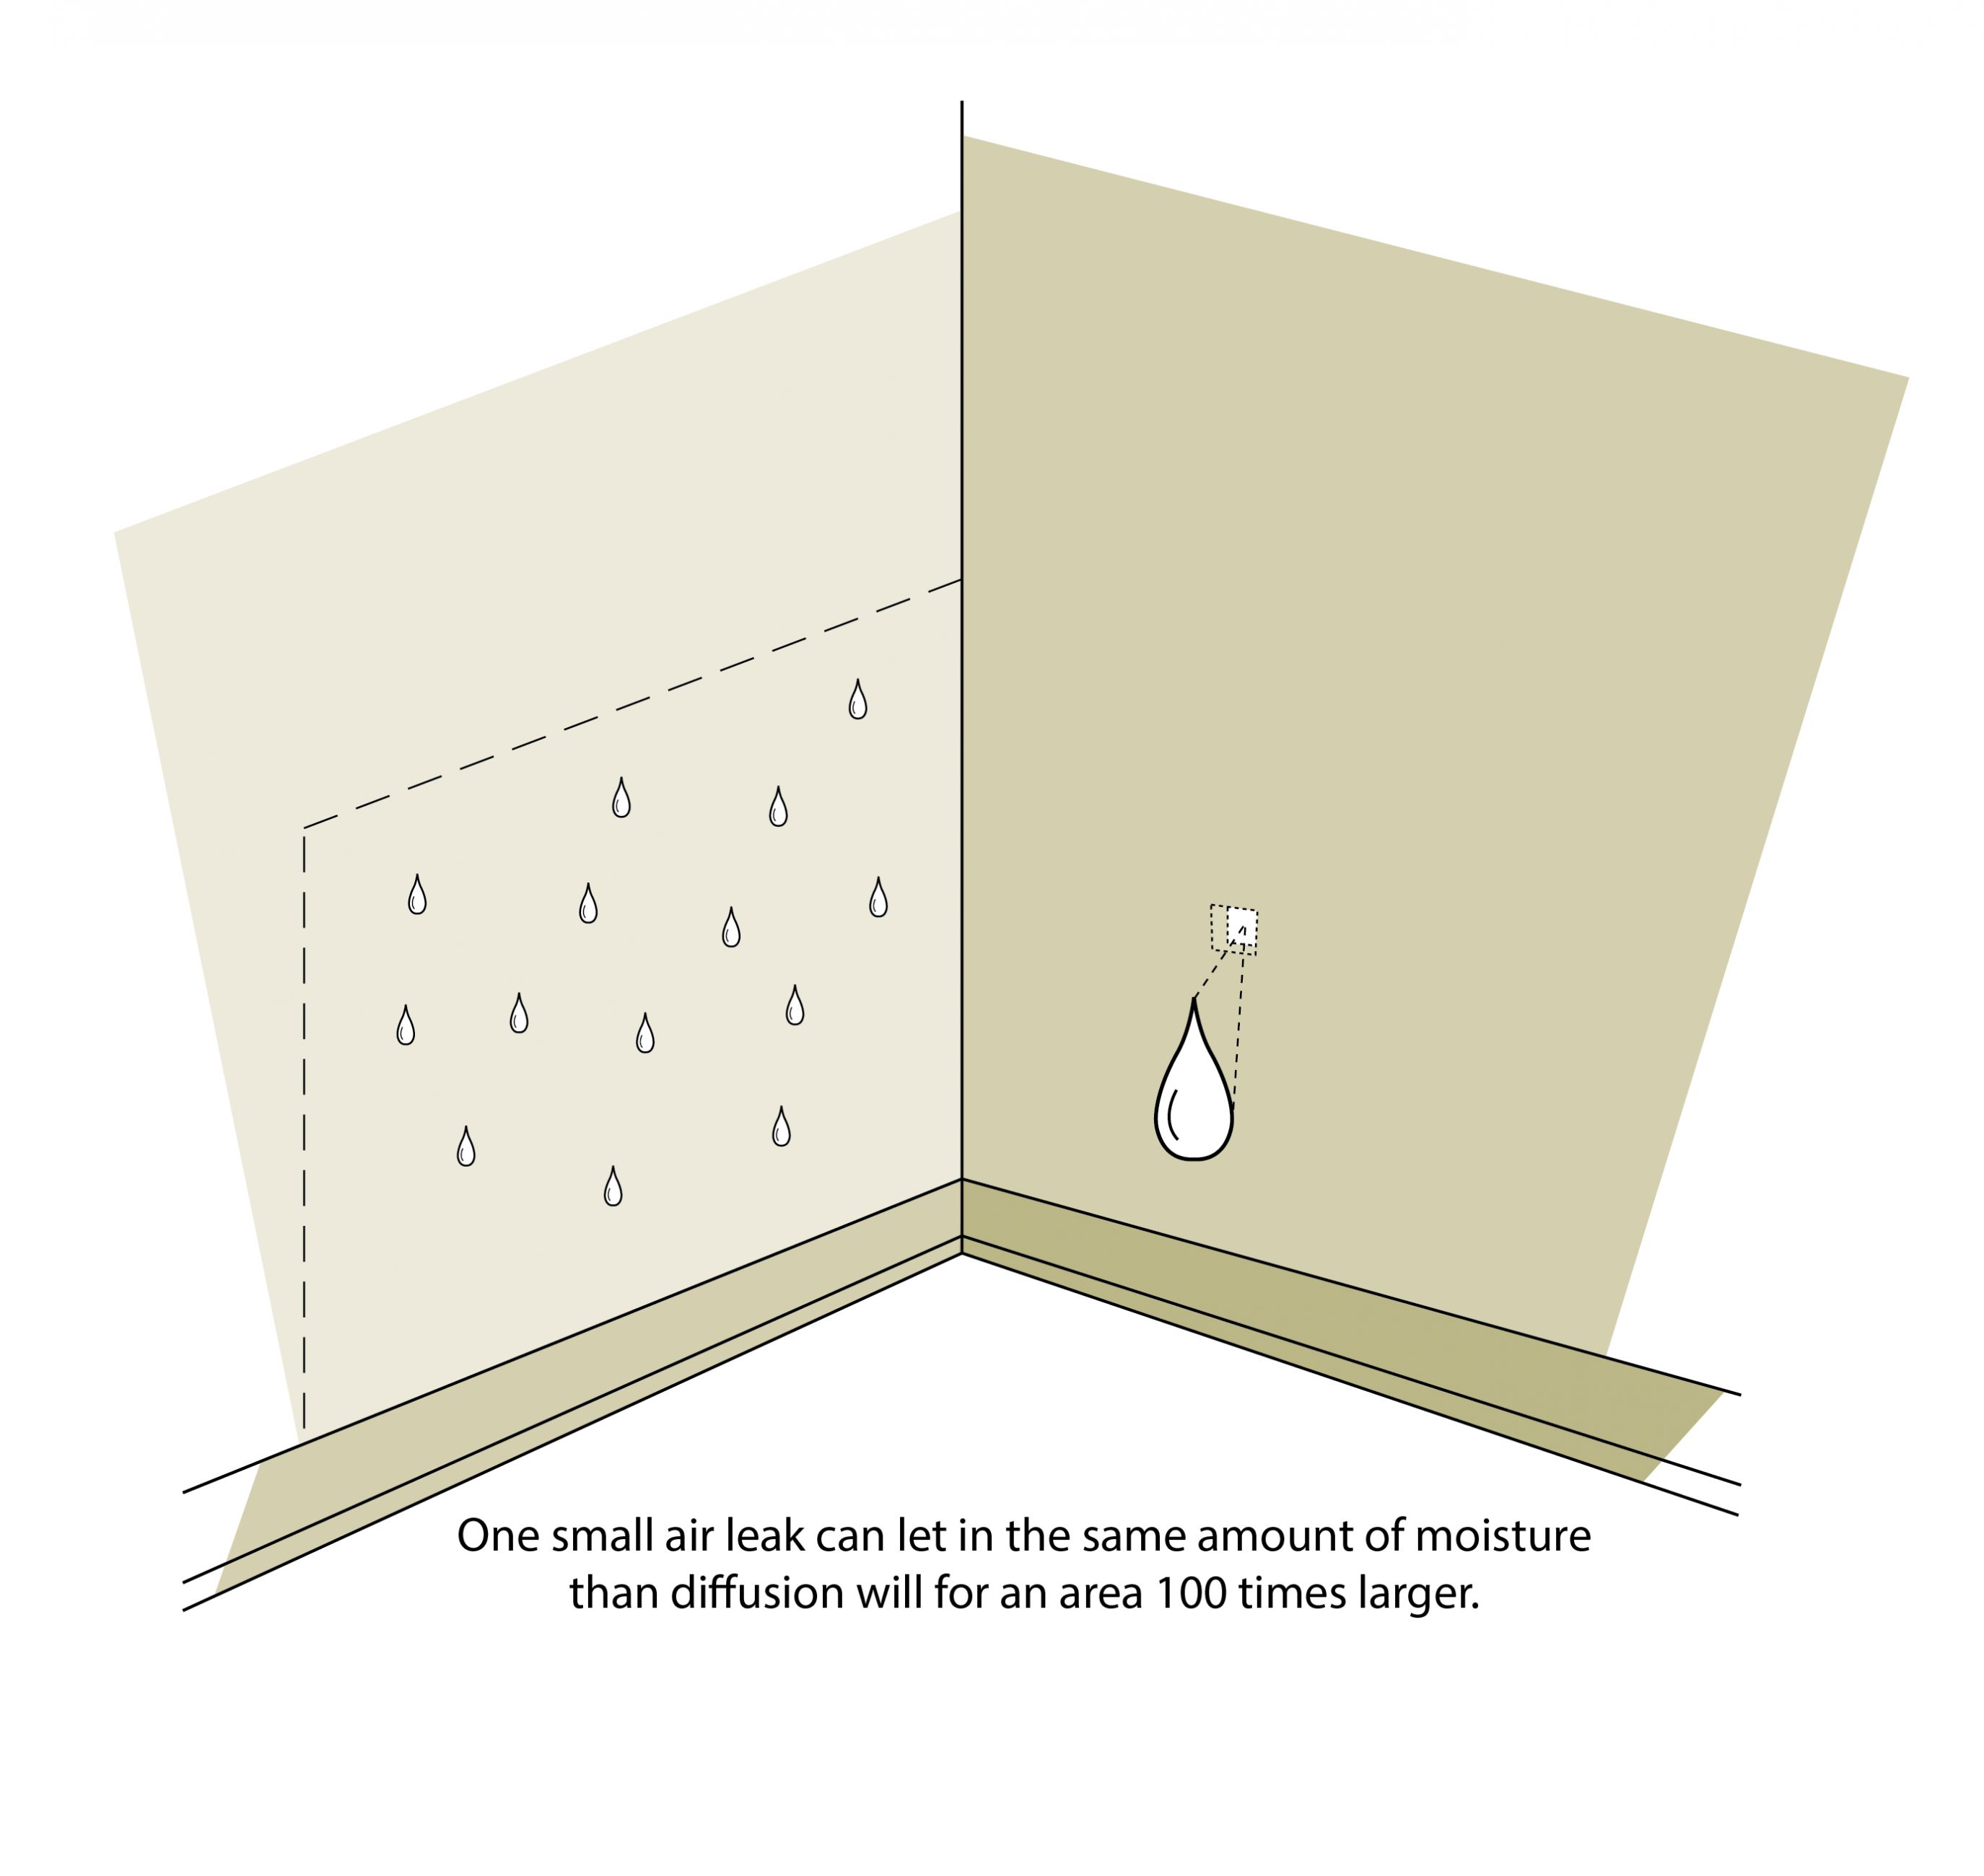
Figure 2-4 Moisture entry from holes in the building envelope
Text version
Illustration of a wall corner with several small drops on one wall and a large water drop coming out of a hole on the other. – One small air leak can let in 100 times more moisture than diffusion will for the same area.
2.1.6 Condensation
Water vapour becomes a problem when it condenses into liquid water. This happens at the point of 100 percent relative humidity (known as the dew point), which is when the air cannot hold any more water vapour. Warm air can contain far more water vapour than cold air.
Condensation on windows is a typical example. When air contacts a cold window, the air loses heat. The air can then no longer hold all the water vapour and some condenses out onto the surface of the window. If the window is extremely cold, the condensation will appear as frost. Condensation is more likely to occur in humid areas such as the kitchen, bathroom and some basements and crawl spaces.
2.1.7 House as a system
A house operates as a system. All the elements of a house, the environment, envelope, mechanical systems and occupant activities affect each other, and the result affects the performance of the house as a whole. The secret to avoiding problems is in understanding these relationships.
For example, reducing air leakage provides more comfort to the occupants and protects the envelope from moisture damage, but it also increases humidity levels inside the house since less water vapour can escape. This can mean an increase of condensation on windows. If a house is tightened to this degree, it will now need more ventilation. The lesson here is that a change to one component of the house can have an immediate effect on another component. Many small changes over time can also affect the balance of the system.
Before beginning any retrofit work, it is a good idea to review what is involved and to understand which other aspects of the house may be affected. For major retrofit projects, you may have to anticipate the need for changes to the heating system or house ventilation and include these changes in the work plan. When undertaking smaller projects that are spread out over time, monitor your house carefully after each project to assess the impact of the changes.
For example, watch for signs of higher relative humidity, such as condensation on windows, stale air and lingering odours. At some point, you will probably have to make adjustments to the heating system and house ventilation to keep the system working properly and efficiently.
2.2 Control of heat flow
Insulation wraps the house in a layer of material that slows the rate of heat loss to the outdoors. Still air does not conduct heat well and is a relatively good insulator. In large empty spaces such as wall cavities, heat can be lost across the air space by convection and radiation. Insulation divides the air space into many small pockets of still air, inhibiting heat transfer by convection. At the same time, the insulation material reduces radiation across the space.
2.2.1 How is insulation rated?
To rate insulation, its resistance to heat flow is measured, and products are labelled with both an RSI value (Résistance Système International) and an R-value. The R-value is the imperial measurement, and the RSI value is the metric measurement of thermal resistance.
Use the following equation to convert an R-value (imperial) to RSI (metric).
Conversion of an R-value to RSI
R-value/5.678 = RSI
Example: 20/5.678 = RSI 3.52
The higher the resistance value, the slower the rate of heat transfer through the insulating material. One brand of insulation may be thicker or thinner than another, but if they both have the same RSI value, they will control heat flow equally well. Section 3, “Materials,” describes insulation materials and their RSI values.
Follow these common guidelines where you install insulation:
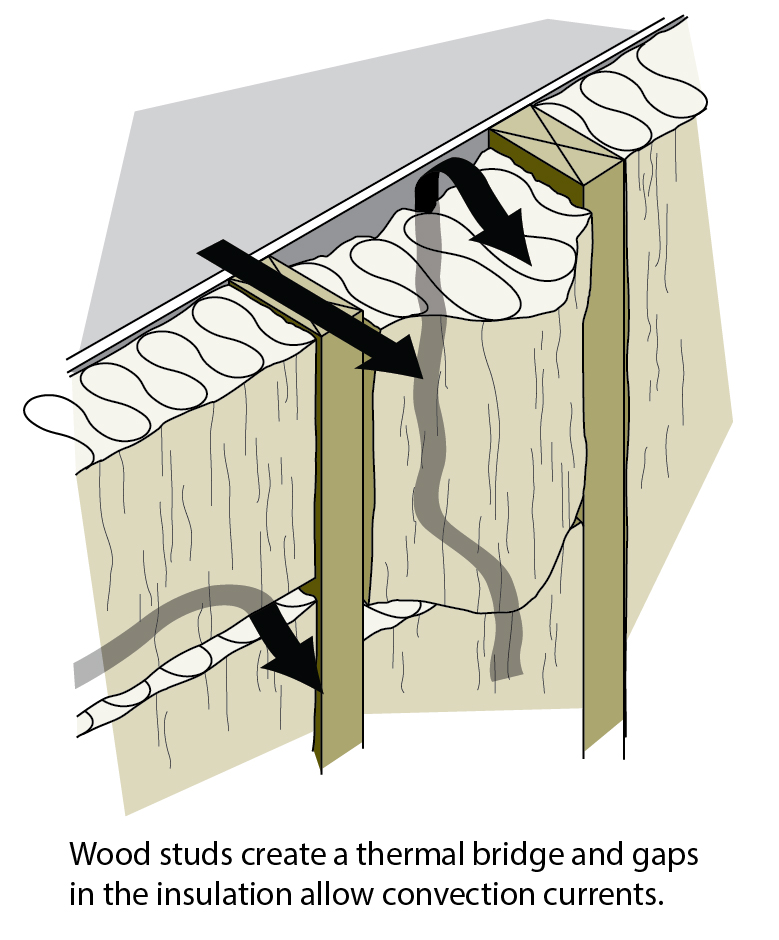
- Ensure that the insulation fills the space completely and evenly. Blank spots or corners allow convection currents to occur, sometimes letting heat bypass the insulation completely.
- Minimize thermal bridging. A thermal bridge is any solid material that connects the warm side of the envelope to the cold side (e.g. a stud in wall). Figure 2-5 illustrates this phenomenon. When insulation such as foam board is installed on one side of the thermal bridge, it acts like a roadblock, reducing heat flow.
- Loose-fill insulation must be installed by your contractor at the proper thickness and blown in at the proper density. This is especially important for wall and cathedral or flat roof applications.
2.2.2 Nominal RSI values and effective RSI values
The nominal RSI is the insulating value for the insulation itself (e.g. RSI 3.52 batt [R-20] as purchased). The effective insulation value accounts for all the other building components and what portion of the structure they represent.
For example, wall studs and top and bottom plates will reduce the effective insulation value of an insulated wall; while sheathing, drywall and the exterior finish can increase a wall’s thermal resistance. Figure 2-6 illustrates that RSI 3.52 (R-20) batt insulation in a 2 x 6 wall yields an effective insulation value of only 2.99 (R-17).
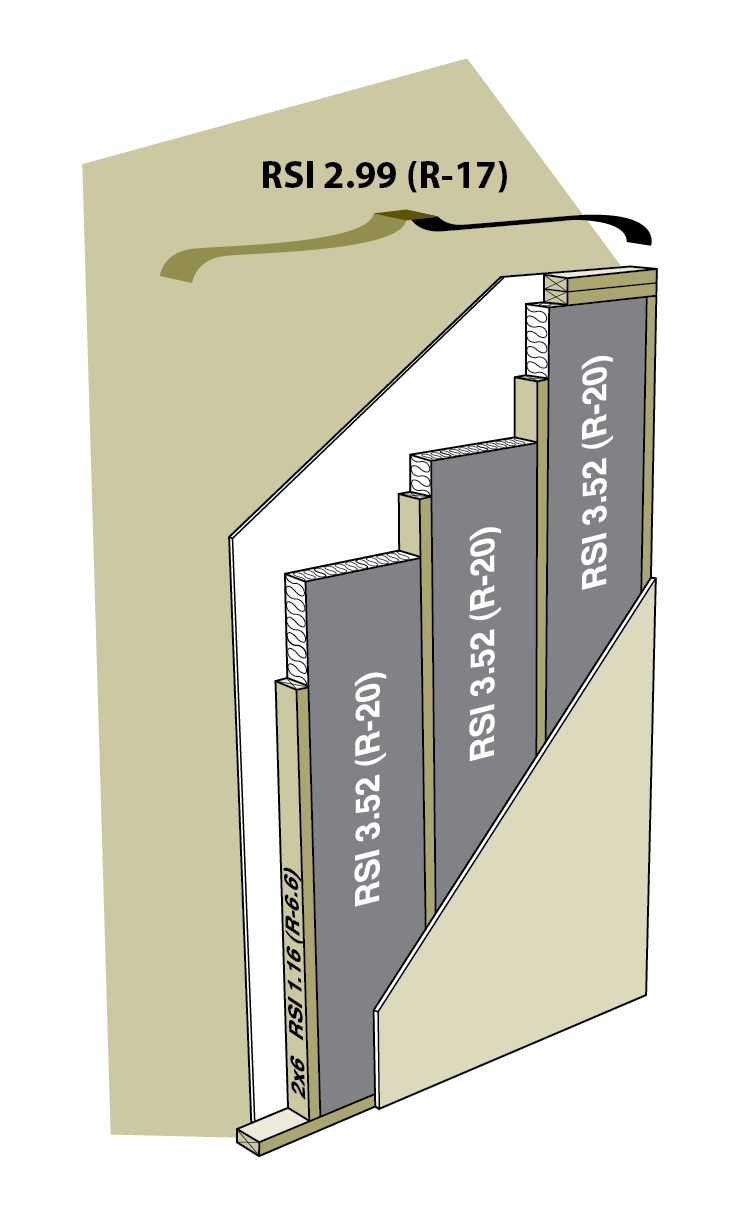
Figure 2-6 Nominal versus effective RSI (R) values
Text version
Cutaway of a wall showing four two by six wall studs with R.S.I. 1.16 or R-6.6, and three batts of insulation with R.S.I. 3.52 or R-20 between these studs, but with an effective insulation value of only R.S.I. 2.99 or R-16.98 for the whole wall unit.
How much insulation?
You must install at least the minimum levels according to local building codes, but you can exceed these values where it is practical and economical. Table 2-1 provides a guideline for how much insulation to install based on climate zones and Figure 2-7 shows a map of climate zones and their associated criteria. How the house is built will determine how much you can practically add, and how much insulation is already there will help you decide how much you can economically add. If you are doing other renovations, this may make it worthwhile to add higher insulation levels.
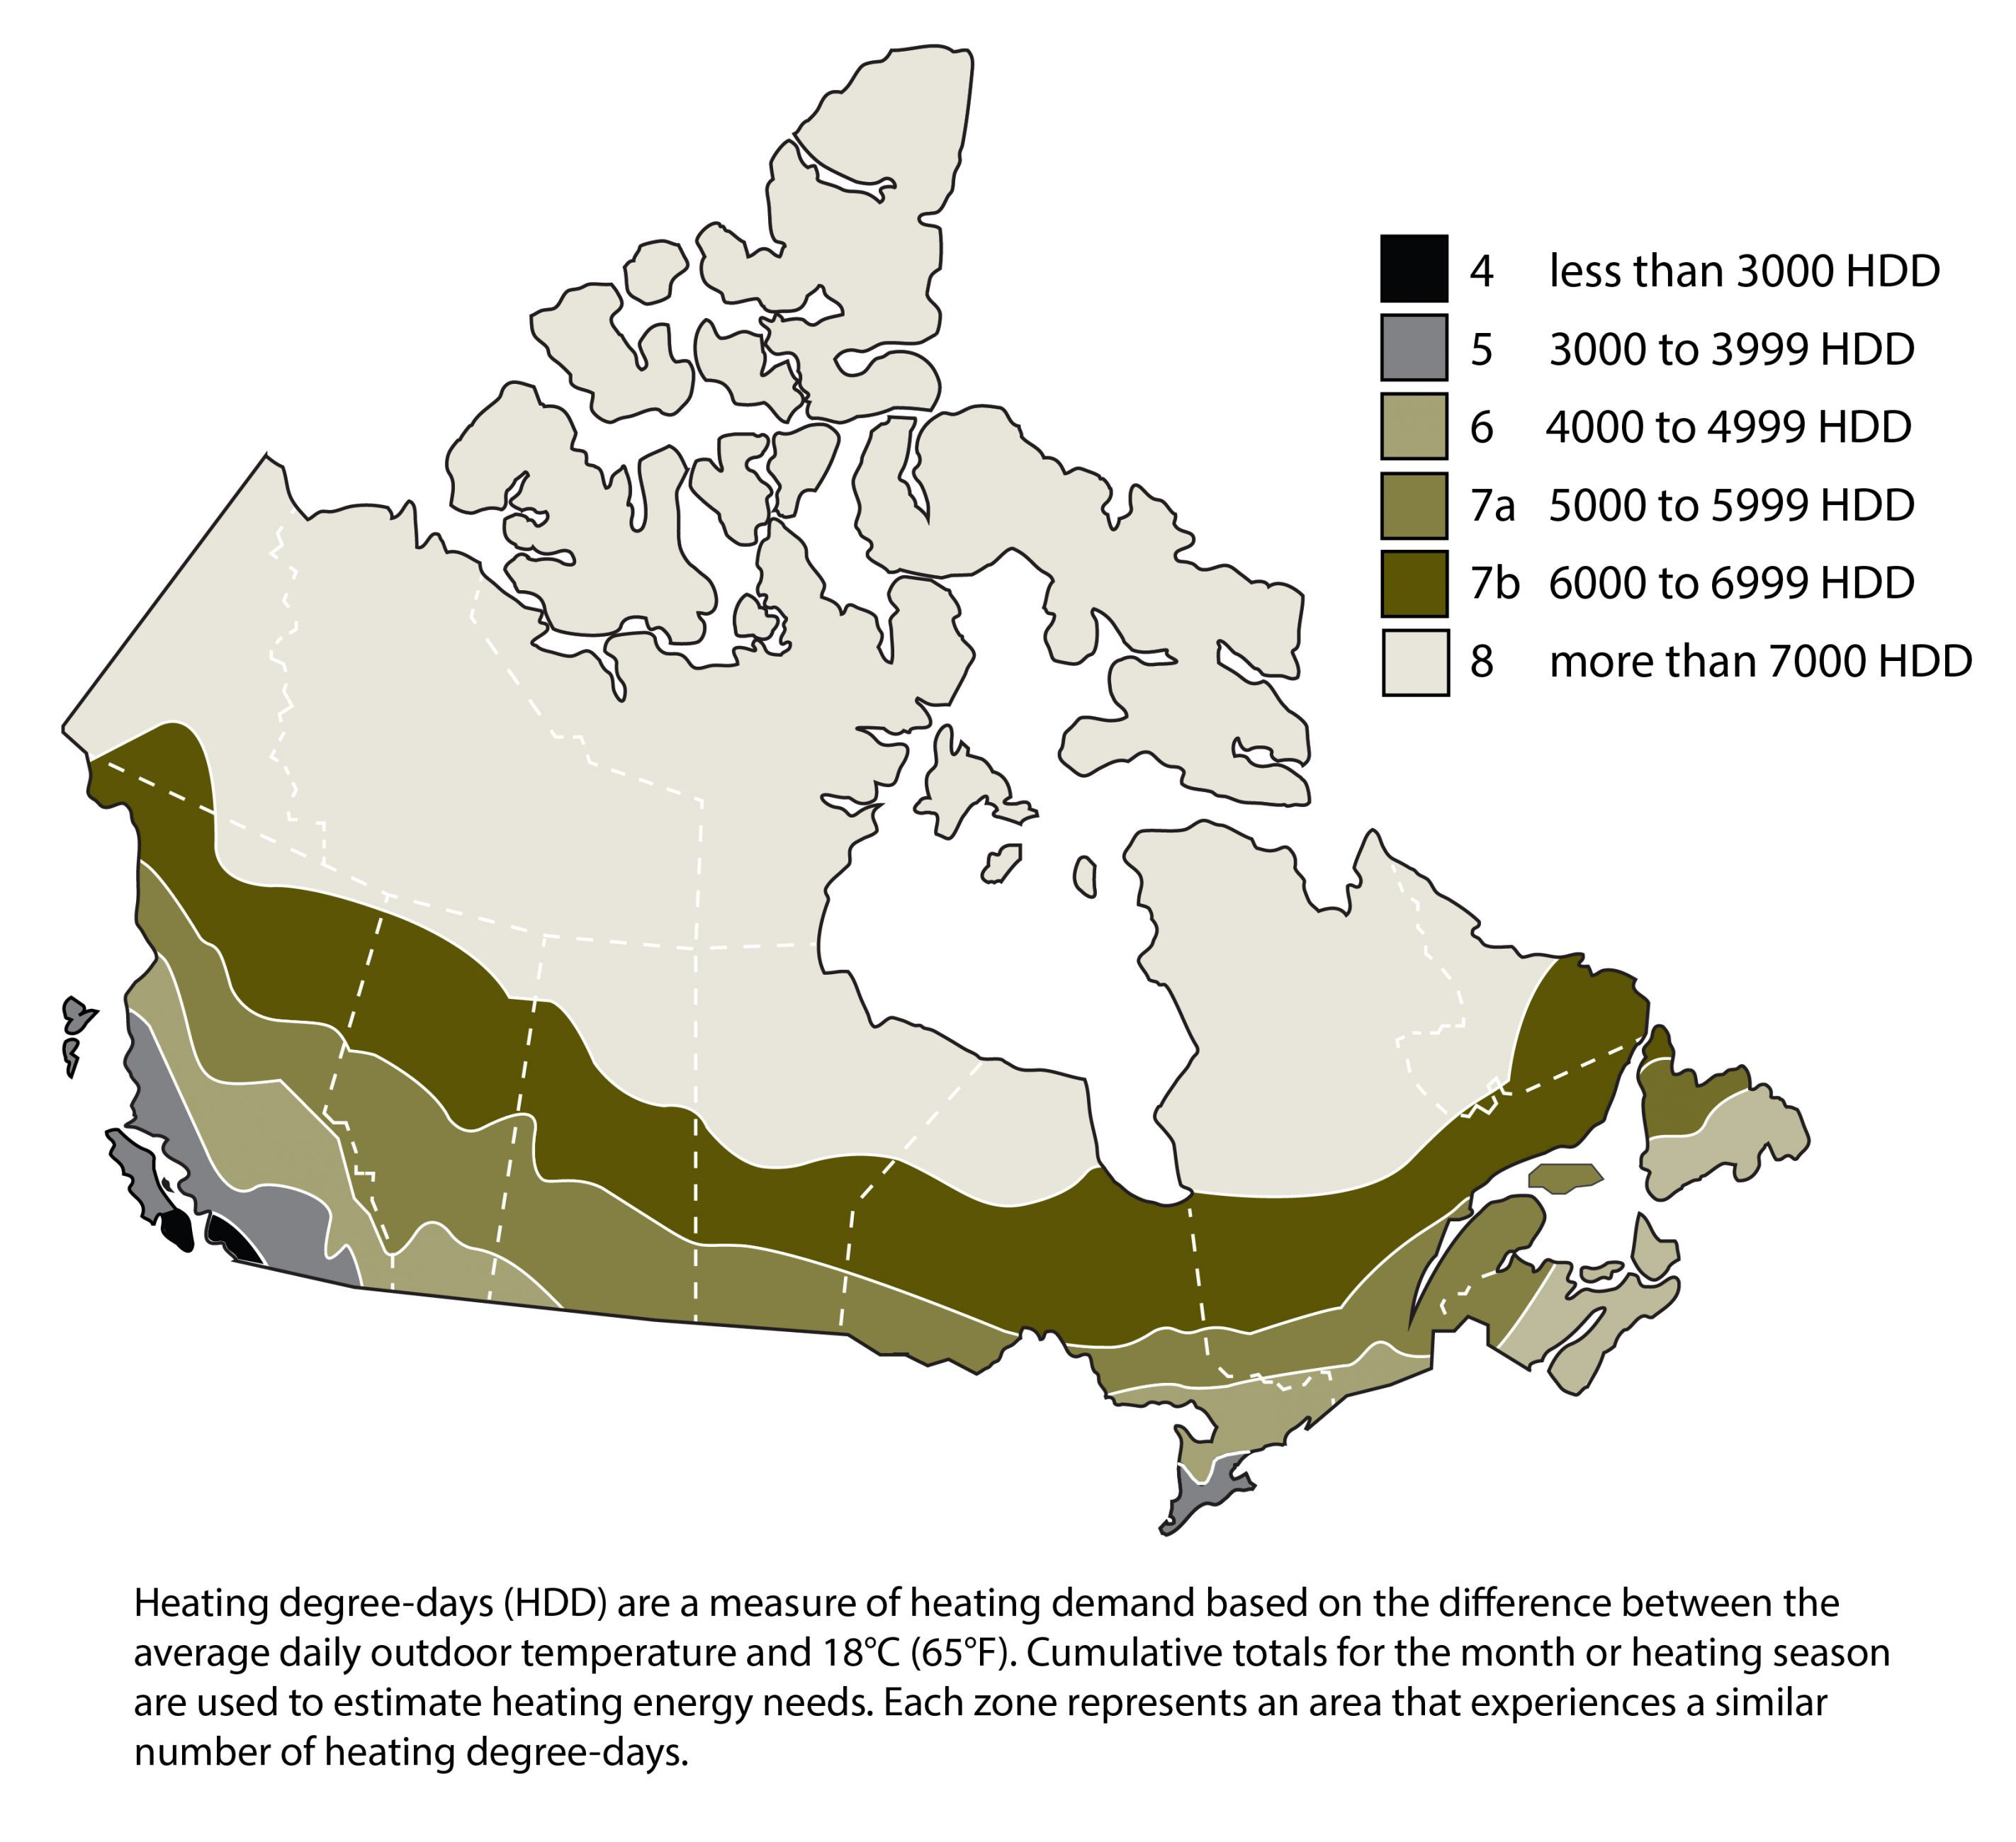
Figure 2-7 Heating degree-day zones
Text version
Heating degree-days (HDD) are a measure of heating demand based on the difference between the average daily outdoor temperature and 18°C (65°F). Cumulative totals for the month or heating season are used to estimate heating energy needs. Each zone represents an area that experiences a similar number of heating degree-days.
| House component | Metric (RSI) or imperial (R) | Nominal insulating value | |||||
|---|---|---|---|---|---|---|---|
| Zone 4 <3000 HDD |
Zone 5 3000 to 3999 HDD |
Zone 6 4000 to 4999 HDD |
Zone 7a 5000 to 5999 HDD |
Zone 7b 6000 to 6999 HDD |
Zone 8 >7000 HDD |
||
| Walls | RSI | 3.9 | 4.8 | 4.8 | 7.1 | 7.1 | 7.1 |
| R | 22.0 | 27.0 | 27.0 | 40.0 | 40.0 | 40.0 | |
| Basement Walls | RSI | 3.3 | 4.2 | 4.2 | 5.3 | 5.3 | 5.3 |
| R | 19.0 | 24.0 | 24.0 | 30.0 | 30.0 | 30.0 | |
| Roof or Ceiling | RSI | 7.9 | 9.7 | 10.6 | 14.1 | 14.1 | 14.1 |
| R | 45.0 | 55.0 | 60.0 | 80.0 | 80.0 | 80.0 | |
| Floor (over unheated spaces) | RSI | 6.2 | 7.1 | 7.1 | 8.8 | 8.8 | 8.8 |
| R | 35.0 | 40.0 | 40.0 | 50.0 | 50.0 | 50.0 | |
2.3 Control of airflow
Controlling airflow protects building materials from moisture damage, improves comfort and makes for a cleaner, healthier, safer and quieter home. Controlling airflow prevents uncontrolled air leakage through the building envelope, provides for fresh air supply and the exhaust of stale air, and provides draft and combustion air for fuel-burning appliances.
2.3.1 Air leakage control — weather barriers, air barriers and vapour barriers
Insulation must trap still air to be effective. Insulation must be protected from wind blowing through from the outside and from air escaping from the inside of the home.
Typically, the air barrier (sometimes referred to as a wind barrier or weather barrier) is under the exterior wall finish or cladding (wood or vinyl siding, brick veneer, stucco, etc.). Its primary roles are to shield the wall components from the weather (rain, wind, etc.) while also providing an escape route to the exterior for any water vapour that has penetrated the wall cavity. When rain leaks past the cladding or internal water vapour permeates through the air barrier, there should be a space or gap at the base of the wall where the moisture can escape. This space, called the drainage plane, allows moisture to drain down and away.
An air barrier blocks airflow through the building envelope. It reduces heat loss by preventing air from passing in and out through the envelope and protects the insulation and structure from moisture damage. The air barrier, when located on the exterior, may also act as part of the drainage plane. Standard building materials, such as exterior sheathing, building paper and house wrap, act as the air barrier. Figure 2-8 shows different configurations for weather, air and vapour barriers.
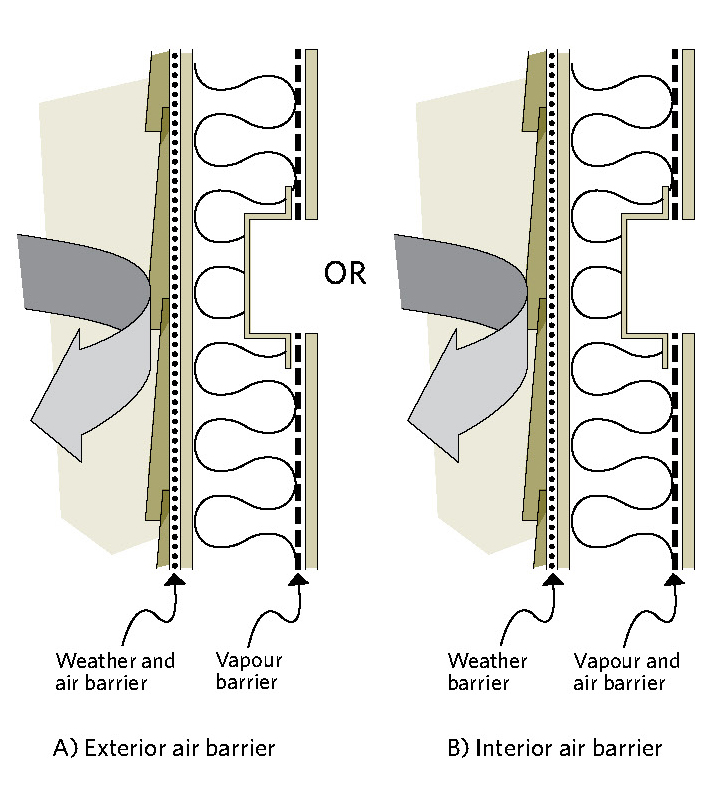
Figure 2-8 Different configurations of weather barrier, air barrier and vapour barrier
Text version
Cutaways of two walls. The first shows an exterior air barrier which acts as weather and air barrier on the exterior side, and a vapour barrier on the interior side. The second shows weather barrier on the exterior side and a combined vapour and air barrier on the interior side. An arrow representing wind is bouncing off the exterior portion of the exterior wall in both cases
The vapour barrier resists the diffusion of water vapour from the inside to the outside of the building envelope. It protects the insulation and structure from moisture damage that can be caused if water vapour moves into and condenses in the envelope assembly. In some applications, the vapour barrier also acts as the air barrier by reducing heat loss as it prevents air from passing in and out through the envelope (i.e. an air and vapour barrier).
A number of building materials resist vapour diffusion well enough to be used as a vapour barrier. These include polyethylene sheeting, smart retarders, oil-based and special vapour barrier paints, some insulation materials, exterior-grade plywood and oriented strand board (OSB).
New houses typically have an air barrier on the outside and a vapour barrier on the inside of the exterior walls. The ceiling typically has only a single air and vapour barrier, as an exterior air barrier is normally impractical due to air sealing constraints caused by the roofing and ceiling structures.
One material can work as both an air barrier and a vapour barrier, provided it meets the requirements of both types of barriers and is properly installed. Polyethylene sheets and foil-backed gypsum drywall can combine these functions. To avoid confusion of terms, when a material is doing both jobs it is called an air and vapour barrier.
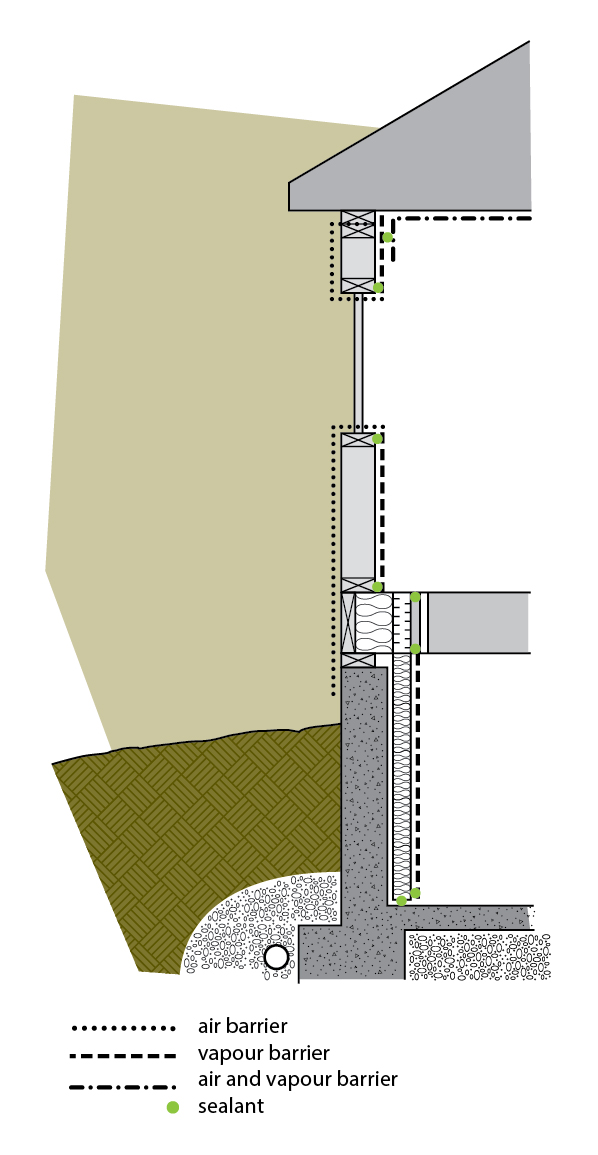
Figure 2-9 The air barrier is a system that joins several building components
Text version
Cutaways of the external walls of a one storey home with a basement: circle-dotted lines around the exterior walls and window openings represent the air barrier; dashed lines up the interior above-ground and basement walls represent the vapour barrier; and circle and dashed lines along the upper wall and ceiling represent the air and vapour barrier.
Because the house envelope is made up of many components, it is impossible for any one material to surround the house completely and form the air barrier (see Figure 2-9). The air barrier is actually a continuous system made up of many parts that are sealed to each other with caulking, tape, gaskets and weatherstripping. Typical components of the air barrier system include the following:
- polyethylene, drywall or plaster – when used for large interior surfaces such as walls and ceilings;
- windows, doors, hatches, vent dampers and any components that close an opening in the envelope;
- structural parts of the building in some cases, such as the sill plate or rim joist.
2.3.2 How tight should an air barrier system be?
The air barrier must be continuous and well sealed. But if the air barrier is too tight, how will fresh air get into the house?
First, most older houses are so loosely built that, even after extensive air-leakage control work, enough air will still come in to provide ventilation. Second, the air barrier is just the first step in the control of airflow.
The other essential steps include providing air for ventilation and air for combustion in a controlled manner. These steps may be necessary in houses where extensive retrofit work has already been done.
Read Section 9, “Operating your house,” for essential information about ensuring proper ventilation and adequate combustion air for your home.
Safety warning:
Every home that has a combustion appliance should have carbon monoxide detectors. The local building code may require it. Typically, the requirement is to have one detector located near the furnace or appliance and one detector in each bedroom area to ensure that the alarm can be heard. Be sure to follow the installation and operation instructions. Check with your building or fire department for more information.
2.4 Control of moisture flow
Control of moisture in all its forms is critical in making homes durable and comfortable. Building components and practices such as flashings, roofing and waterproofing the basement protect the home from liquid water. It is equally important to control the movement of water vapour to provide added protection for the house structure and help maintain indoor humidity at a comfortable level.
Controlling moisture involves construction techniques that keep moisture away from the structure, producing less moisture and exhausting the excess.
2.4.1 Sources of moisture in the home
Even houses that are apparently dry, with no leaks in the basement or roof, can have moisture problems. Where does all the moisture come from?
Examples of moisture sources:
- A family of four generates about 50 litres (L) (11 Imperial gallons) of water a week through normal household activities (see Table 2-2 for a breakdown of this usage).
- Where basement waterproofing is inadequate, groundwater in the soil can migrate through the foundation by capillary action and evaporate on the surface of the wall or floor.
- A small plumbing leak can produce a lot of moisture.
- During humid weather, building materials and furnishings absorb moisture from the air and then expel it during the heating season.
- New building materials added to the interior of the home can initially introduce an additional moisture source.
| Activity | Moisture produced (L) |
|---|---|
| Cooking – three meals daily | 6.3 |
| Bathing – 0.2 L per shower (a bath is 0.05 L) | 2.4 |
| Clothes washing | 1.8 |
| Floor mopping per 9.3 m² (100 sq. ft) | 1.3 |
| Normal respiration and skin evaporation from occupants | 38.0 |
| Total moisture production per week | 49.8 |
Despite all this water produced each day, the majority of older and even newer, poorly air sealed houses have dry air in winter to the point that homeowners may have humidifiers installed. Why?
Cold outdoor air cannot carry much water vapour. Since warm moist air rises (warm air is more buoyant than cold air), it creates a negative pressure below that can draw in cold air. In poorly air sealed homes, uncontrolled airflow brings colder, drier air indoors and forces the warm, moist air out through openings in the upper walls and attic. As the moist air escapes through openings in the upper walls and attic, a drying effect is achieved throughout the house.
With regards to the warm moist air that is escaping, it can condense within the walls and attic as liquid or, if it is cold enough, as frost as illustrated in Figure 2-10. This can reduce the effectiveness of insulation, cause mould and structural damage.
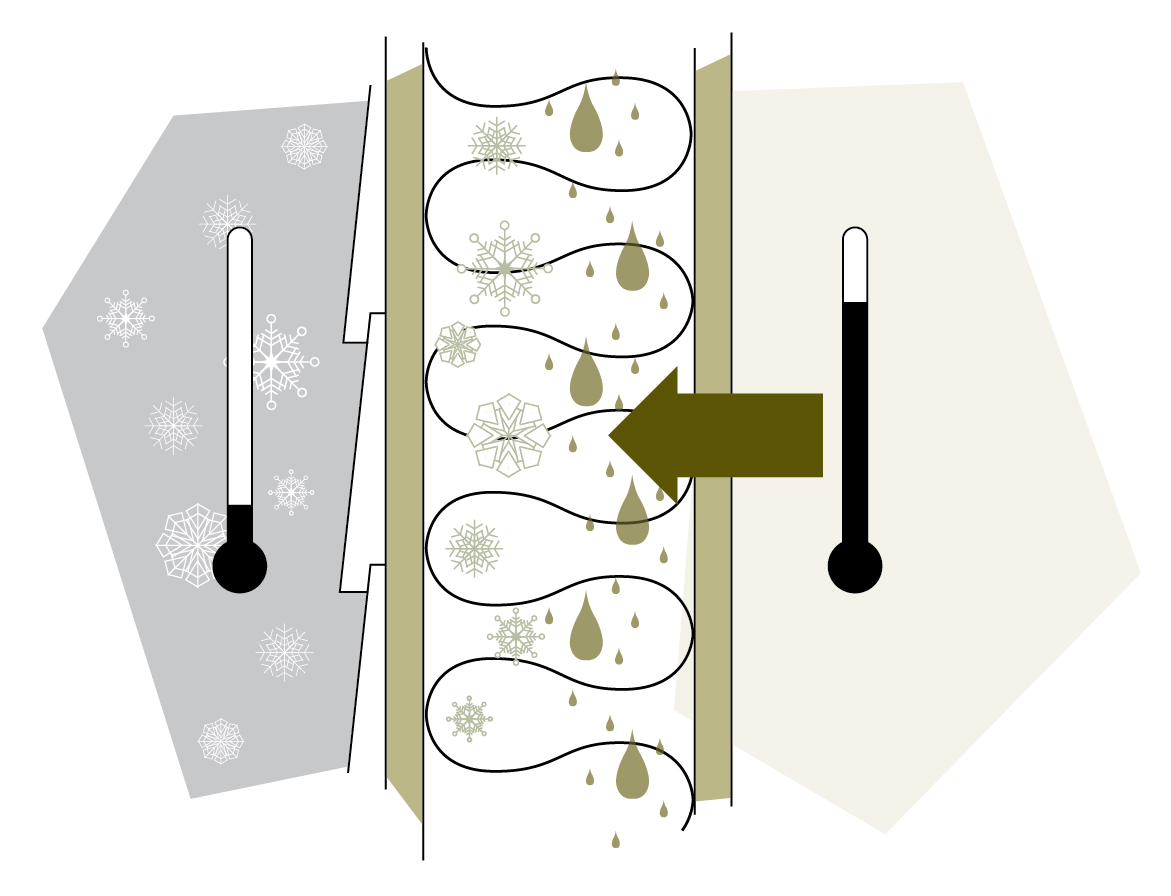
Figure 2-10 Water vapour condenses into liquid water or frost when it reaches the dew point
Text version
Cutaway of an exterior wall with a high temperature thermometer on the indoor side and a low-temperature thermometer and snowflakes on the outdoor side. There is an arrow pointing from inside outward and both small and large water droplets in the centre of the wall cavity.
2.4.2 How much humidity?
Humidity levels above 20 percent help prevent dry, sore throats and should make the air feel warmer and more comfortable. Moist air will also eliminate static electricity in the house and help to protect plants and preserve your furniture.
On the other hand, higher humidity levels can cause frosting and fogging of windows, staining of walls and ceilings, peeling paint, mould growth and odours. Condensation on windows or static electricity can provide good indications of the relative humidity levels. However, a humidity sensor or humidistat can monitor or adjust humidity levels more accurately.
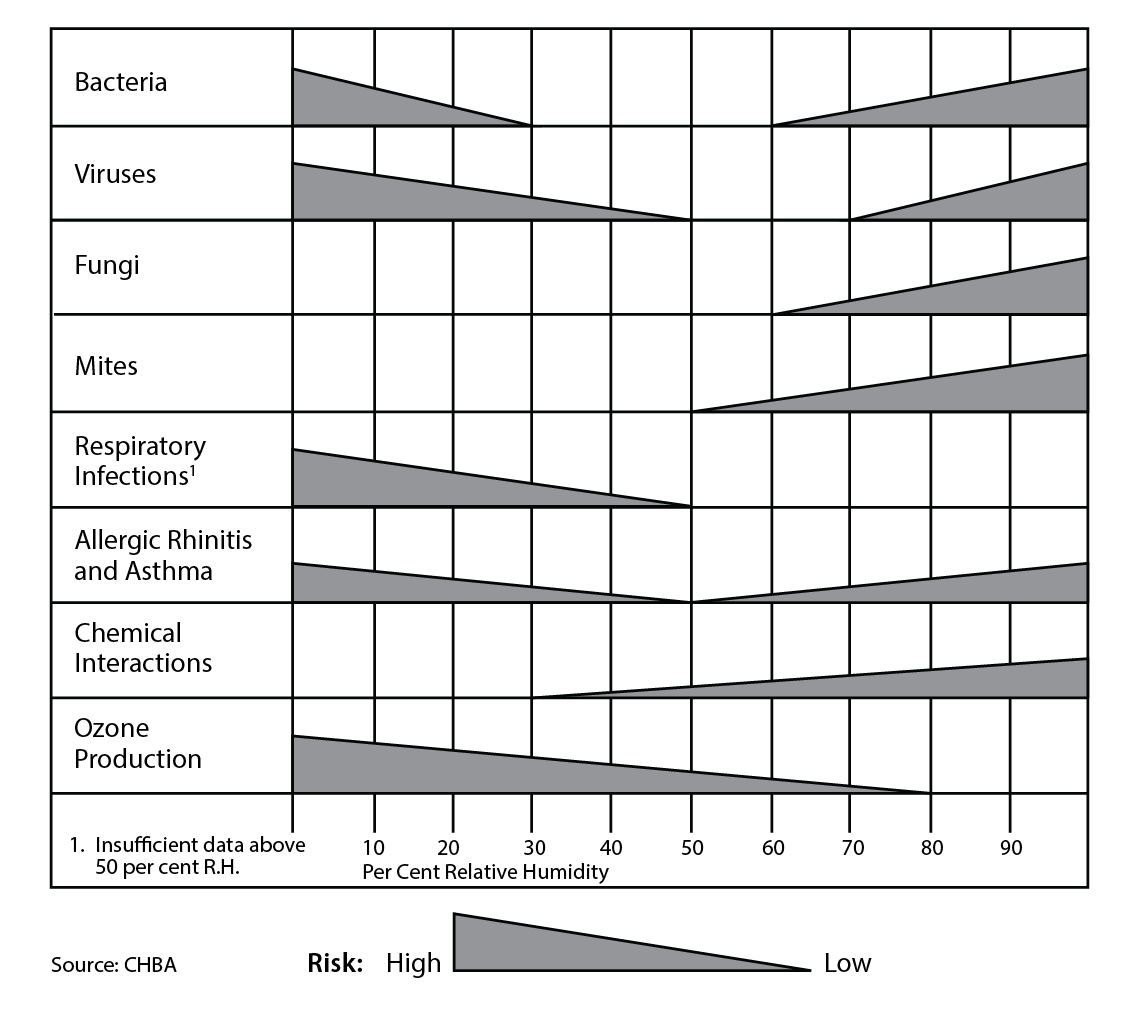
Having too low or high humidity levels in your home can expose the occupants to different health risks. See Figure 2-11 for potential risks associated with different humidity levels. Maintaining a humidity level between 30-50% (lower humidity in the winter and higher in the summer) limits the exposure to humidity related health risks.
See Table 9-1, Maximum indoor relative humidity levels, for more details on relative humidity levels and their effect on windows.
2.4.3 Keeping the structure dry
Here are four strategies that are used to keep the structure dry:
- Exterior weather and moisture protection: This strategy requires building paper, siding, flashing, gutters and other construction techniques (e.g. a drainage plane) to shed water and repel wind-driven rain. It also involves below-grade measures such as proper drainage, grade slope and water proofing to protect the foundation from groundwater leaks or from moisture movement by capillary action. These techniques are shown in Figure 2-12.
- Reducing moisture at the source: This involves producing less moisture in the first place, exhausting moist air and bringing in drier air. (For solutions to moisture problems, see section 9, “Operating your house.”)
- Preventing moist indoor air from getting into the envelope: This requires a vapour barrier to reduce moisture movement by diffusion and an air barrier to prevent moisture movement by air leakage.
As a general rule, the vapour barrier should be on the warm side of the insulation. In some cases, however, the vapour barrier can be located within the wall or ceiling assembly, following the one-third, two-thirds rule (1/3 – 2/3 rule). This rule requires that at least two thirds of the insulation value of the wall is on the cold side of the vapour barrier (see Figure 2-13). Because this ratio should be adjusted for houses with high interior humidity (i.e. levels exceeding 50 percent, such as those with indoor pools or open spa-pools) or for homes in extremely cold climates (i.e. northern Canada), consult with your local building authority. - Letting the envelope dry (through) to the outside: This final strategy allows the house to deal with seasonal fluctuations in humidity and to release any moisture that does penetrate the envelope from the interior or exterior. Drying to the outside is promoted by layering materials most resistant to vapour diffusion on the warm side of the envelope and the least resistant (such as building paper) on the outside.
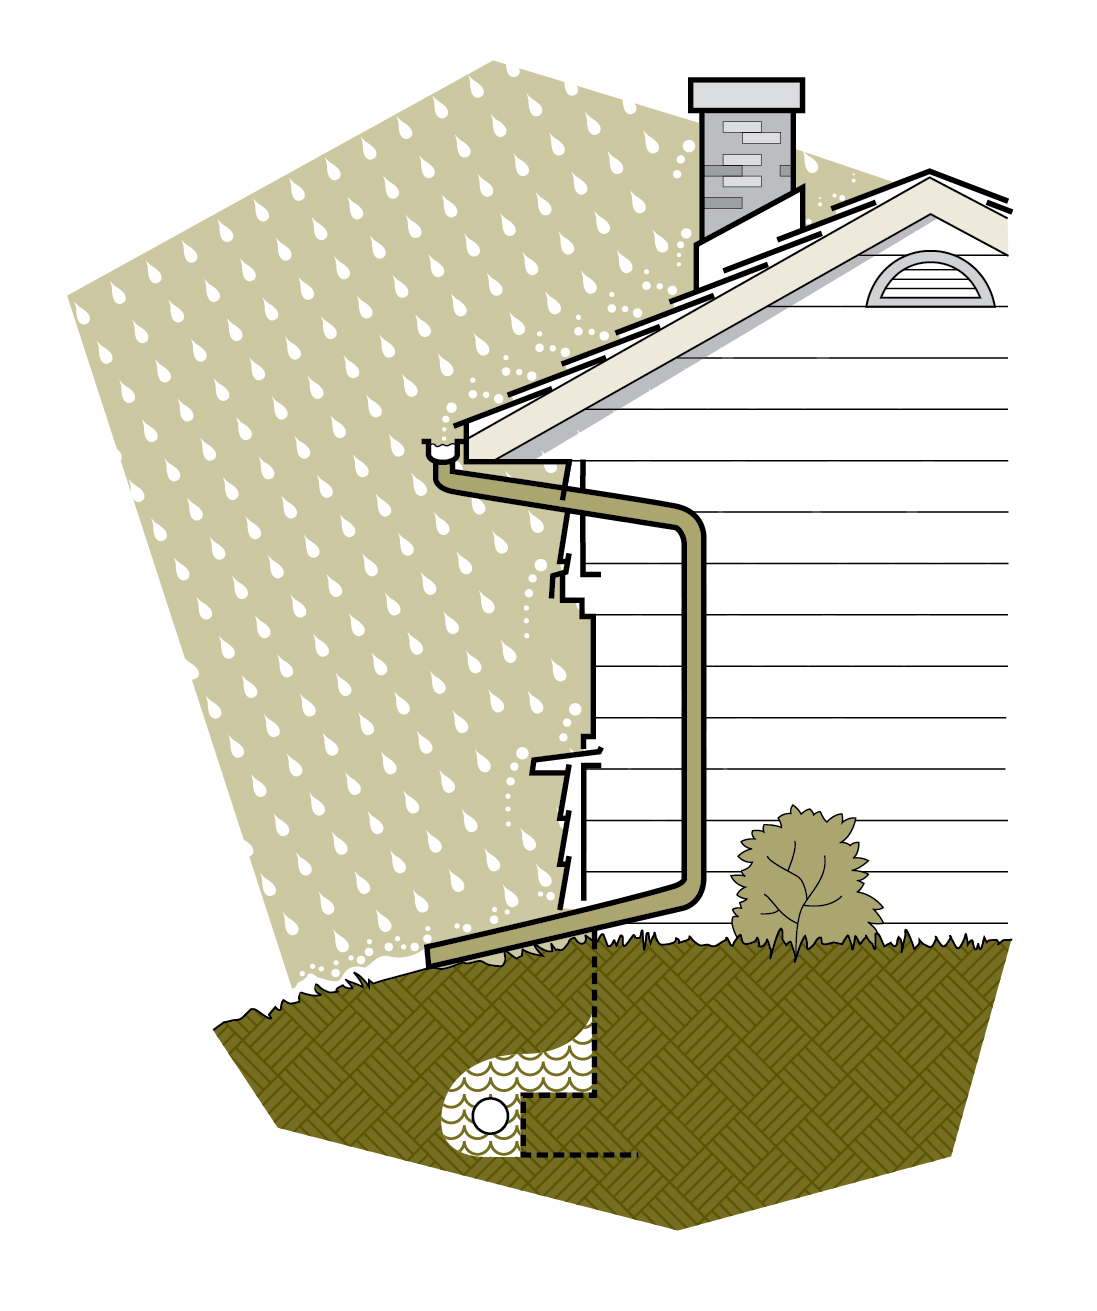
Figure 2-12 The building envelope must shed water from the roof to the footings
Text version
Illustration showing a home’s drainage plane. Rain is hitting the roof and collecting in an eaves trough. A downspout runs down the exterior wall and away from the house. A vertical dotted line extends below the ground in line with the house, and water is drained away from the footing of the basement.
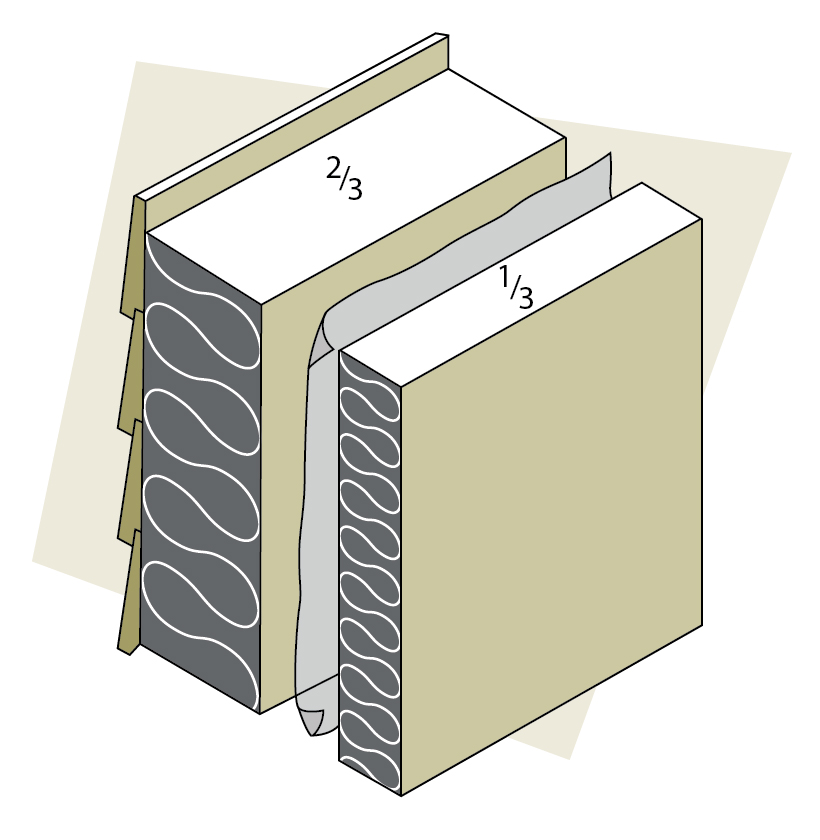
Figure 2-13 Up to one third of the insulating value can be installed on the warm side of the vapour barrier
Text version
Cutaway of an exterior facing wall with two-thirds of the total batt insulation next to the exterior wall and one-third of the batt insulation on the interior side. The two sections are separated by a vapour barrier.
Some wall systems work well with a relatively impermeable insulated sheathing because the interior wall-cavity temperatures are kept high. As a precaution, when retrofitting a wall, always install code-compliant RSI levels of insulated sheathing and ensure that the interior surfaces are vapour resistant.
Some siding applications have an air space or drainage plane immediately behind the exterior finish to promote drying out of materials that have been soaked by rain, wind or solar-driven dampness. This drainage plane also provides an escape route for any moisture that has penetrated the wall cavity from the indoors. If installing insulated siding, keep a drainage space behind the insulation even though a small amount of the insulation value of the siding will be lost.
2.5 Older homes
Older homes are part of our architectural heritage and require special consideration when retrofitting. Maintaining the durability of the structure is especially important. Some houses that were built before 1950 incorporated unusual construction details and materials that make it necessary to improvise and adapt standard retrofit methods.
Remain sensitive to the heritage aspect, design, materials and particular features of the house when retrofitting. Some houses may even have special heritage designation that may limit what can be changed. The retrofit will need to minimize changes to the building’s appearance and emphasize repair, rather than replacement, of building components. In any event, it is advisable to consult with your local building authorities about planned upgrades.
In some cases, you may want to consult with an architect or a building conservator with knowledge of heritage house conservation and in others, an engineer, before undertaking work that may compromise the structure. Refer to the Renovating for energy efficiency section of our website.
Relevant to this topic: Section 9: Operating your home
Page details
- Date modified:
